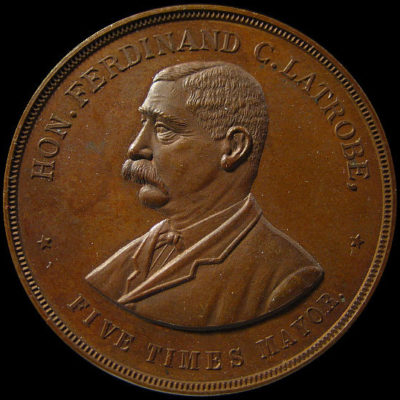
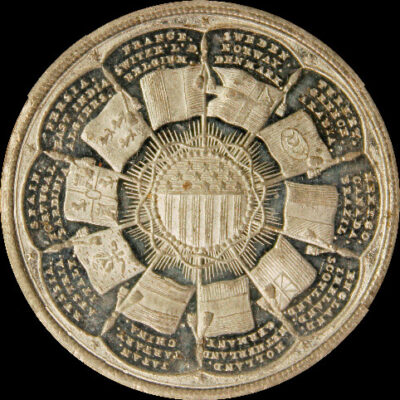
All So-Called Dollars
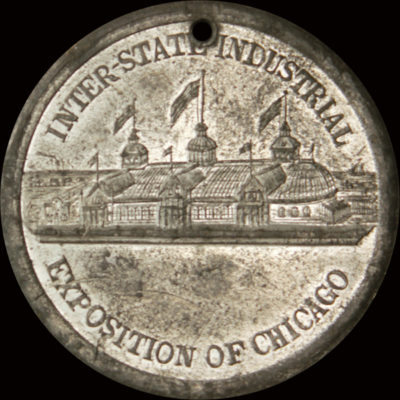
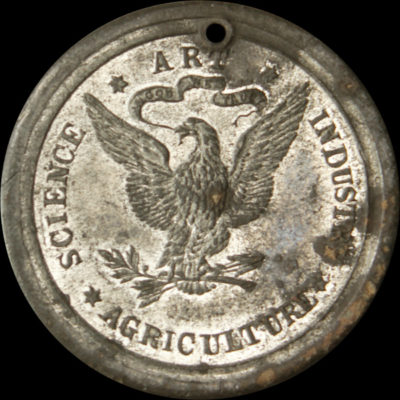
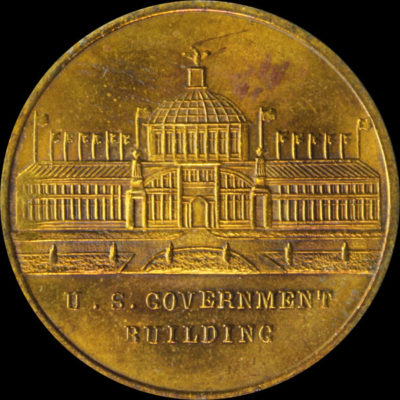
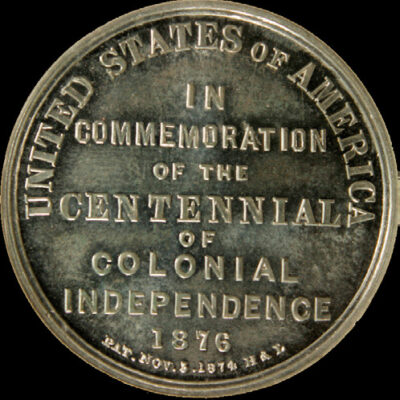
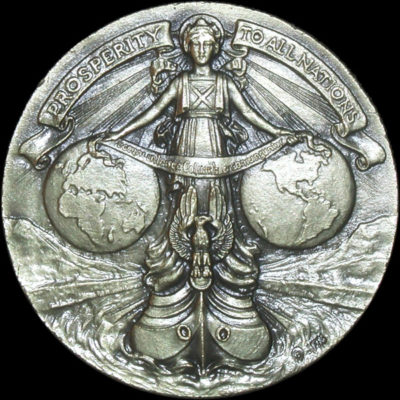
Inter-State Industrial Exposition Official Medal
1873 · SH 1-11 WM · White Metal · 1873 Inter-State Industrial Exposition of Chicago
The Inter-State Exposition Building, modeled after the London and New York Crystal Palaces adorns the…
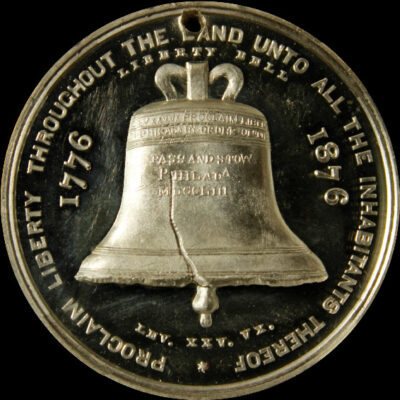
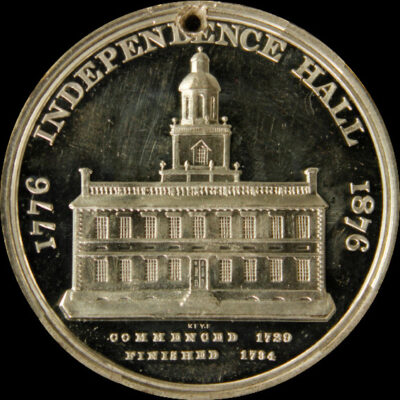
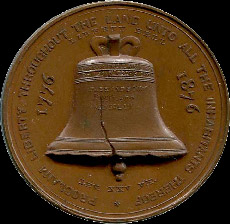
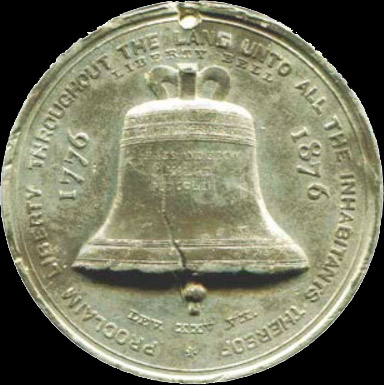
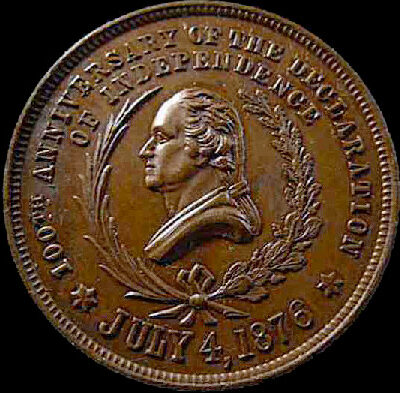
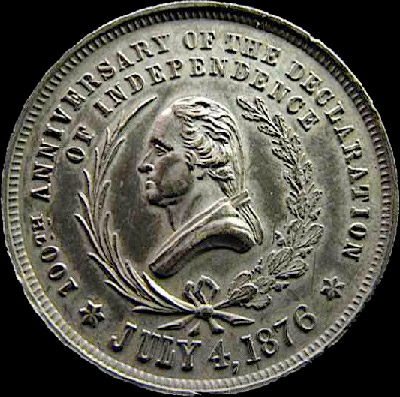
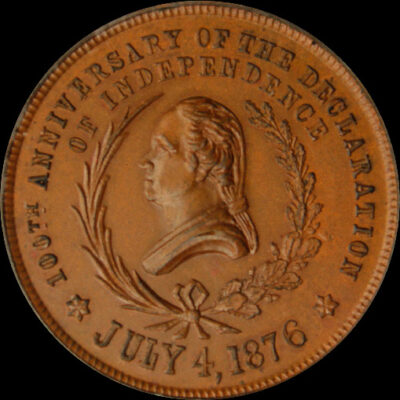
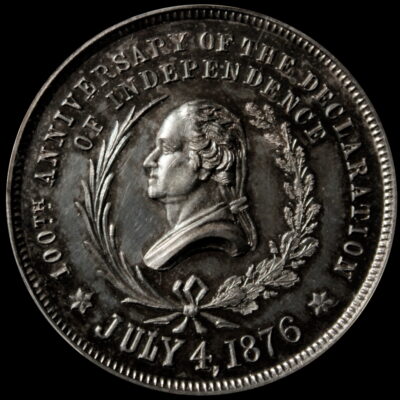
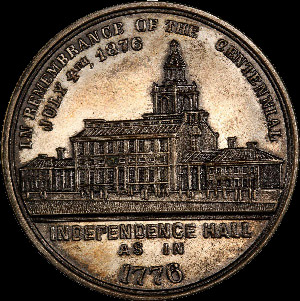
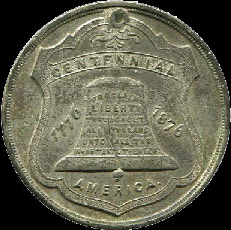
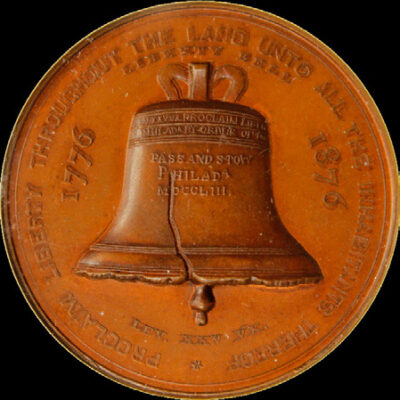
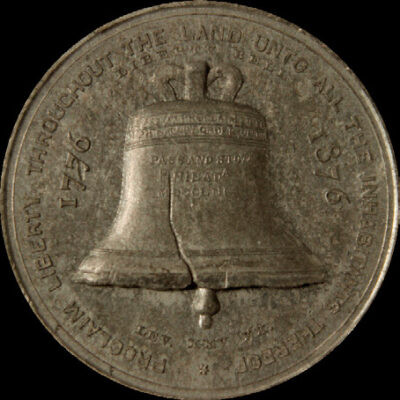
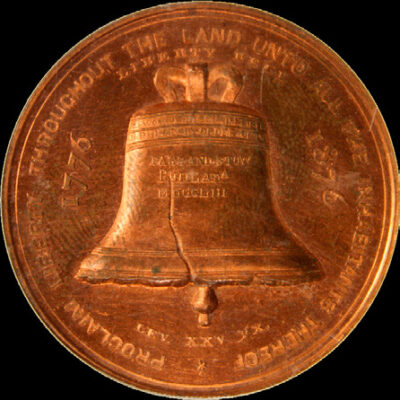
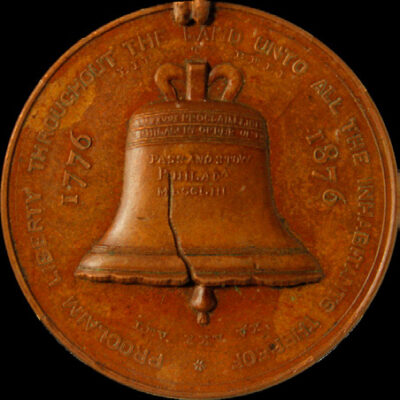
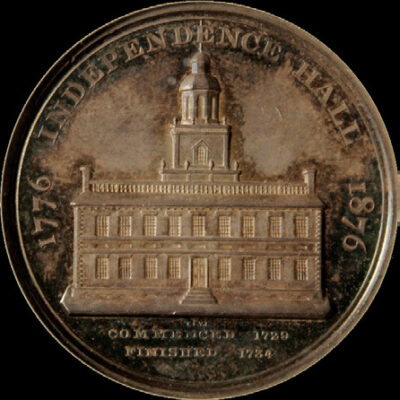
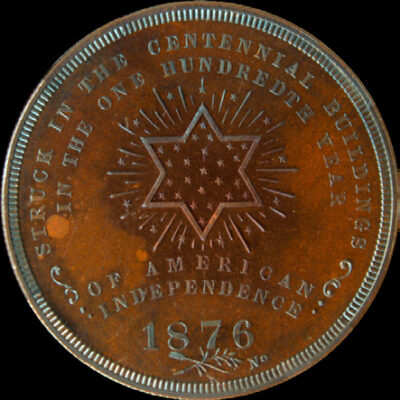
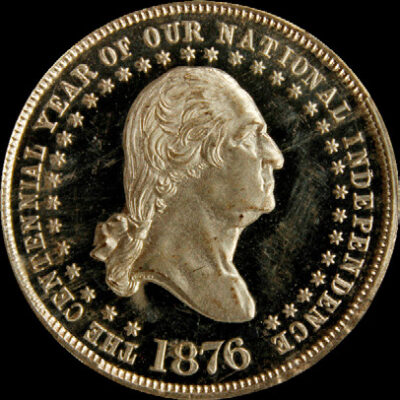
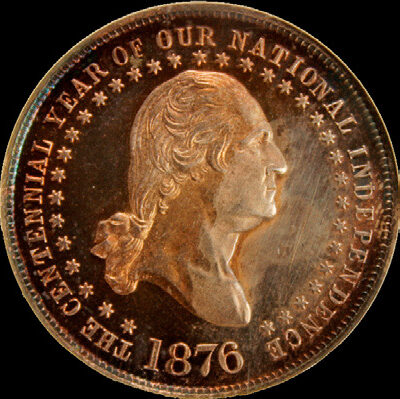
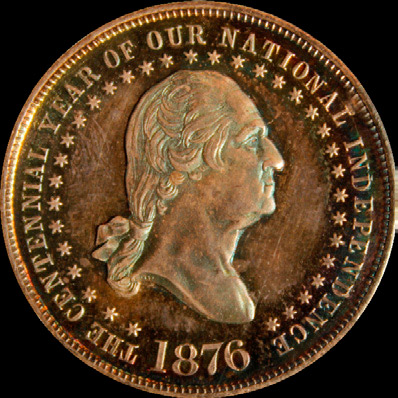
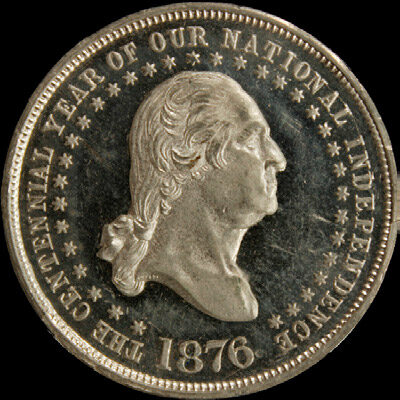
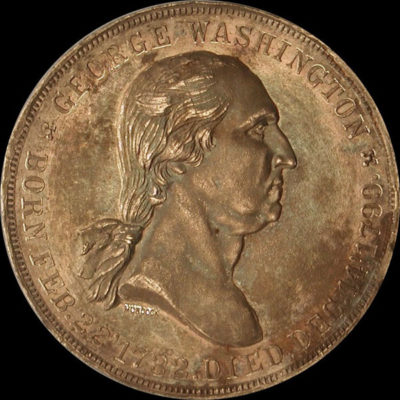
Centennial Liberty Bell Rounded 6 / Independence Hall
1876 · SH 2-4 WM · White Metal · 1876 U.S. Centennial Exposition
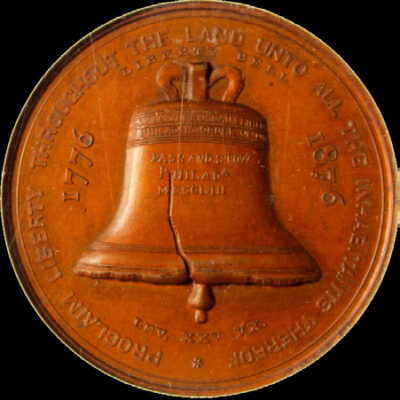
William H. Key engraved two different dies with the Liberty Bell design. Careful inspection reveals…

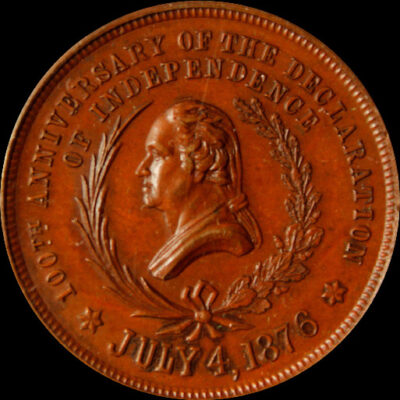
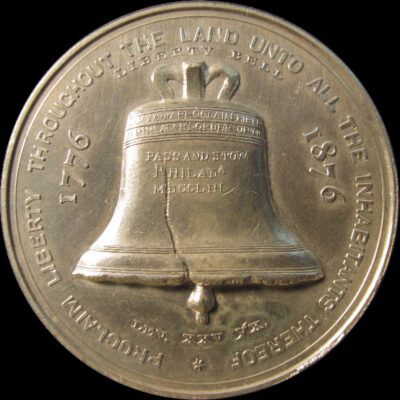
Centennial Liberty Bell / Garland
1876 · SH 2-10 CU · Copper · 1876 U.S. Centennial Exposition
Key’s Liberty Bell is paired with a plain reverse that has a circle of garland…

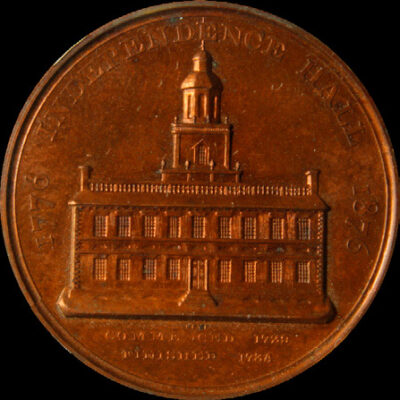
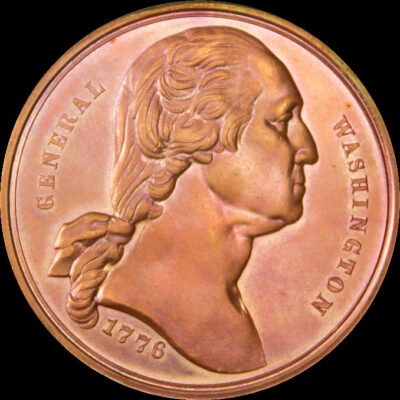
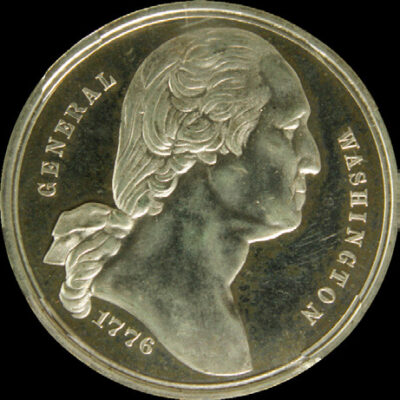
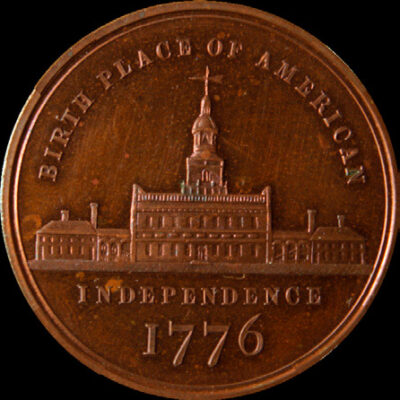
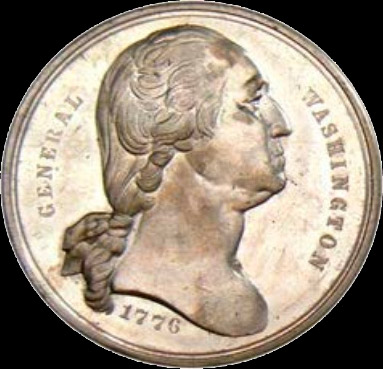
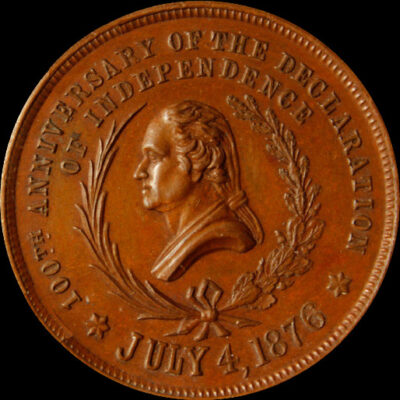
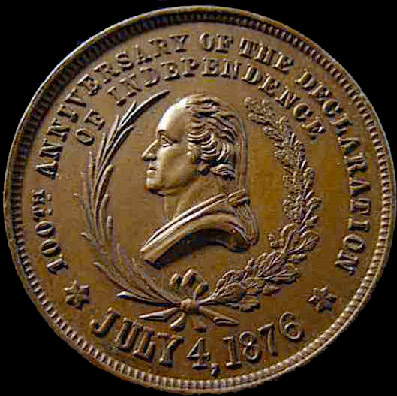
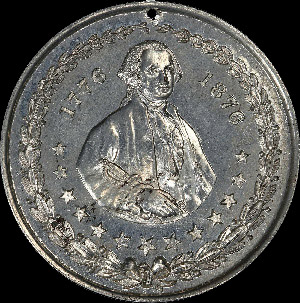
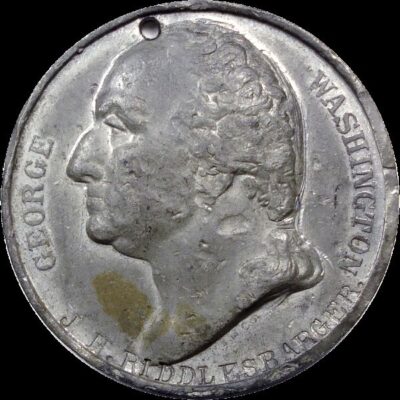
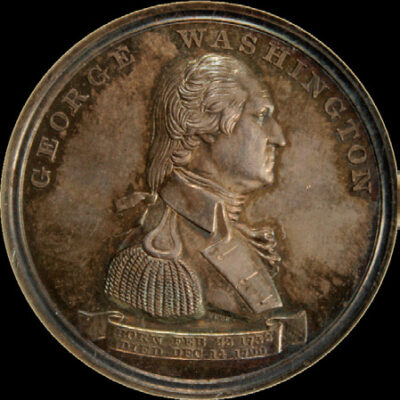
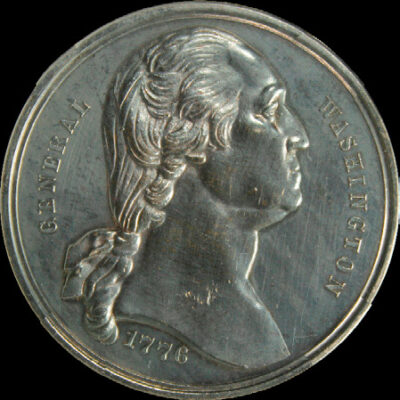
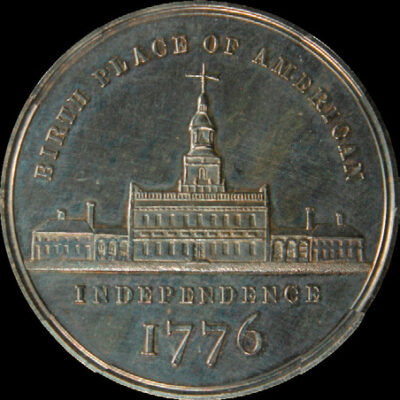
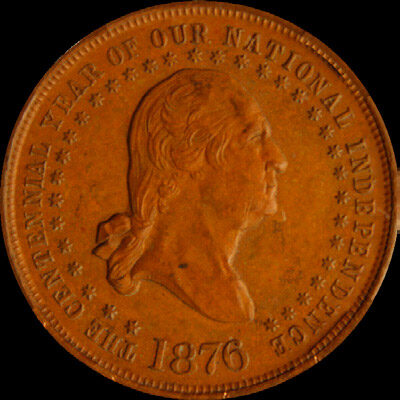
Centennial Washington Large Bust / Independence Hall
1876 · SH 2-12 CU · Copper · 1876 U.S. Centennial Exposition
The Washington bust design engraved by Soley is combined with the Independence Hall Bell design…
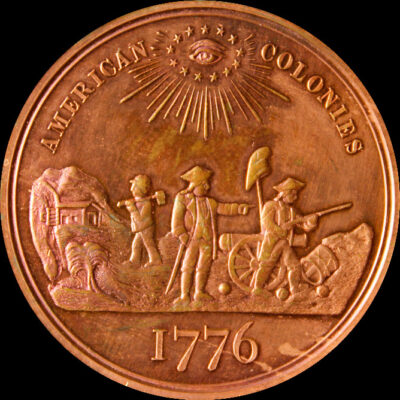
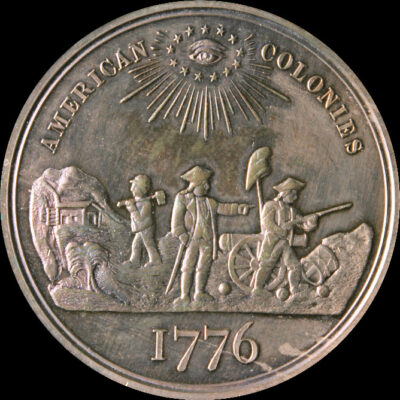
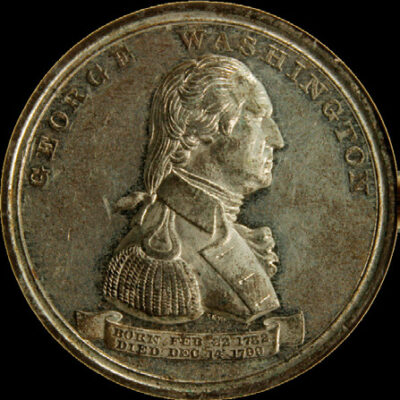
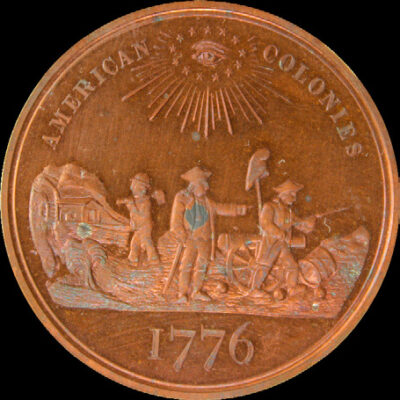
Centennial Washington Large Bust / American Colonies
1876 · SH 2-15 CU · Copper · 1876 U.S. Centennial Exposition
Auction catalogs from 1878 & 1879 name the reverse die the “American Colonies,” representing the…

Centennial Washington Large Bust / Scrolls
1876 · SH 2-17 S · Silver · 1876 U.S. Centennial Exposition
Obverse die by Soley, reverse die with arabesque scrolls likely done by Soley as well.…

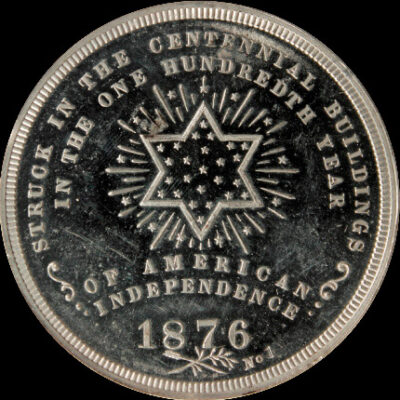
Centennial Washington Large Bust / Star
1876 · SH 2-18 WM · White Metal · 1876 U.S. Centennial Exposition
Soley’s white metal variety reverse die has a “No” for “number” engraved into the die…
Centennial Seated Liberty / Star
1876 · SH 2-20.1 WM · White Metal · 1876 U.S. Centennial Exposition
Scott Stamp & Coin Company, in their October 27, 1879 auction, lot #689, sold a…
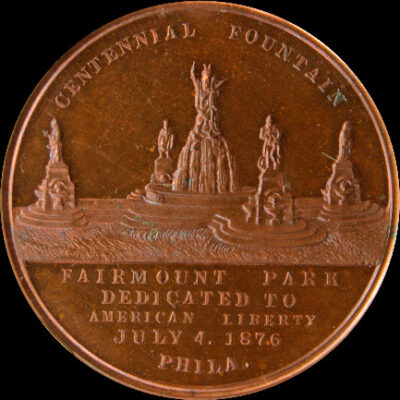
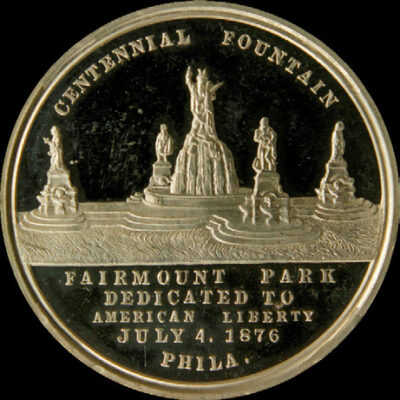
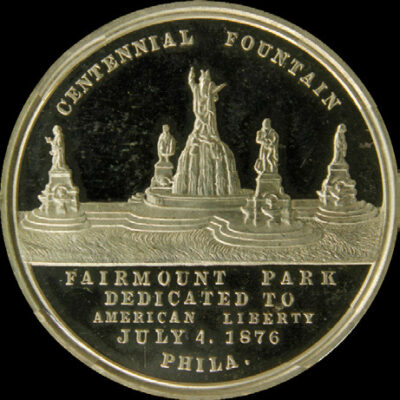
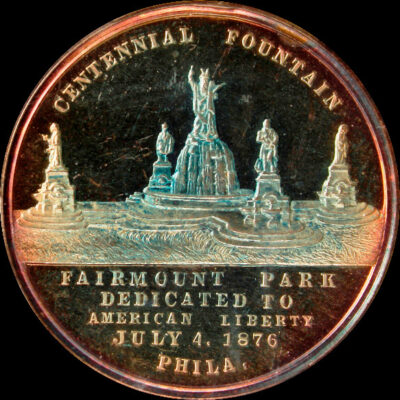
Centennial Fountain / Star
1876 · SH 2-22 CU · Copper · 1876 U.S. Centennial Exposition
The Centennial Fountain die is found paired with Soley’s Washington Large Bust, this star reverse,…


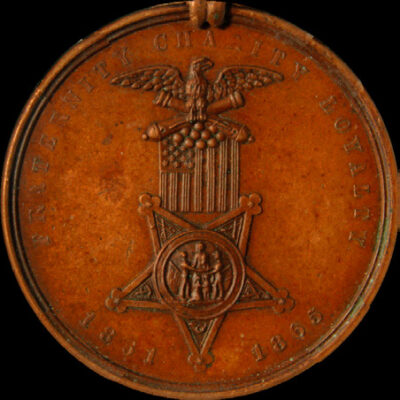
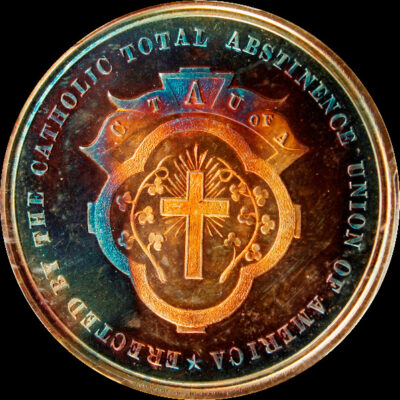
Total Abstinence / Scrolls
1876 · SH 2-25 S · Silver · 1876 U.S. Centennial Exposition
The H.W. Holland list of Centennial Medals published in the January 1876 American Journal of…
Centennial Small Independence Hall / Scrolls
1876 · SH 2-27 CU · Copper · 1876 U.S. Centennial Exposition
Soley’s Small Independence Hall paired with the Scrolls reverse. Only known struck in copper and…

Centennial Seated Liberty / Scrolls
1876 · SH 2-29 CU · Copper · 1876 U.S. Centennial Exposition
Soley’s Seated Liberty design is paired with his scrolls reverse. The scrolls reverse is found…
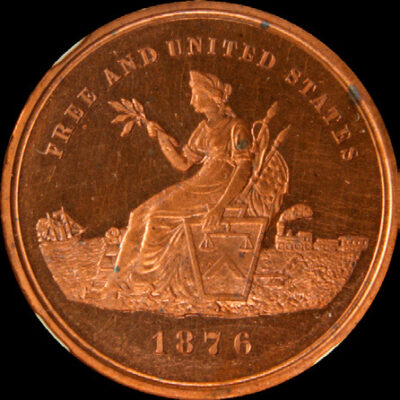
Centennial American Colonies / Scrolls
1876 · SH 2-30 S · Silver · 1876 U.S. Centennial Exposition
The H.W. Holland list of Centennial medals published in the January 1876 American Journal of…
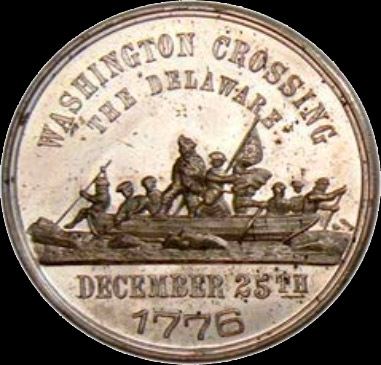
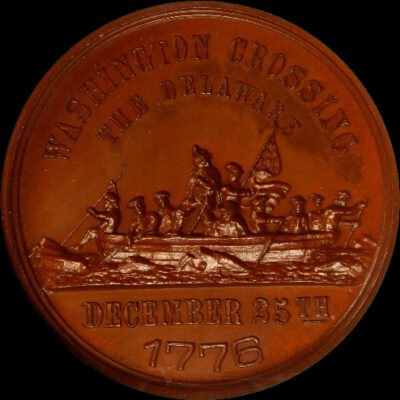
Centennial Washington Large Bust / Crossing the Delaware
1876 · SH 2-31 WM · White Metal · 1876 U.S. Centennial Exposition
Soley’s obverse of Washington’s bust is paired with a die by an unknown engraver. The…
Centennial Washington Large Bust / New Jersey Seal
1876 · SH 2-32 WM · White Metal · 1876 U.S. Centennial Exposition
Soley’s obverse of Washington’s bust is paired with a die by an unknown engraver. The…
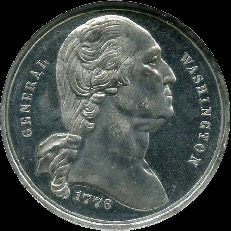
Centennial General George Washington / Crossing the Delaware
1876 · SH 2-33 BZ · Bronze · 1876 U.S. Centennial Exposition
The authors struggled with this medal as it was possibly engraved by George Morgan, and…

Centennial Liberty Bell / Children’s HOP
1876 · SH 2-37 WM · White Metal · 1876 U.S. Centennial Exposition
Authorized to be struck by a church, so an argument could be made that this…
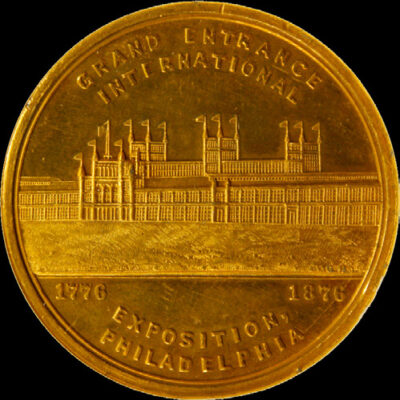
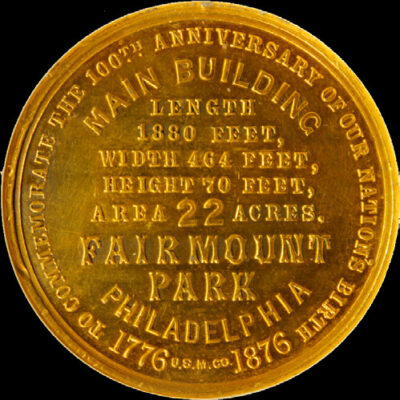
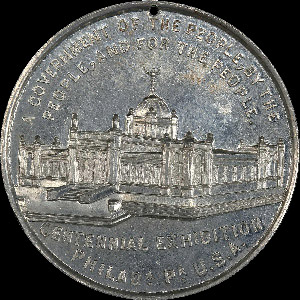
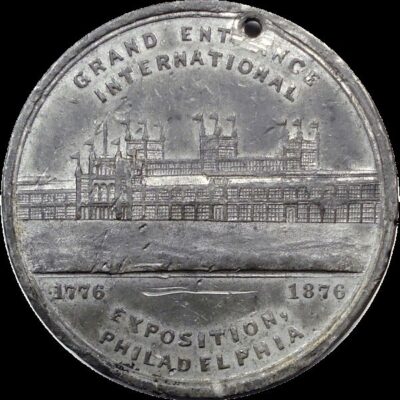
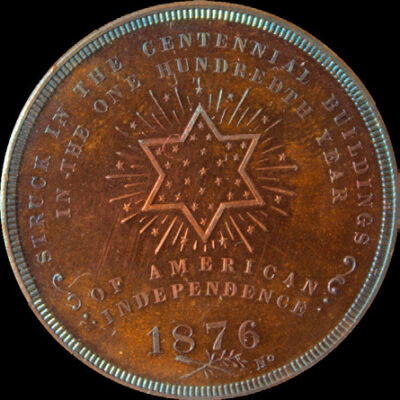
Centennial Grand Entrance
1876 · SH 2-44 GP · Gold-Plated · 1876 U.S. Centennial Exposition
This is the only exposition building die not engraved by Key; it is a George…

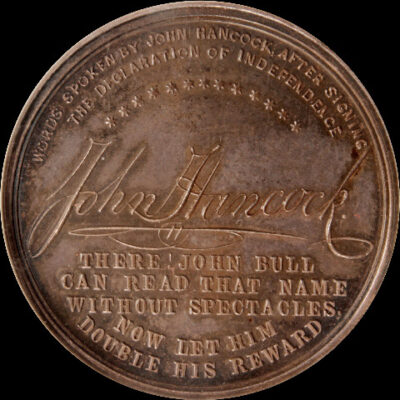
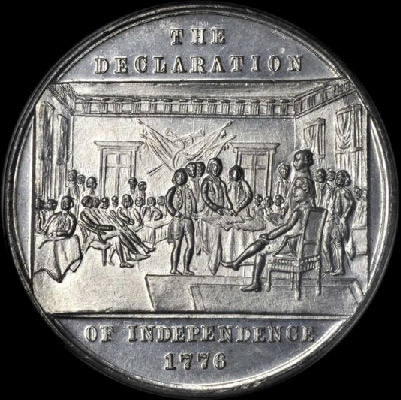
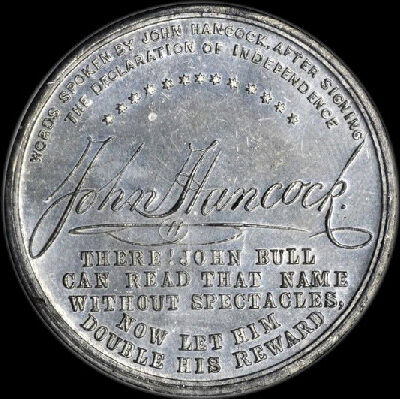
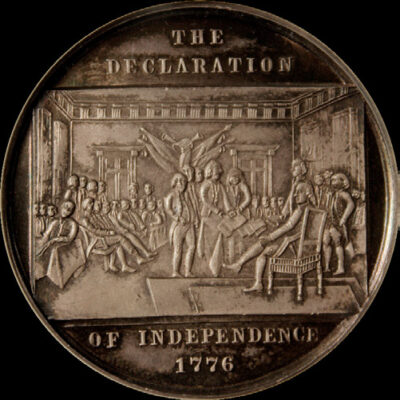
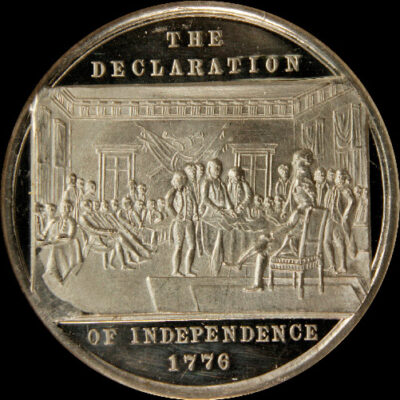
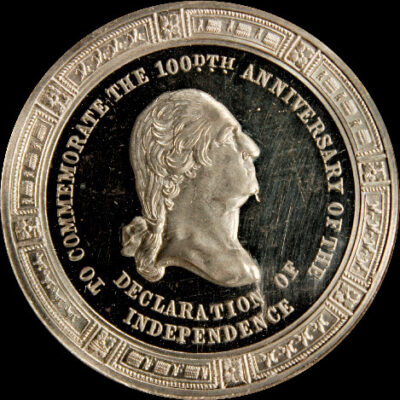
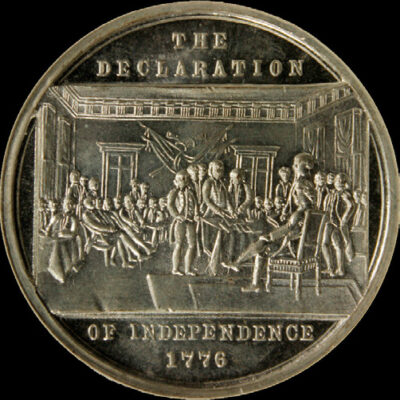
Centennial Declaration of Independence Demarest / John Hancock Signature
1876 · SH 2-48 S · Silver · 1876 U.S. Centennial Exposition
The Declaration of Independence die engraved by Demarest has four people seated and two standing…
Centennial Declaration of Independence Three Seated One Standing / John Hancock Signature
1876 · SH 2-49 WM · White Metal · 1876 U.S. Centennial Exposition
The Declaration of Independence obverse has three different varieties that are found paired with the…

Centennial Declaration of Independence Demarest / Declaration of Independence four seated
1876 · SH 2-50 WM · White Metal · 1876 U.S. Centennial Exposition
Two Declatation of Independence dies muled together, one is signed by Demarest, the other is…
Centennial Declaration of Independence three seated one standing / Washington Ornamental Bust
1876 · SH 2-52 WM · White Metal · 1876 U.S. Centennial Exposition
The Declaration of Independence obverse has three different varieties that are found paired with the…
Centennial Washington Ornamental Bust / John Hancock Signature
1876 · SH 2-54 WM · White Metal · 1876 U.S. Centennial Exposition
The Washington die, engraved by George Hampden Lovett, features a naked bust of George Washington…
Centennial Washington Ornamental Bust / Commemoration
1876 · SH 2-55 WM · White Metal · 1876 U.S. Centennial Exposition
The obverse, engraved by George Hampden Lovett, features a naked bust of George Washington with…
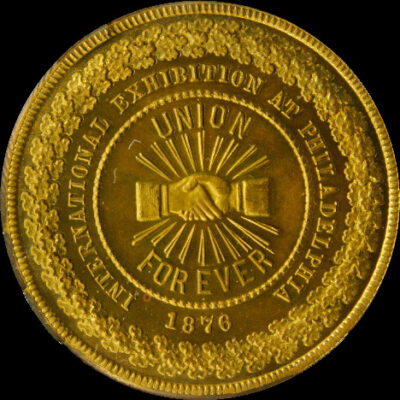
Centennial Union Forever
1876 · SH 2-56 BS · Brass · 1876 U.S. Centennial Exposition
Microscopic “Lovett” for George H. Lovett on Washington’s bust truncation. Shaking hands are in the…
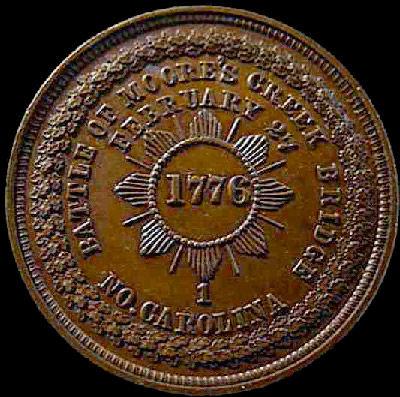
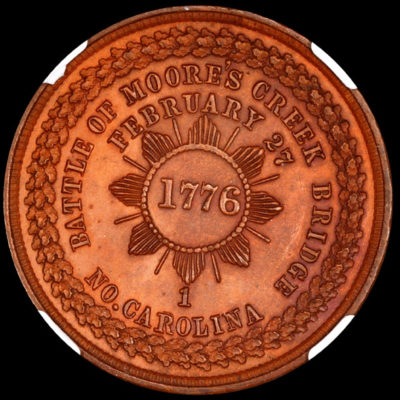
Centennial Lovett Small Bust Battle of Moores Creek
1876 · SH 2-65 BZ · Bronze · 1876 U.S. Centennial Exposition
The first in a series of eight medals with a smaller bust of Washington, engraved…
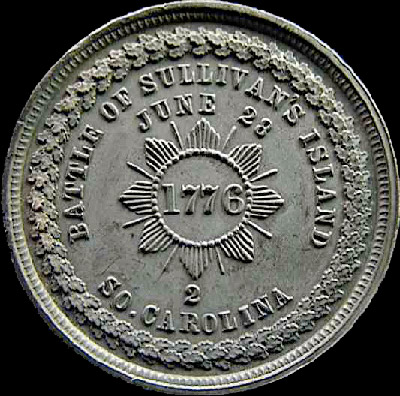
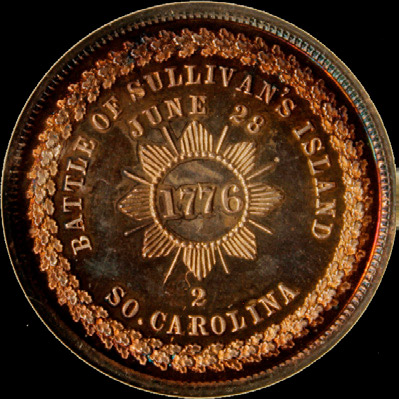
Centennial Lovett Small Bust Battle of Sullivan’s Island
1876 · SH 2-66 WM · White Metal · 1876 U.S. Centennial Exposition
The second in a series of eight medals with a smaller bust of Washington, engraved…
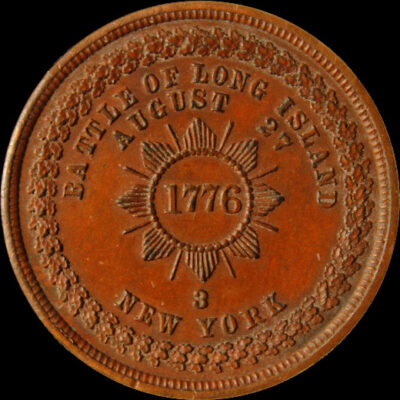
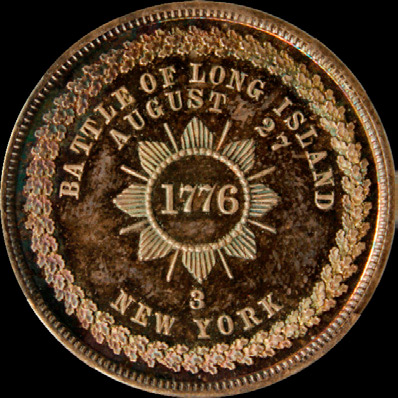
Centennial Lovett Small Bust Battle of Long Island
1876 · SH 2-67 BZ · Bronze · 1876 U.S. Centennial Exposition
The third in a series of eight medals with a smaller bust of Washington, engraved…
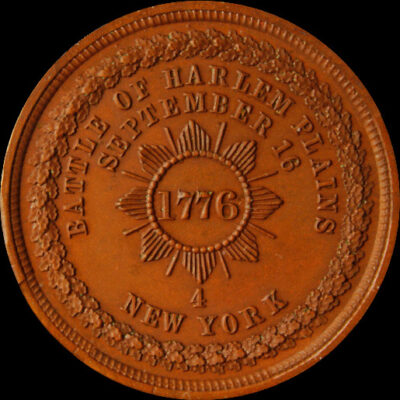
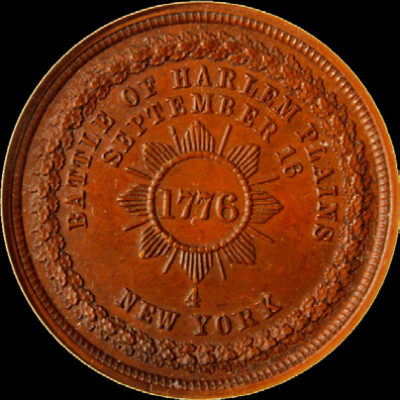
Centennial Lovett Small Bust Battle of Harlem Plains
1876 · SH 2-68 BZ · Bronze · 1876 U.S. Centennial Exposition
The fourth in a series of eight medals with a smaller bust of Washington, engraved…
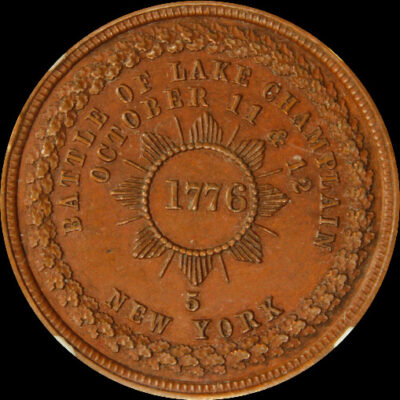
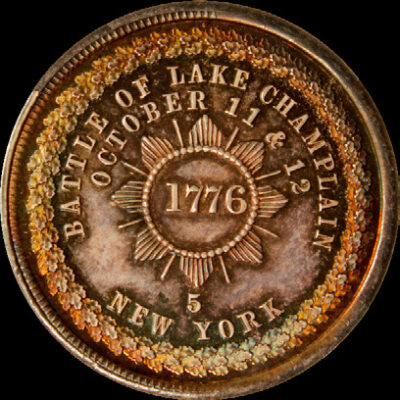
Centennial Lovett Small Bust Battle of Lake Champlain
1876 · SH 2-69 BZ · Bronze · 1876 U.S. Centennial Exposition
The fifth in a series of eight medals with a smaller bust of Washington, engraved…
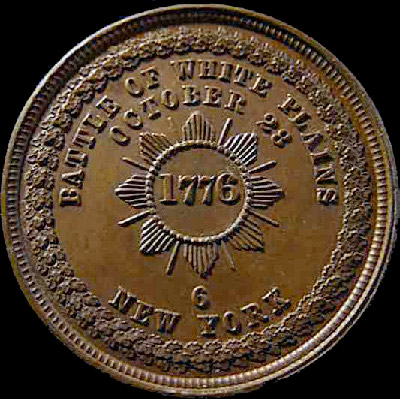
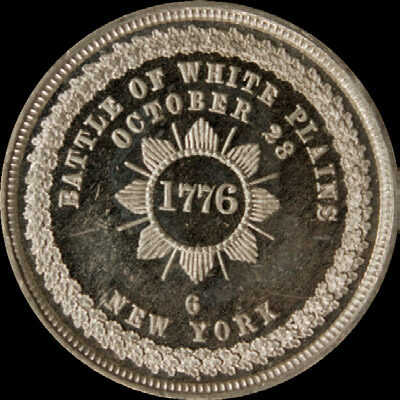
Centennial Lovett Small Bust Battle of White Plains
1876 · SH 2-70 BZ · Bronze · 1876 U.S. Centennial Exposition
The sixth in a series of eight medals with a smaller bust of Washington, engraved…

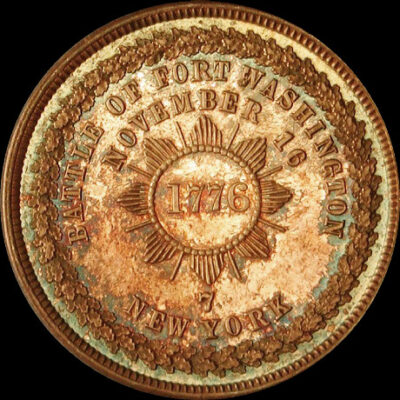
Centennial Lovett Small Bust Battle of Fort Washington
1876 · SH 2-71 BZ · Bronze · 1876 U.S. Centennial Exposition
The seventh in a series of eight medals with a smaller bust of Washington, engraved…
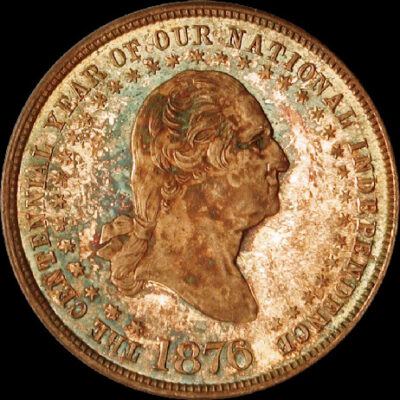
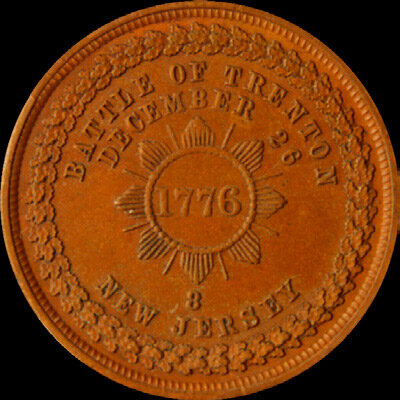
Centennial Lovett Small Bust Battle of Trenton
1876 · SH 2-72 BZ · Bronze · 1876 U.S. Centennial Exposition
The eighth in a series of eight medals with a smaller bust of Washington, engraved…

Centennial Lovett Large & Small Bust
1876 · SH 2-73 S · Silver · 1876 U.S. Centennial Exposition
The Lovett Battle Series with large and small busts combined. Reportedly one struck in silver…
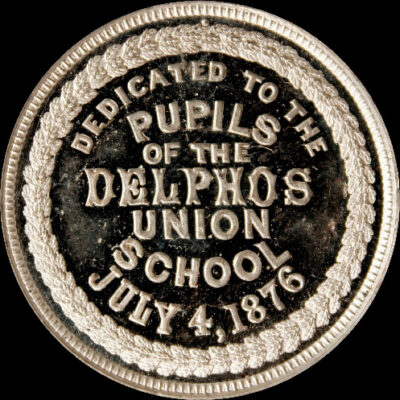
Centennial Delphos School
1876 · SH 2-75 WM · White Metal · 1876 U.S. Centennial Exposition
Another Lovett design using the same central device with a bust of Washington as on…
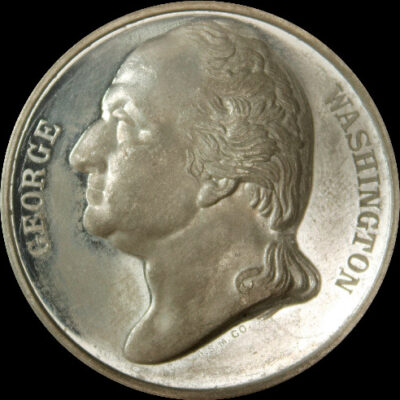
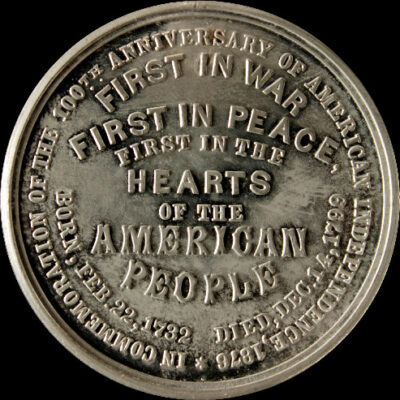
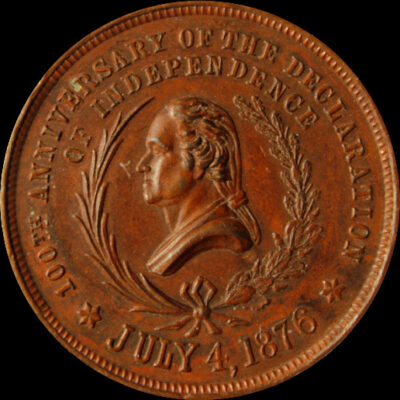
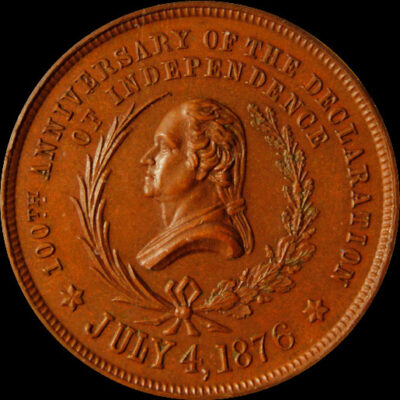
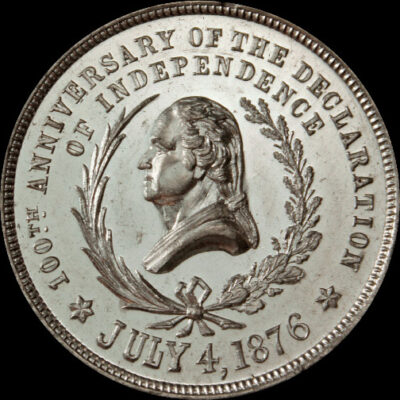
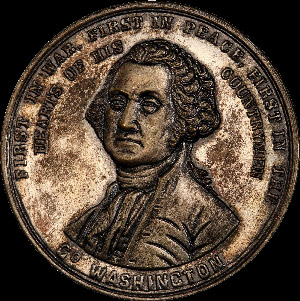
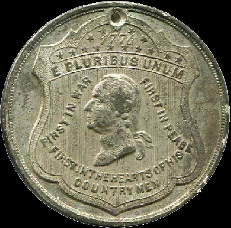
Centennial Washington First in War
1876 · SH 2-76 WM · White Metal · 1876 U.S. Centennial Exposition
This original Washington bust design was engraved by Mathias Nicole Marie Vivier around 1818 for…
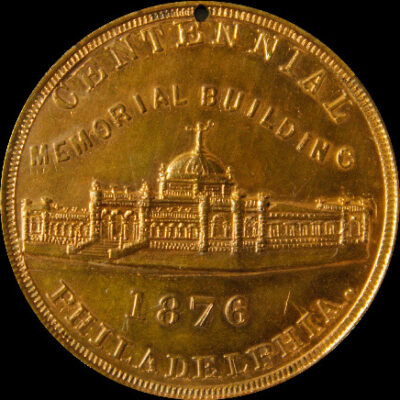
Centennial Washington / Memorial Building
1876 · SH 2-77 BS · Brass · 1876 U.S. Centennial Exposition
George Washington’s bust on the obverse with the Memorial Building on the reverse. Neither die…
Centennial Washington / Memorial Building Copyright
1876 · SH 2-78 BS · Brass · 1876 U.S. Centennial Exposition
The obverse is similar to the preceeding (SH 2-77) without the cinquefoils on either side…
Centennial Washington Independence Hall
1876 · SH 2-79 WM · White Metal · 1876 U.S. Centennial Exposition
Obverse features the bust of Washington in civilian dress, three quarters facing left. Independence Hall…
Centennial Washington with Sword Memorial Hall
1876 · SH 2-80 WM · White Metal · 1876 U.S. Centennial Exposition
Obverse features a half length view of Washington in civilian dress facing three quarters to…
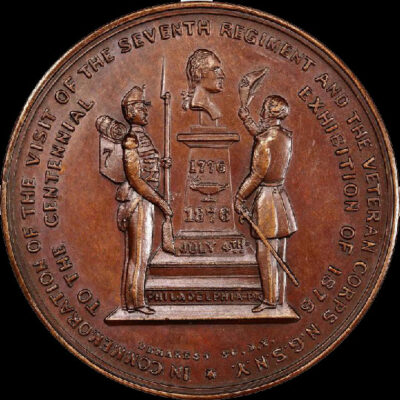
Centennial Seventh Regiment Visit
1876 · SH 2-82 BZ · Bronze · 1876 U.S. Centennial Exposition
Signed by engraver Demarest SC. N.Y. for Abraham Demarest Sr. New York, signature below monument.…
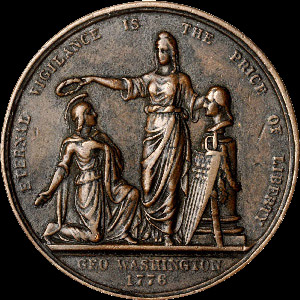
Centennial Eternal Vigilance
1876 · SH 2-83 CU · Copper · 1876 U.S. Centennial Exposition
Scene of Liberty holding a wreath over the head of Vigilance, dies engraved by Charles…
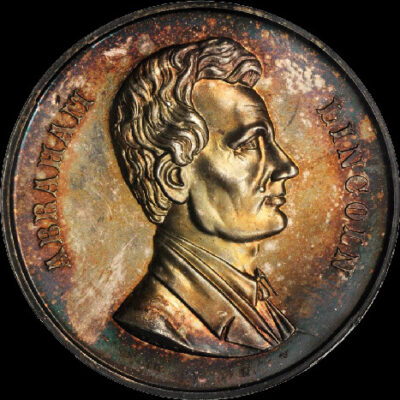
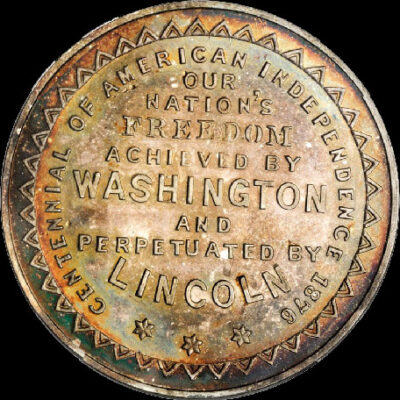
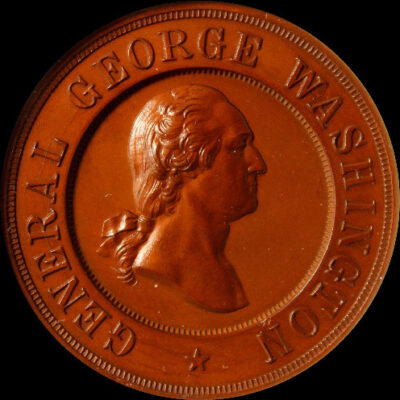
Centennial Abraham Lincoln
1876 · SH 2-84 S · Silver · 1876 U.S. Centennial Exposition
Abraham Lincoln bust on the obverse. Reverse legend states “Our Nations Freedom Achieved by Washington…

Centennial Ulysses S. Grant
1876 · SH 2-85 WM · White Metal · 1876 U.S. Centennial Exposition
Ulysses S. Grant bust on the obverse. An angle with wings flys above the exposition…
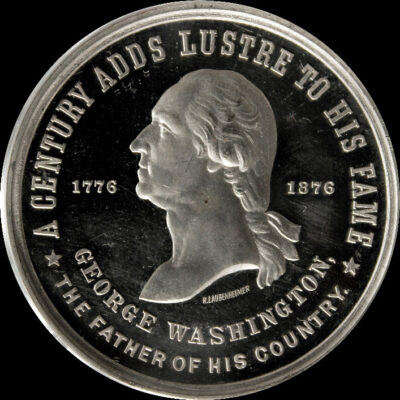
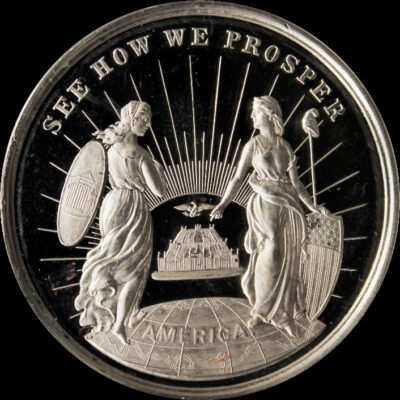
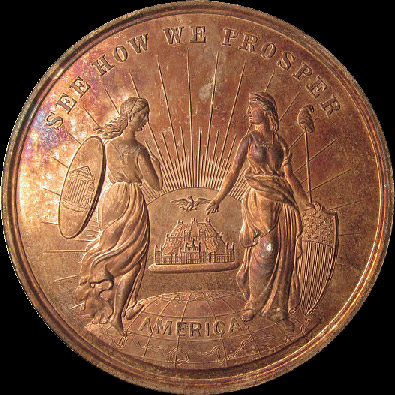
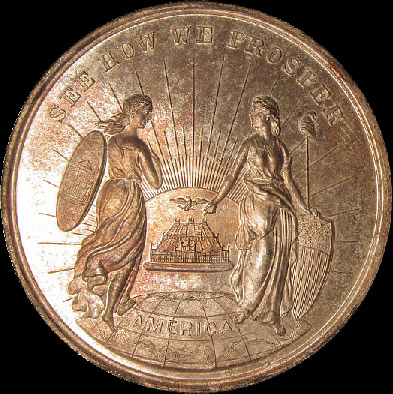
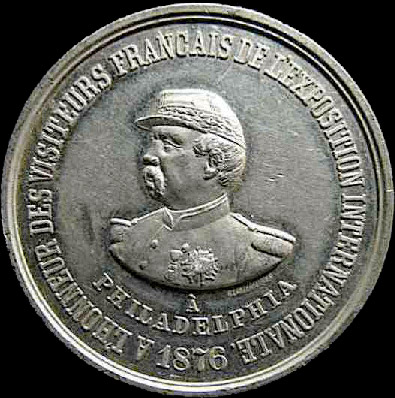
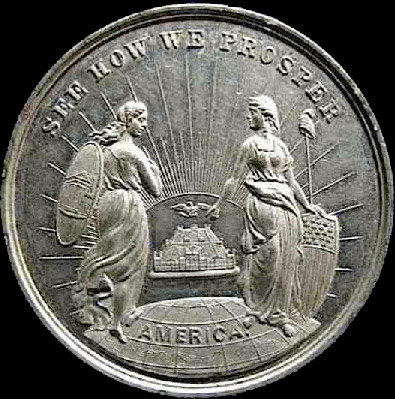
Centennial Washington See How We Prosper
1876 · SH 2-86 WM · White Metal · 1876 U.S. Centennial Exposition
Obverse bust of Washington, engraved by German-American engraver Rudolf Laubenheimer. One of five different obverse…
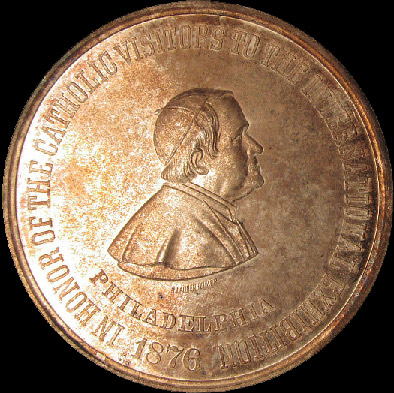
Centennial Catholic See How We Prosper
1876 · SH 2-87 BZ · Bronze · 1876 U.S. Centennial Exposition
Catholic version, “In Honor of the Catholic Visitors to the International Exposition.” Designed by German-American…
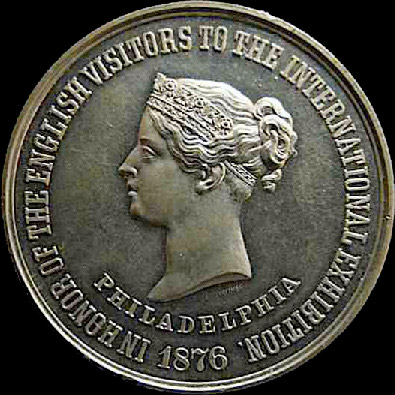

Centennial England See How We Prosper
1876 · SH 2-88 S · Silver · 1876 U.S. Centennial Exposition
English version, “In Honor of the English Visitors to the International Exposition.” Designed by German-American…
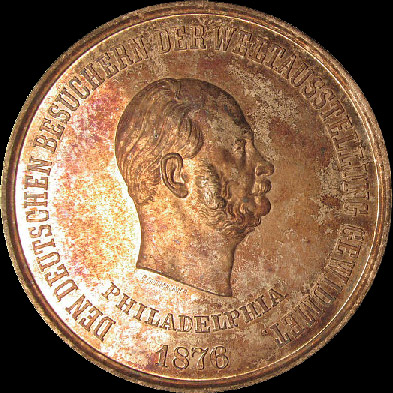
Centennial German See How We Prosper
1876 · SH 2-89 BZ · Bronze · 1876 U.S. Centennial Exposition
German version, in German the legend states “In Honor of the German Visitors to the…
Centennial France See How We Prosper
1876 · SH 2-90 WM · White Metal · 1876 U.S. Centennial Exposition
French version, in French the legend states “In Honor of the French Visitors to the…
Centennial Washington and Liberty Bell on Shields
1876 · SH 2-91 WM · White Metal · 1876 U.S. Centennial Exposition
The bust of Washington is on a shield with the date 1776 above, on the…
Centennial Washington Grand Entrance SCD
1876 · SH 2-92 WM · White Metal · 1876 U.S. Centennial Exposition
George H. Lovett’s bust of George Washington First in War SH-76 is paired with Lovett’s…
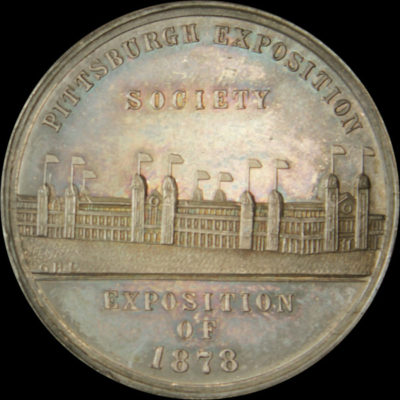
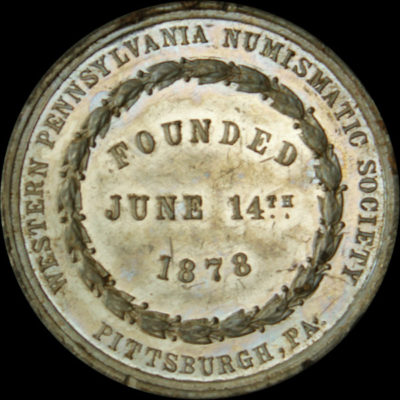
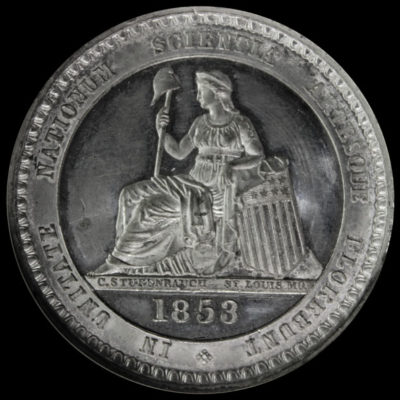
1878 Pittsburgh Exposition Official Medal
1878 · SH 3-1 S · Silver · 1878 Pittsburgh Exposition
George H. Lovett accepted the commission from the Western Pennsylvania Numismatic Society to design the…

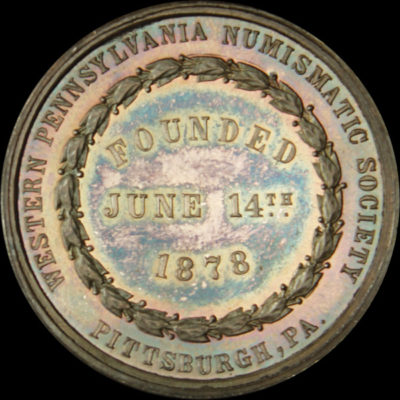
1879 Pittsburgh Exposition Official Medal
1879 · SH 3-11 WM · White Metal · 1879 Pittsburgh Exposition
The Western Pennsylvania Numismatic Society exhibited again in 1879 and commissioned a new obverse die…
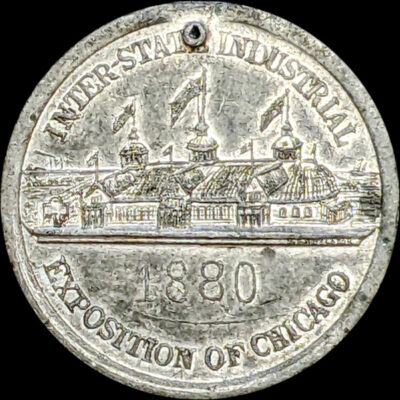
1880 Inter-State Industrial Exposition Official SCD
1880 · SH 3-31 · 1880 Inter-State Industrial Exposition of Chicago
A perspective view of the Inter-state Exposition Building with INTER-STATE INDUSTRIAL EXPOSITION OF CHICAGO on…
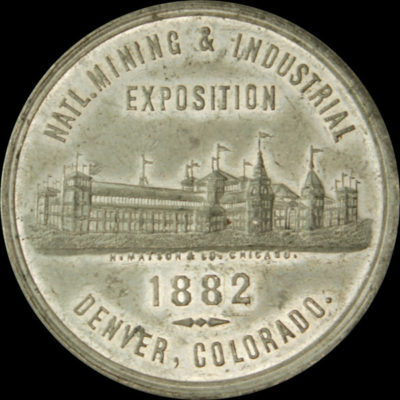
National Mining & Industrial Exposition Official Medal
1882 · SH 3-41 WM · White Metal · 1882 National Mining and Industrial Exposition
The primary three-story exposition building depicted on the obverse was built in the shape of…
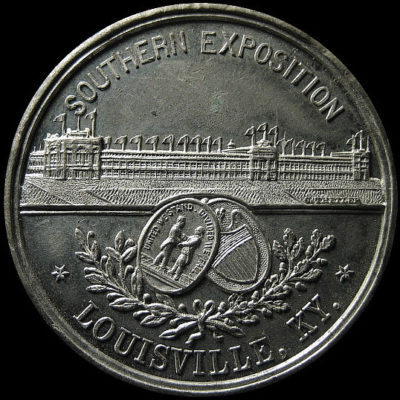

Southern Exposition Official Medal
1883 · SH 3-61 WM · White Metal · 1883 Southern Exposition
The main exposition building adorns the obverse. Reverse legend states the exposition opens August 1st…
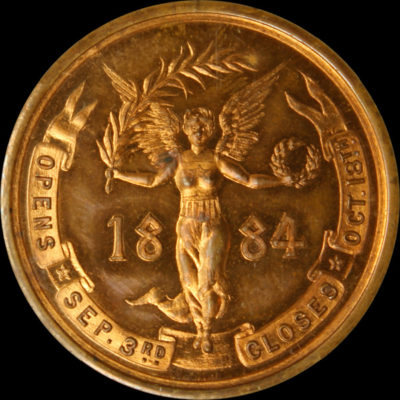
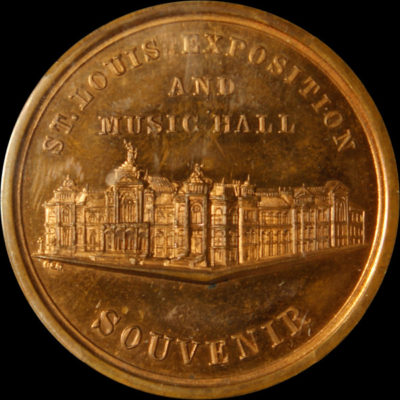
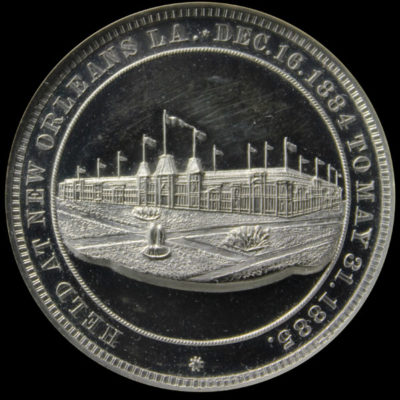
1884 St. Louis Exposition Official Medal
1884 · SH 4-21 CU · Copper · 1884 St. Louis Exposition
A female figure with extended wings walking forward adorns the obverse. Music Hall edifice on…

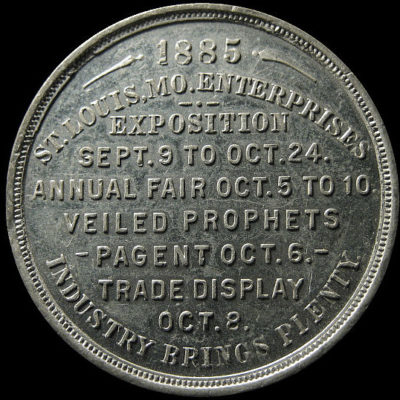
St. Louis Enterprises Exposition Official Medal
1885 · SH 4-51 WM · White Metal · 1885 St. Louis Enterprises Exposition
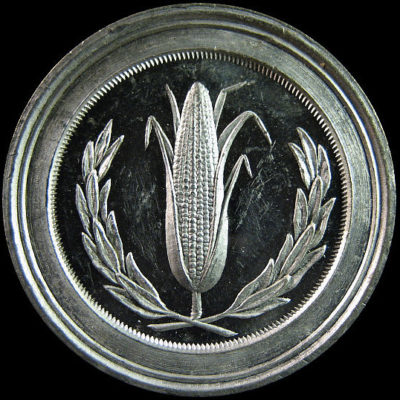
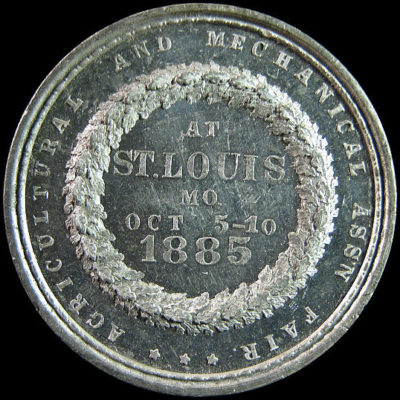
St. Louis Agricultural & Mechanical Medal
1885 · SH 4-52 WM · White Metal · 1885 St. Louis Enterprises Exposition
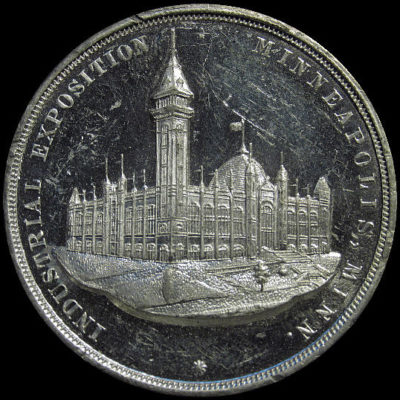
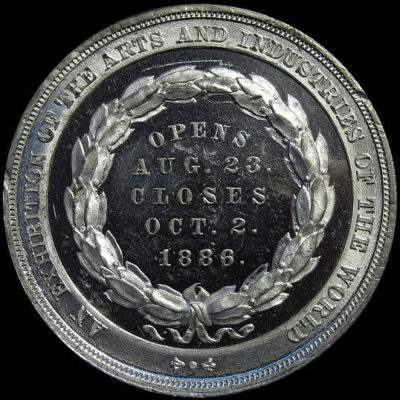
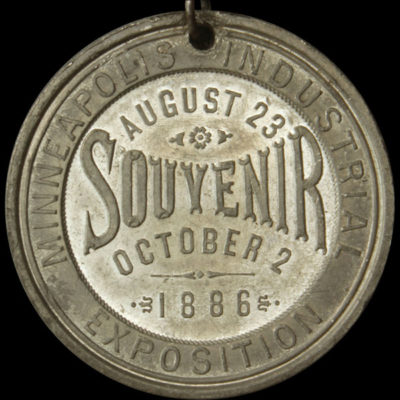
1886 Minneapolis Industrial Exposition Official Medal
1886 · SH 4-71 WM · White Metal · 1886 Minneapolis Industrial Exposition
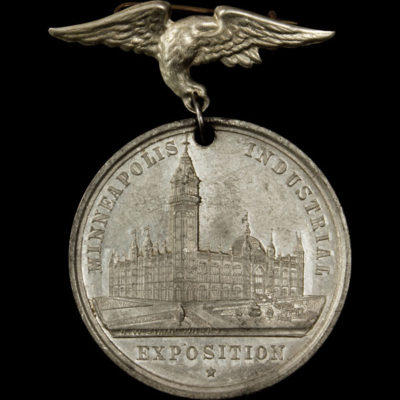
Minneapolis Industrial Exposition Official Medal
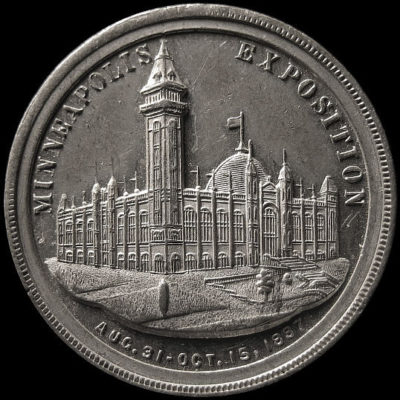
1886 · SH 4-72 WM · White Metal · 1886 Minneapolis Industrial Exposition
Legend on the obverse Minneapolis Industrial Exposition with a large edifice in the center. Micro…
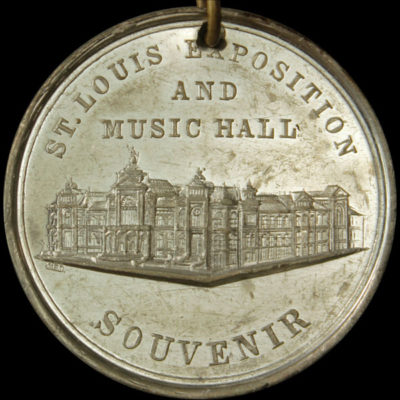
1887 St. Louis Exposition Official Medal
1887 · SH 4-81 WM · White Metal · 1887 St. Louis Exposition
Icons of the arts and industry adorn the obverse, the Music Hall edifice is on…
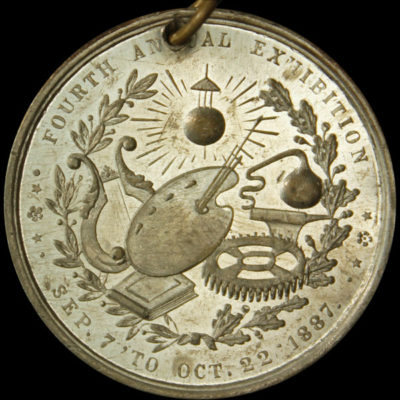
1887 Minneapolis Souvenir Medal
1887 · SH 4-82 WM · White Metal · 1887 Minneapolis Industrial Exposition
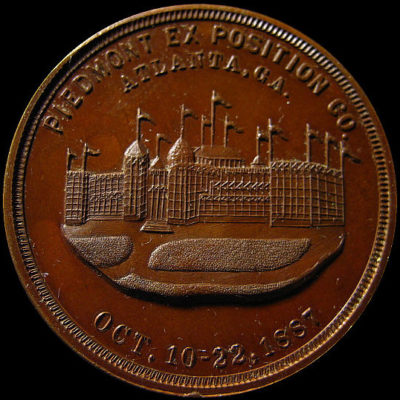
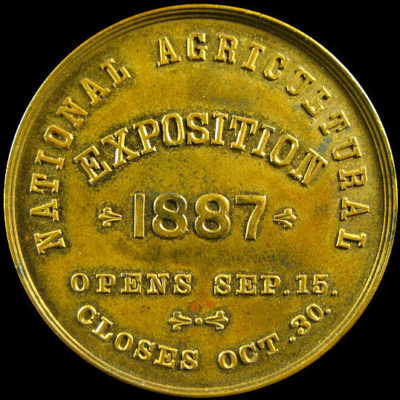
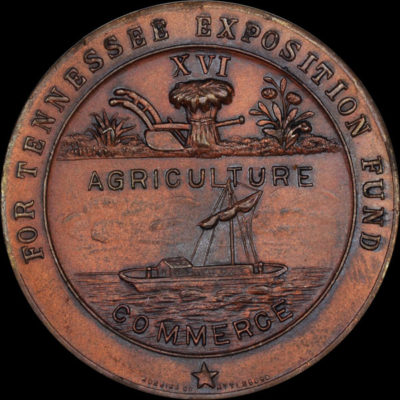
National Agricultural Exposition Official Medal
1887 · SH 4-111 BS · Brass · 1887 National Agricultural Exposition
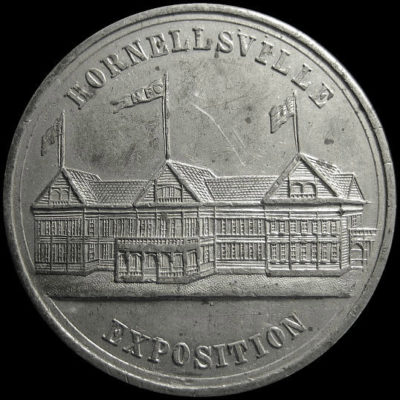
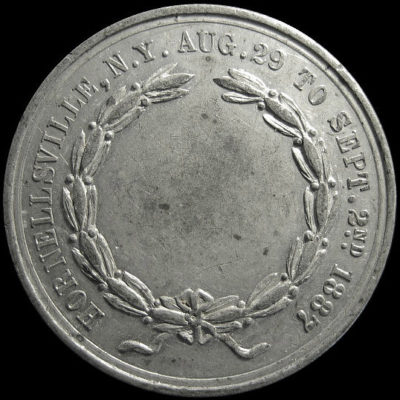
Hornellsville Exposition Official Medal
1887 · SH 4-121 WM · White Metal · 1887 Hornellsville Exposition
The main exposition building is on the obverse, a wreath and the exposition dates are…
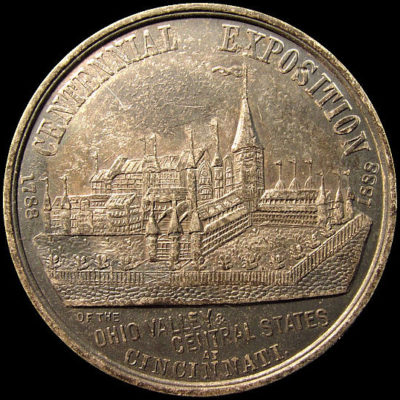
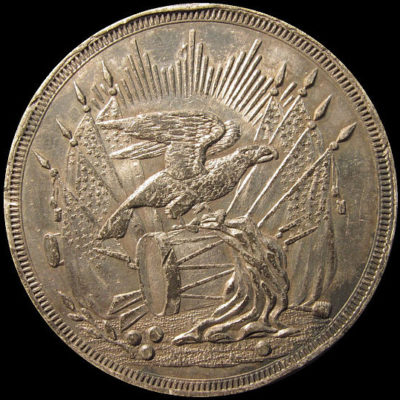
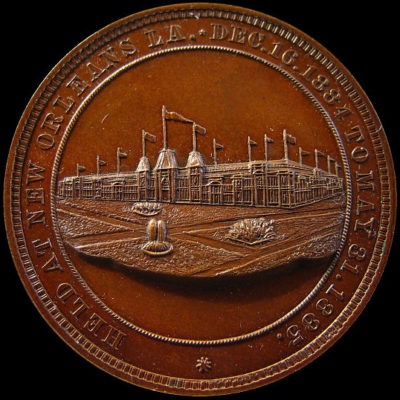
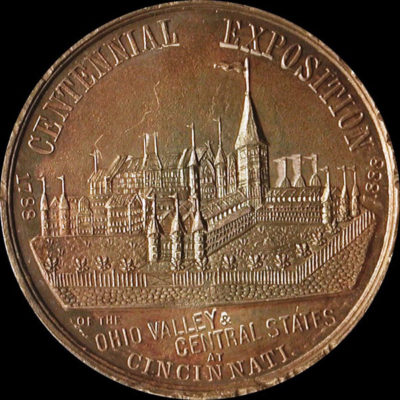
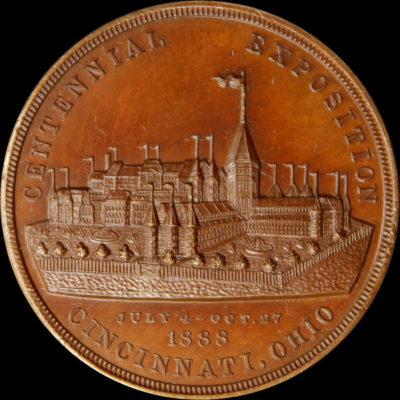
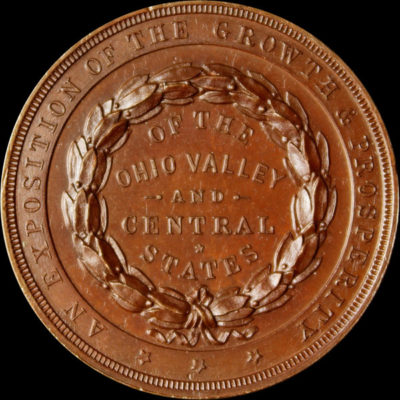
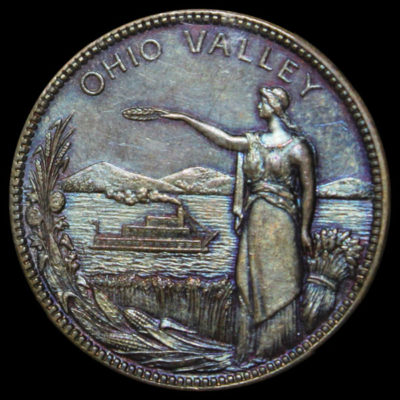
Ohio Valley Eagle on Drum Medal
1888 · SH 5-3 WM · White Metal · 1888 Ohio Valley and Central States Centennial
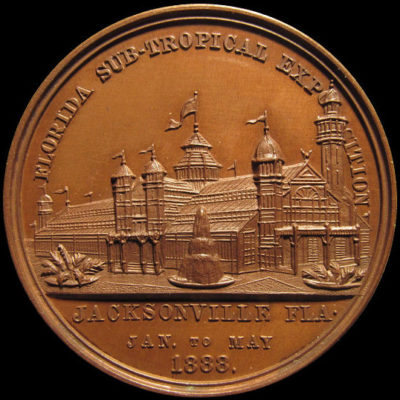
Florida Sub-Tropical Exposition Official Medal
1888 · SH 5-11 BZ · Bronze · 1888 Florida Sub-Tropical Exposition
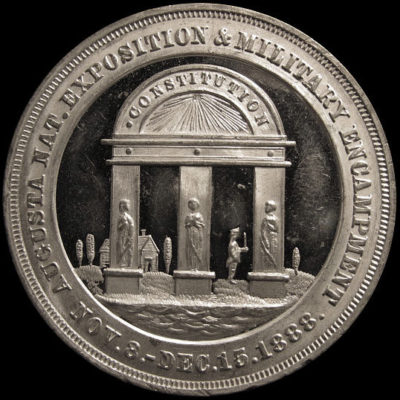
Augusta National Exposition Official Medal
1888 · SH 5-41 WM · White Metal · 1888 Augusta National Exposition
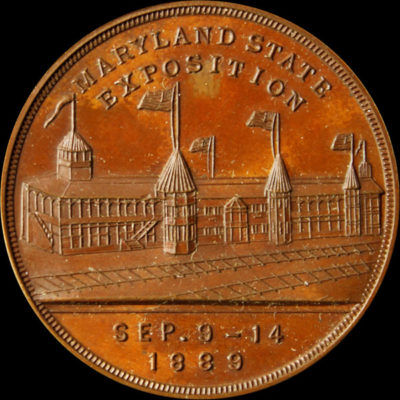

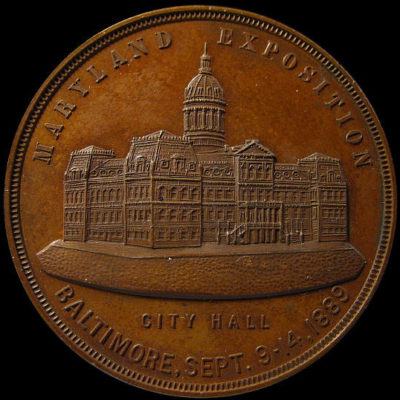
Maryland State Exposition Official Medal
1889 · SH 5-51 BZ · Bronze · 1889 Maryland Exposition
A very well executed design of the main exposition building on the obverse, reverse states…
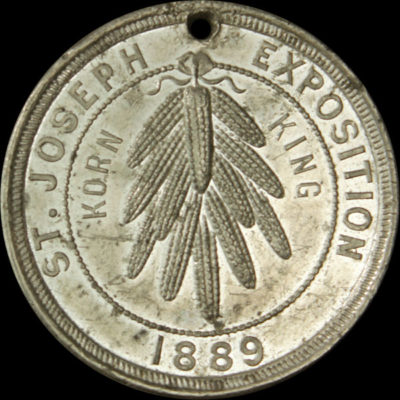
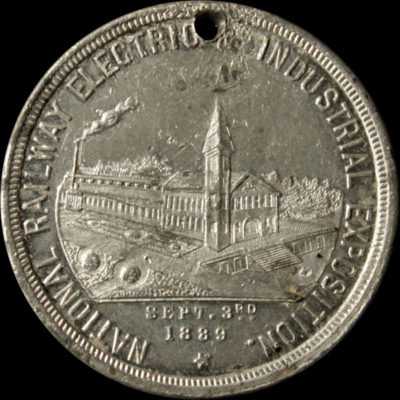
National Railway Electric & Industrial Exposition Official Medal
1889 · SH 5-61 WM · White Metal · 1889 National Railway Electric and Industrial Exposition
Over a dozen ears of corn are hanging on the obverse, Korn King to either…
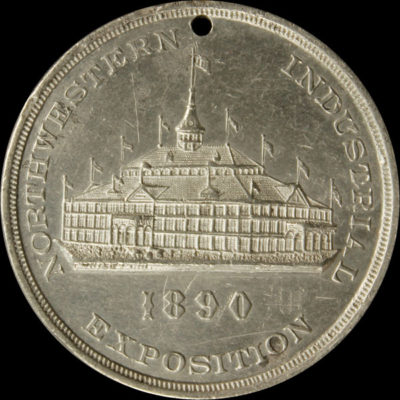
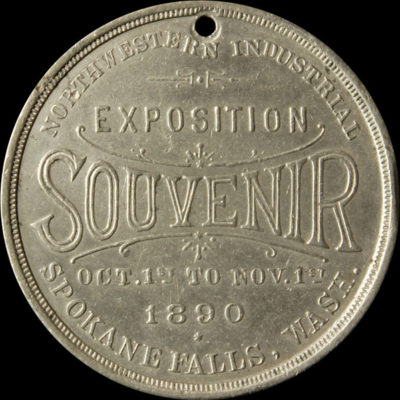
Northwestern Industrial Exposition Official Medal
1890 · SH 5-71 WM · White Metal · 1890 Northwestern Industrial Exposition
The main exposition building appears on the obverse with a micro signature below and to…
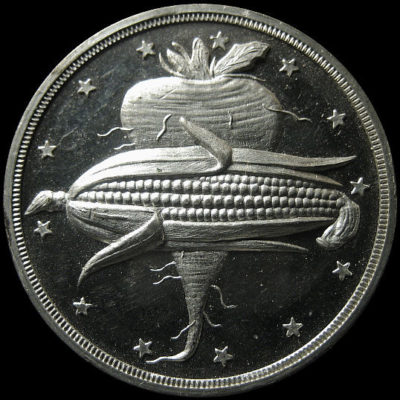
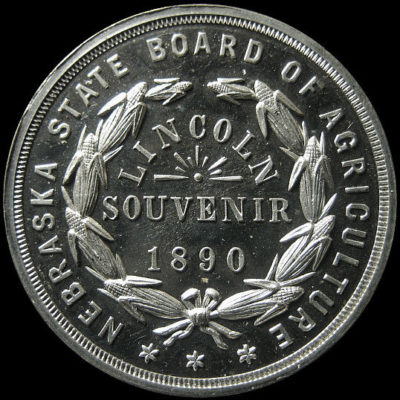
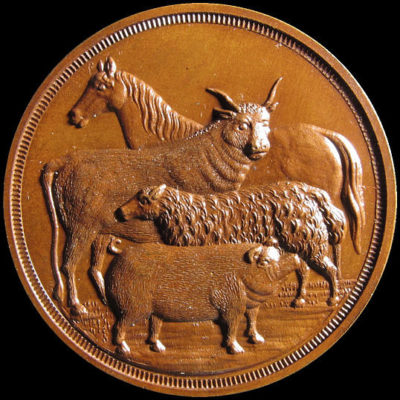
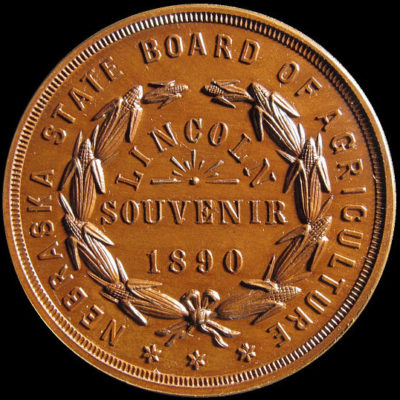
Nebraska State Corn and Turnip Medal
1890 · SH 5-72 WM · White Metal · 1890 Nebraska State Fair and Exposition
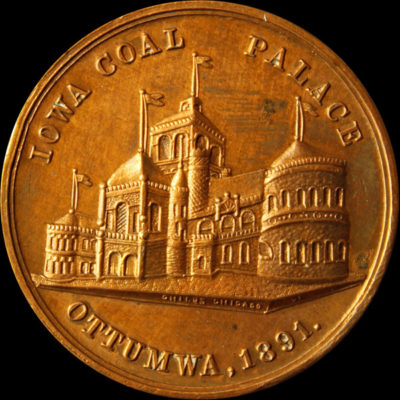
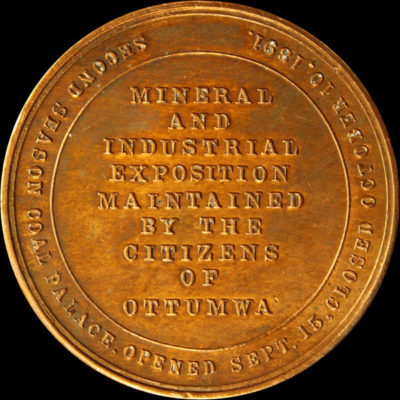
Mineral and Industrial Exposition Official Medal
1891 · SH 5-81 CU · Copper · 1891 Mineral and Industrial Exposition
The Iowa Coal Palace adorns the obverse, micro signature Childs Chicago below the edifice. Legend…
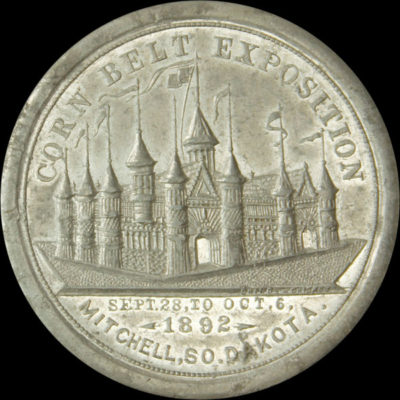
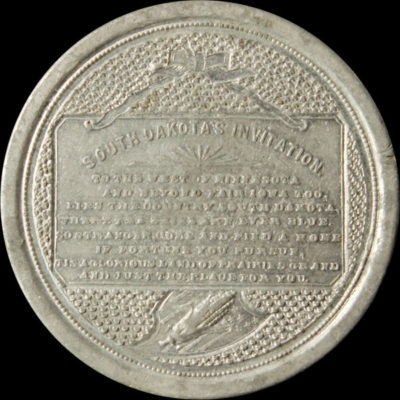
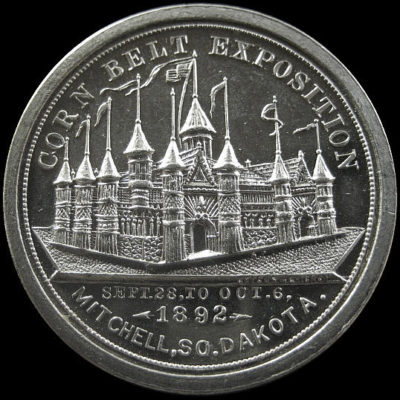
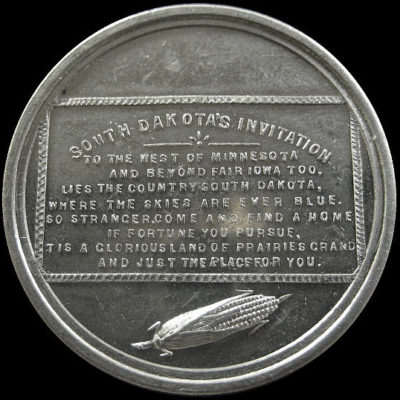
Corn Belt Exposition Official Medal
1892 · SH 5-101 AL · Aluminum · 1892 Corn Belt Exposition
On the obverse is the main exposition building. The reverse states “South Dakota’s Invitation to…
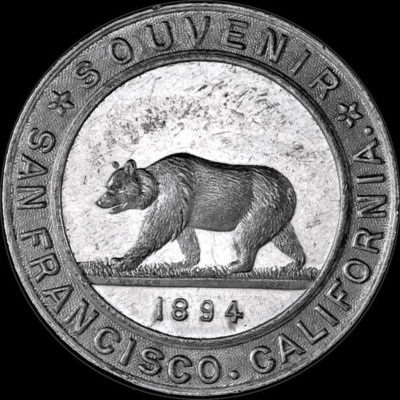
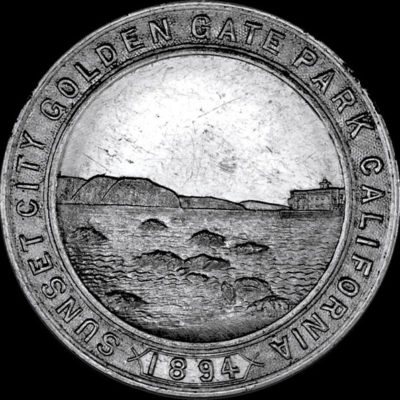
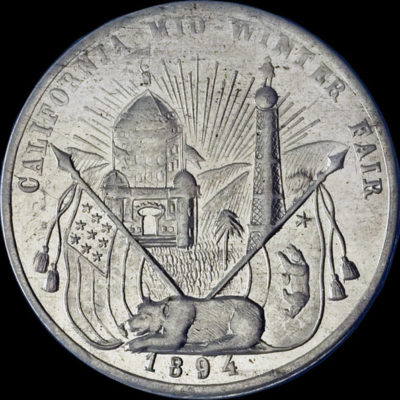
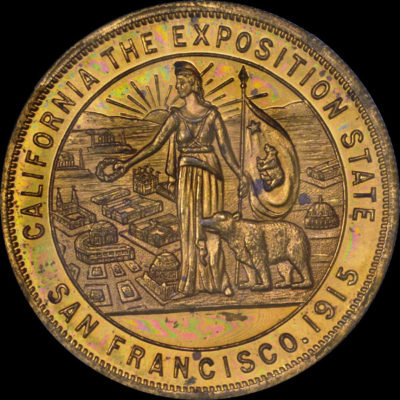
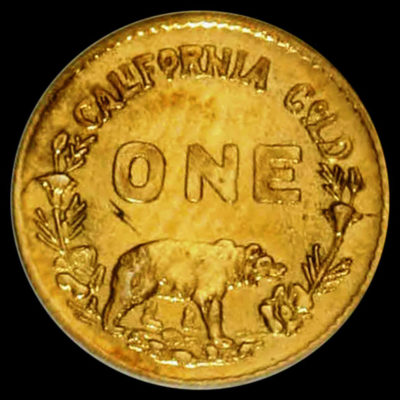
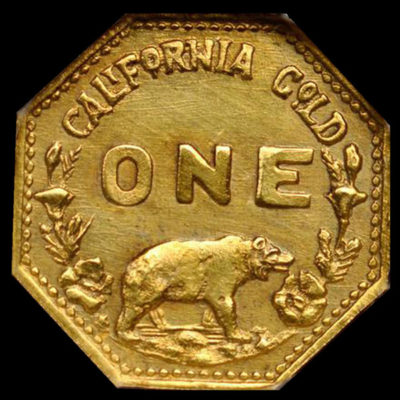
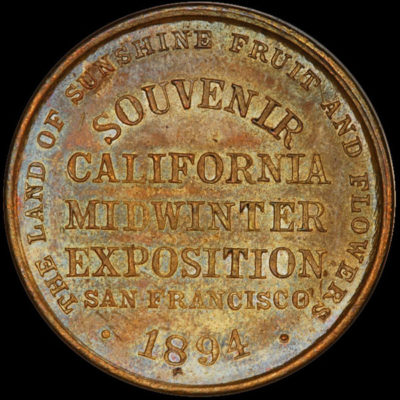
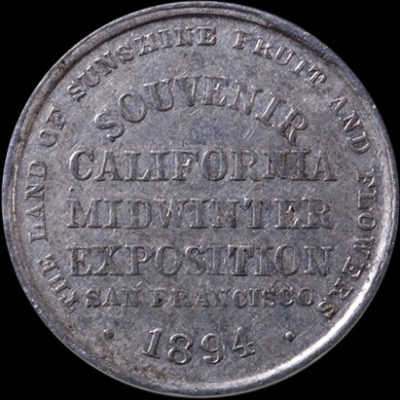
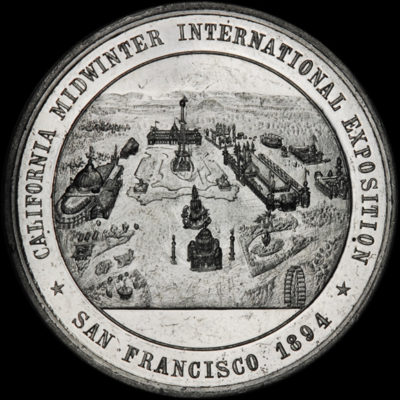
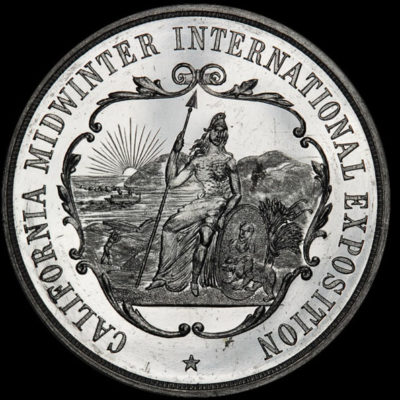
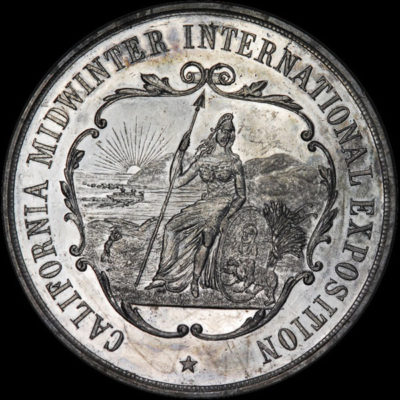
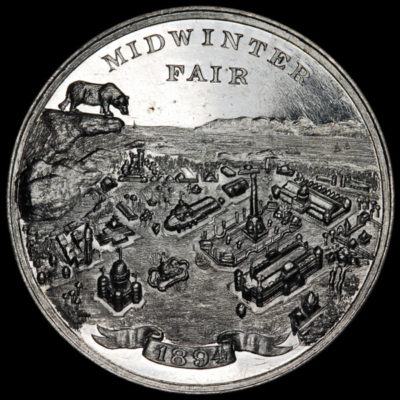
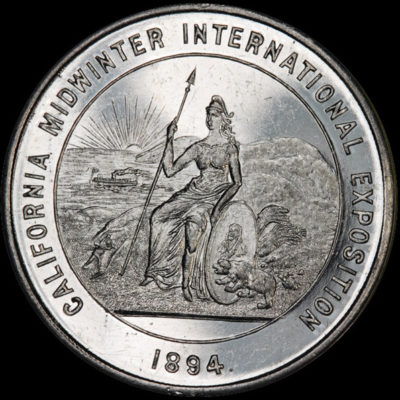
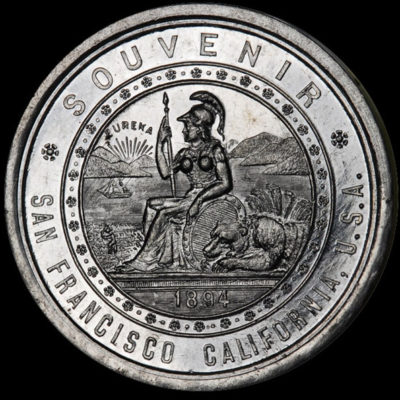
California Bear / Golden Gate – Blumenfield
1894 · SH 7-7 AL · Aluminum · 1894 California Midwinter International Exposition
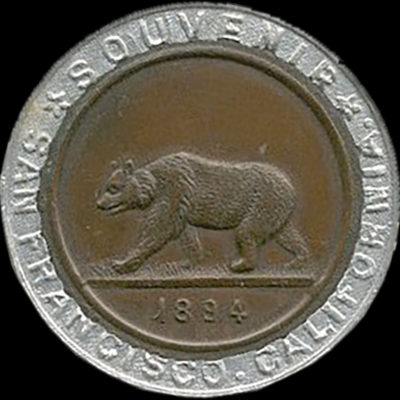
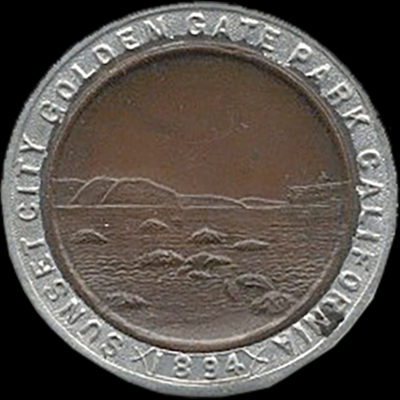
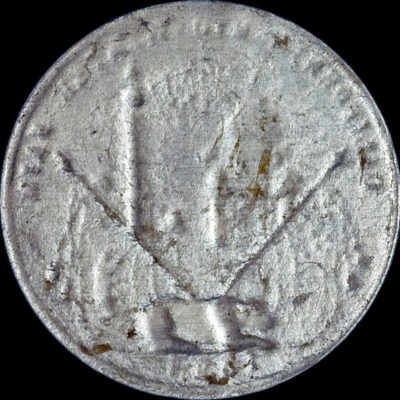
California Bear / Golden Gate – Blumenfield
1894 · SH 7-7 AL/BZ · Aluminum/Bronze · 1894 California Midwinter International Exposition
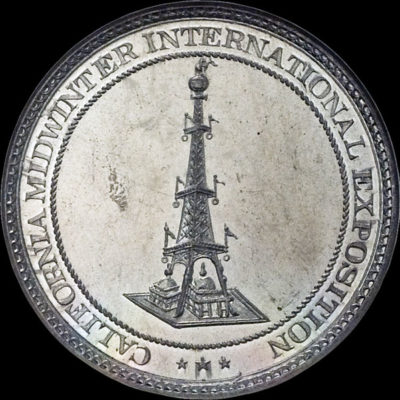
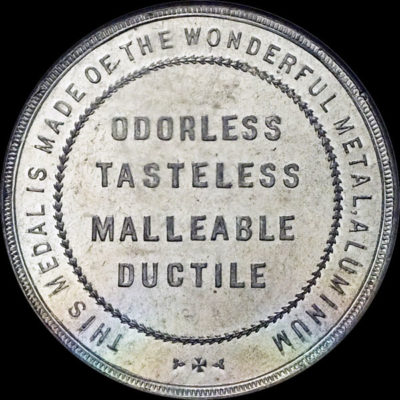
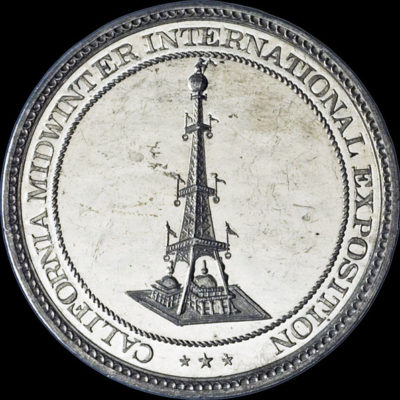
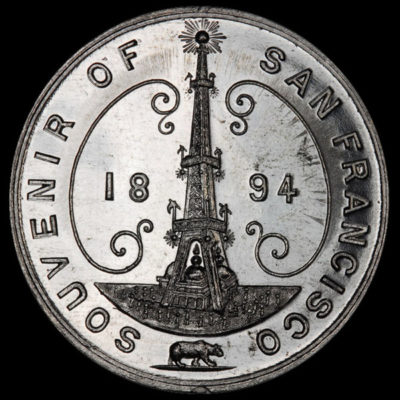
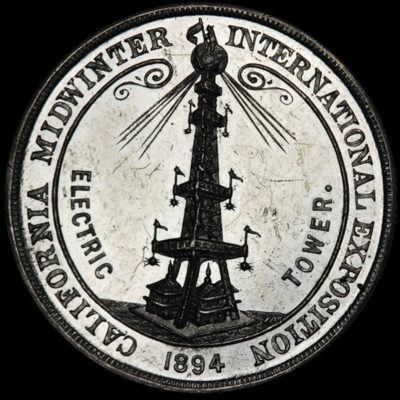
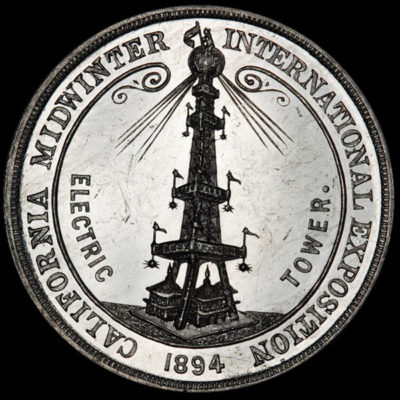
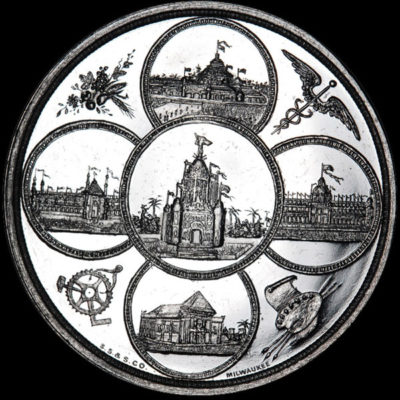
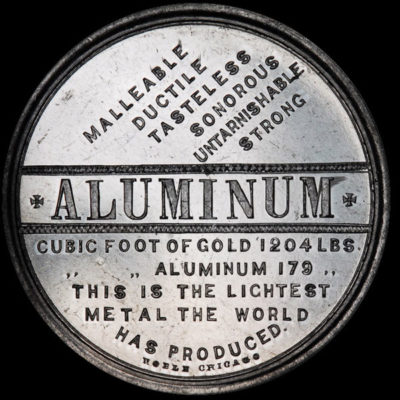
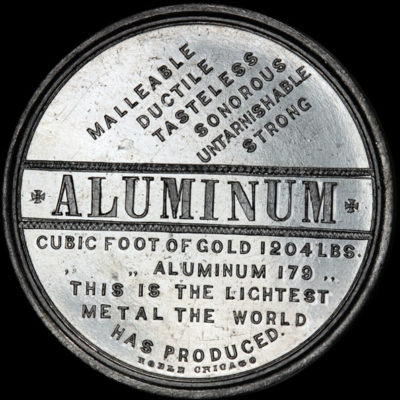
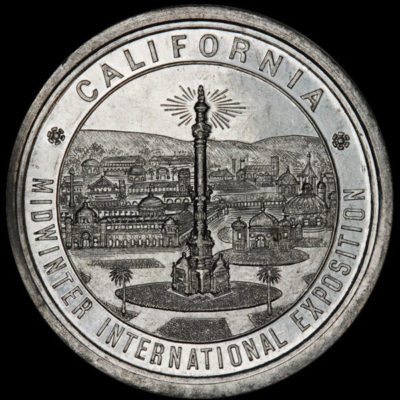
Electric Tower / Wonderful Aluminum
1894 · SH 7-11 AL · Aluminum · 1894 California Midwinter International Exposition
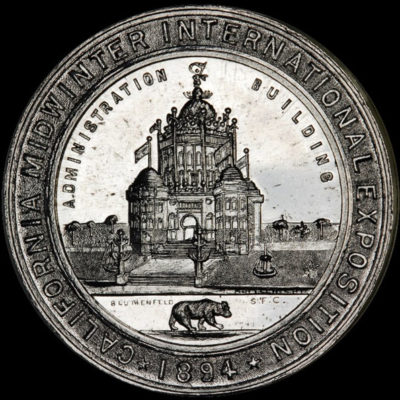
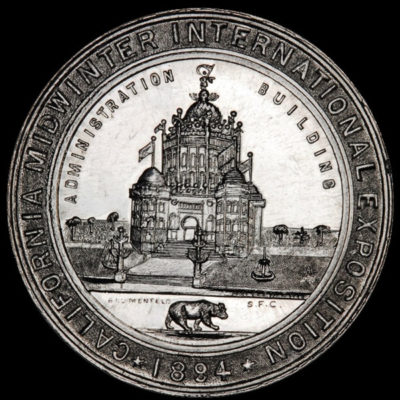
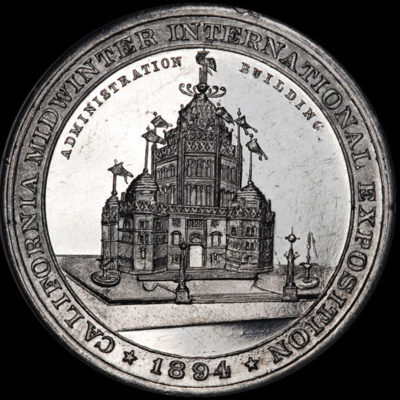
Grizzly Bear / Administration Building
1894 · SH 7-15 BPWM · Bronze-Plated White Metal · 1894 California Midwinter International Exposition
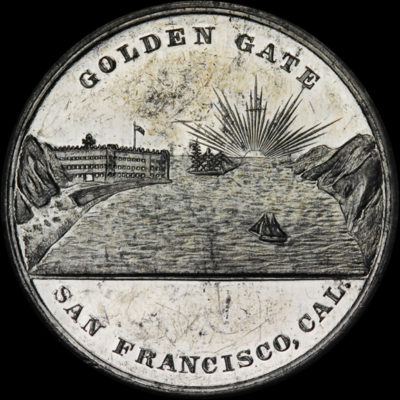
Exposition View / Golden Gate
1894 · SH 7-28 GPS · Gold-Plated Silver · 1894 California Midwinter International Exposition
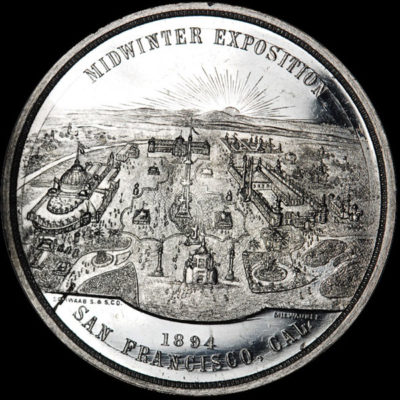
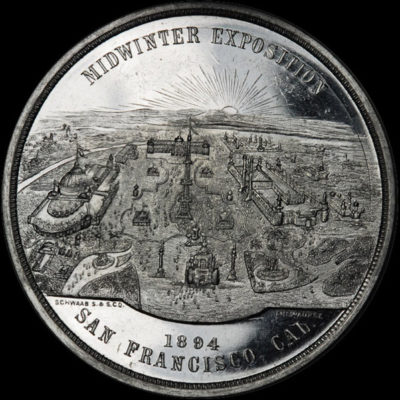
Midwinter Exposition Shell
1894 · SH 7-31 AL · Aluminum · 1894 California Midwinter International Exposition
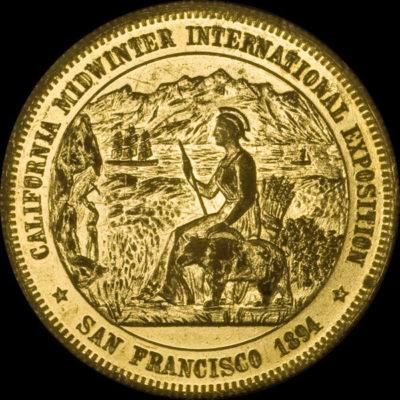
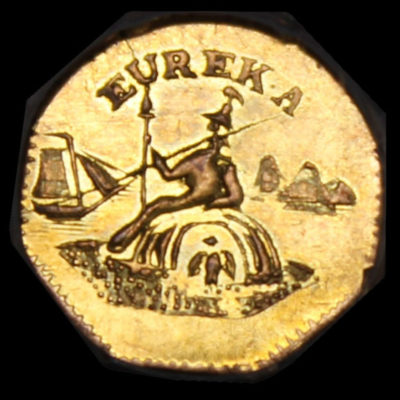
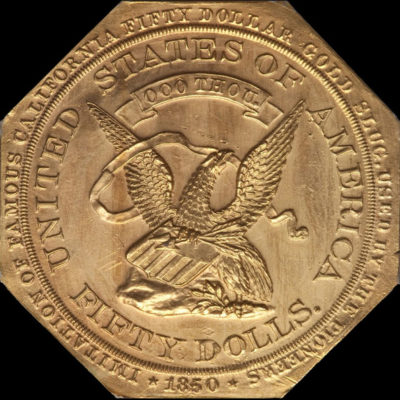
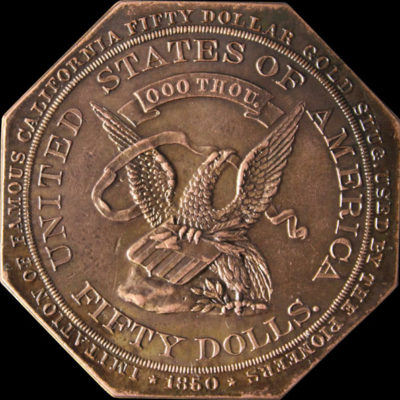
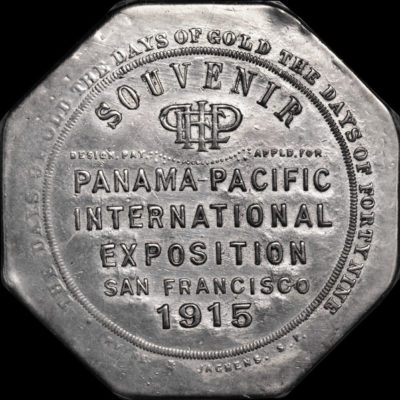
Days of Gold Souvenir
1894 · SH 7-32 G · Gold · 1894 California Midwinter International Exposition
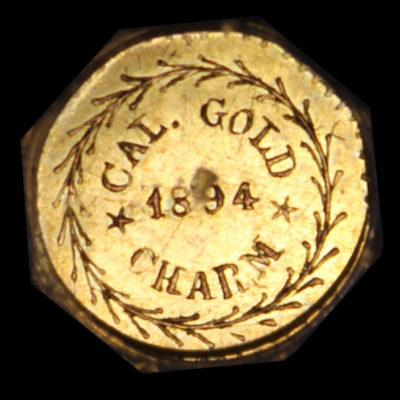
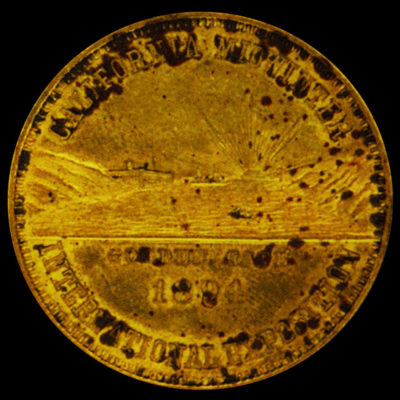
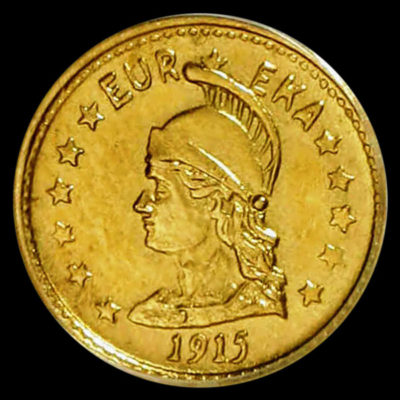
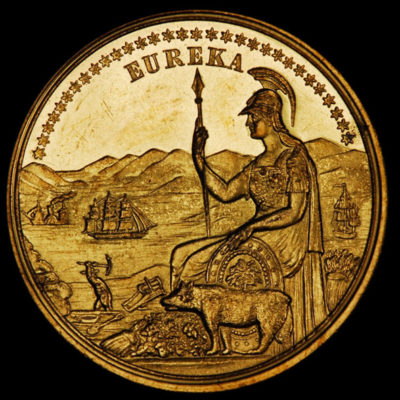
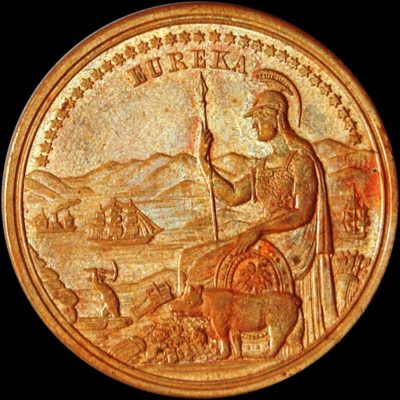
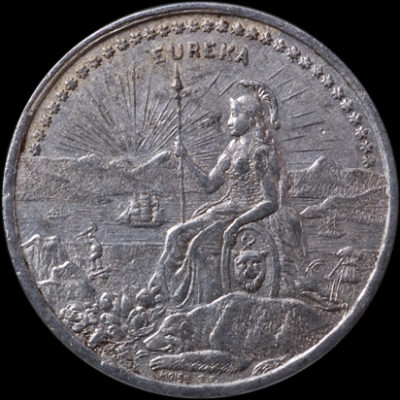
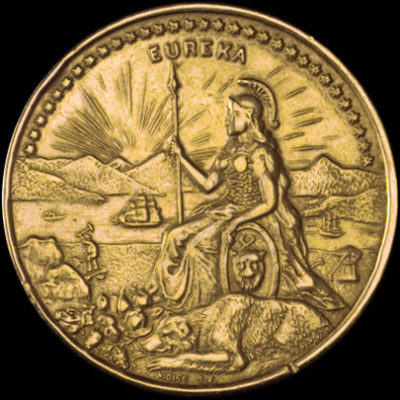
Eureka Cal Gold Closed Wreath Nobel
1894 · SH 7-33 G · Gold · 1894 California Midwinter International Exposition

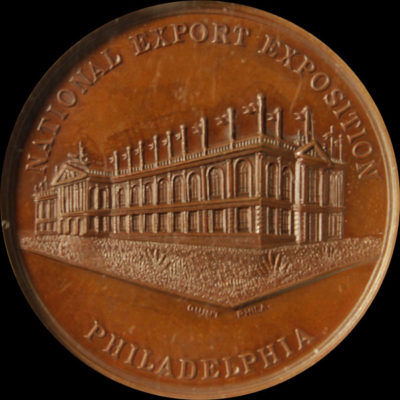
National Export Exposition Official Medal
1899 · SH 10-11 BZ · Bronze · 1899 National Export Exposition
Obverse features a female blowing a trumpet making an announcement as the legend states “For…
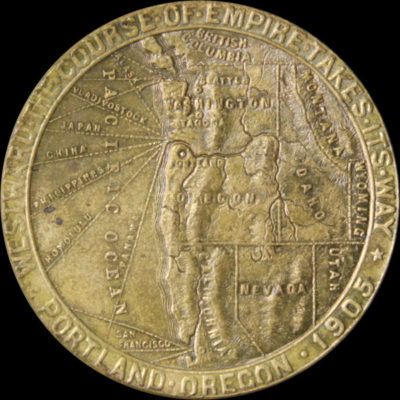
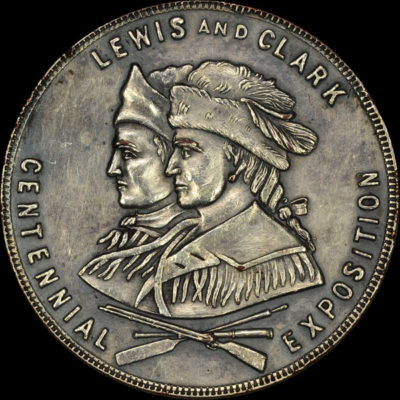
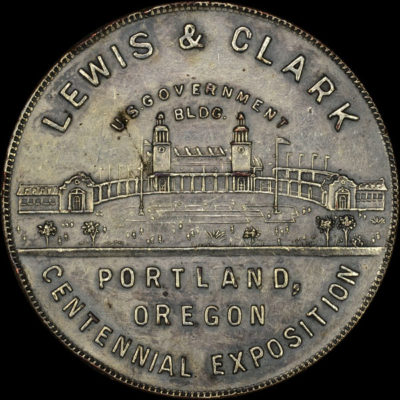
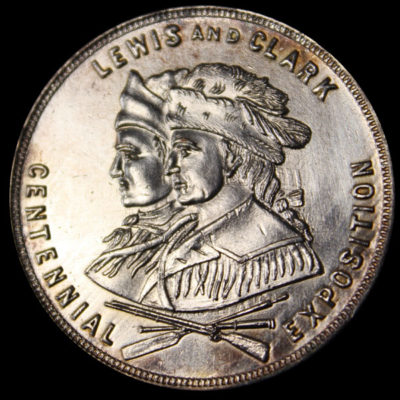
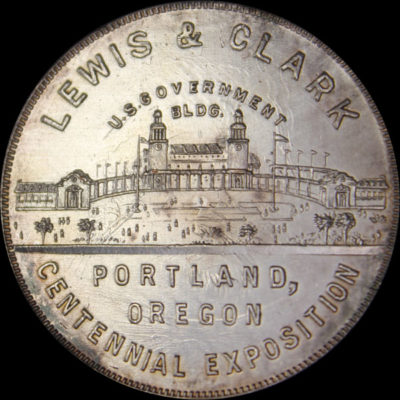
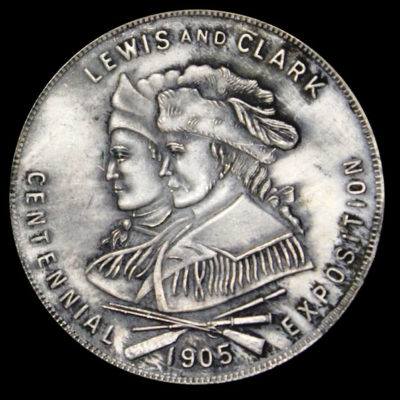
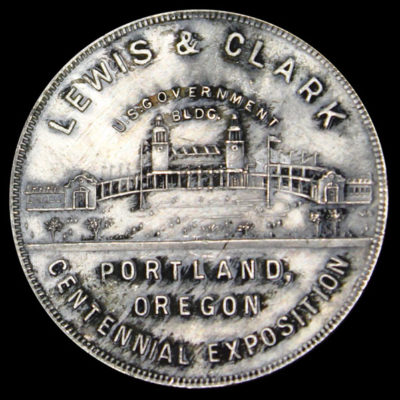
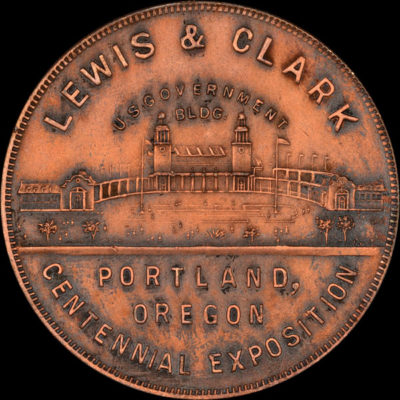
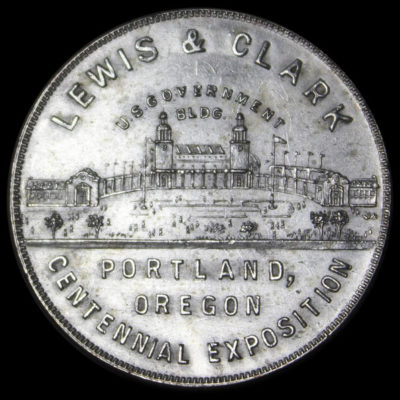
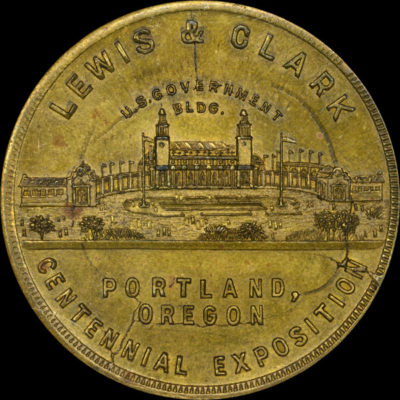
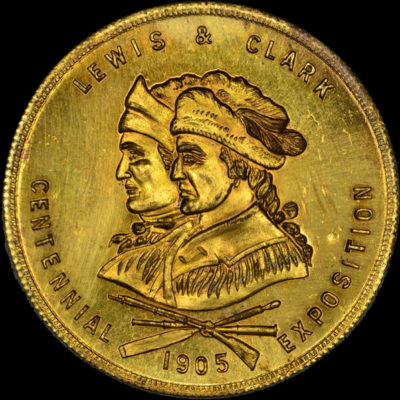
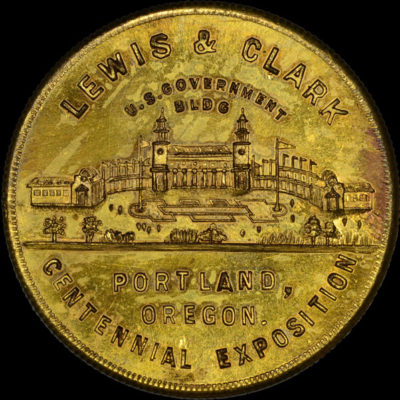
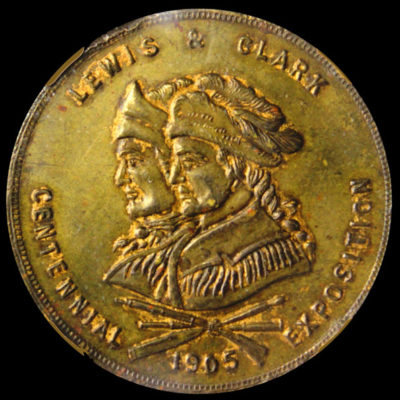
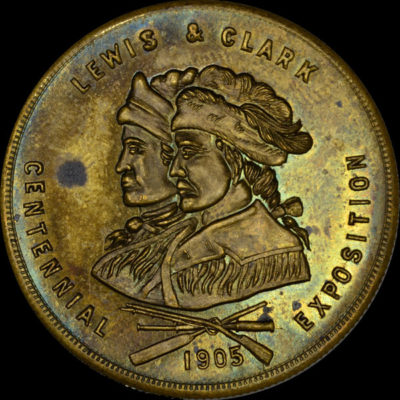
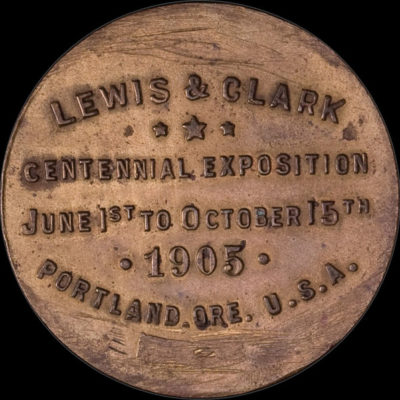
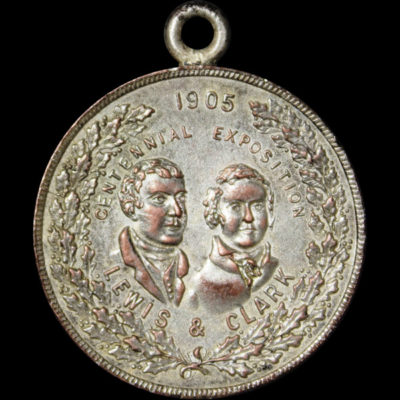
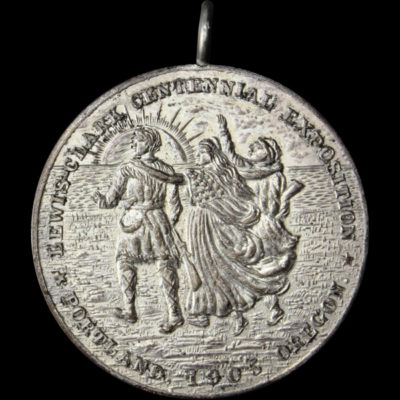
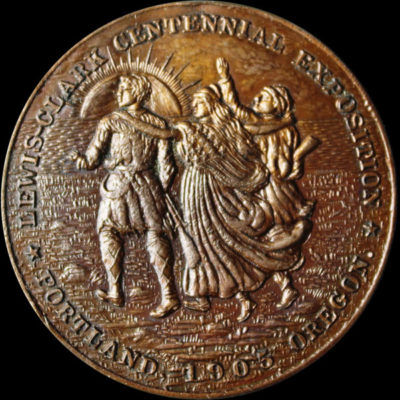
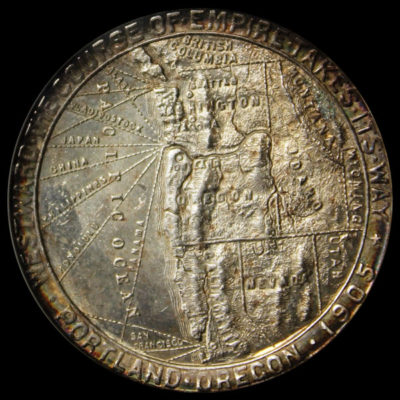
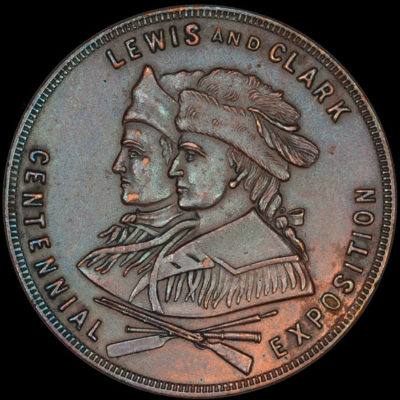
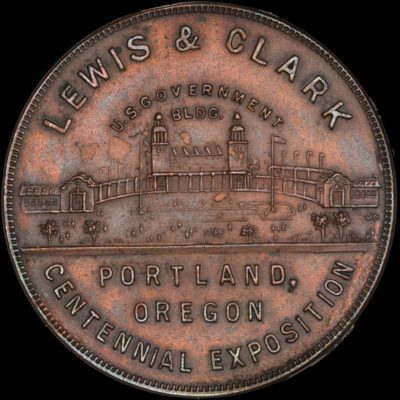
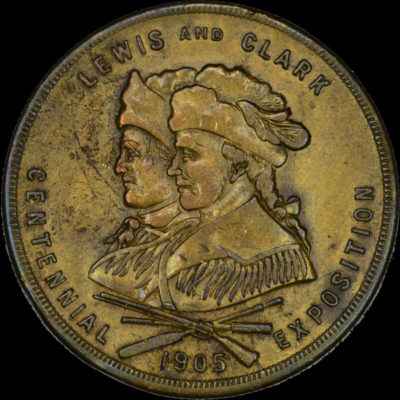
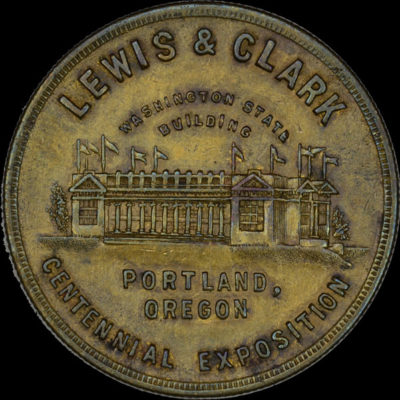
Lewis and Clark Centennial Exposition Official Medal
1905 · SH 14-1 BS · Brass · 1905 Lewis and Clark Centennial Exposition
Lewis and Clark No Date
1905 · SH 14-2 ASP · Antiqued Silver-Plate · 1905 Lewis and Clark Centennial Exposition
Lewis and Clark No Date
1905 · SH 14-2 SP · Silver-Plated · 1905 Lewis and Clark Centennial Exposition
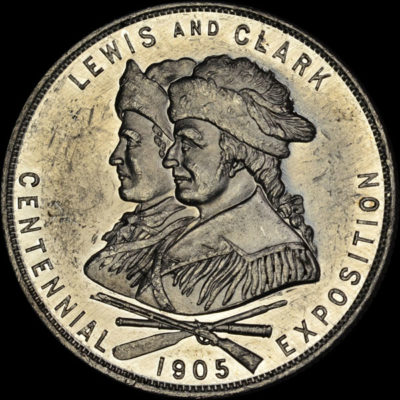
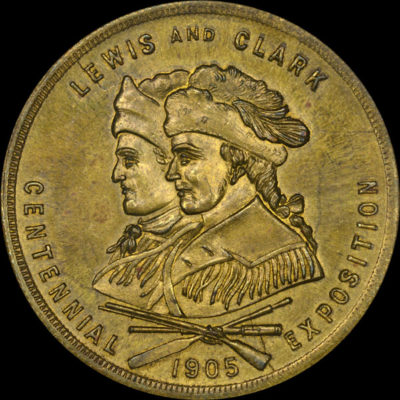
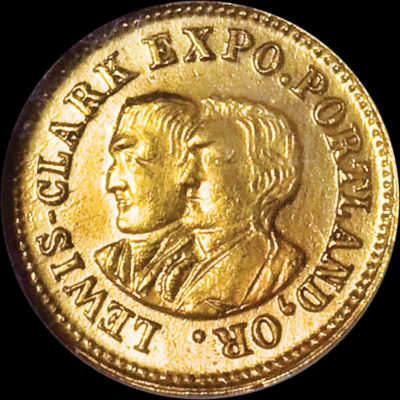
Lewis and Clark 34mm
1905 · SH 14-3 ASP · Antiqued Silver-Plate · 1905 Lewis and Clark Centennial Exposition
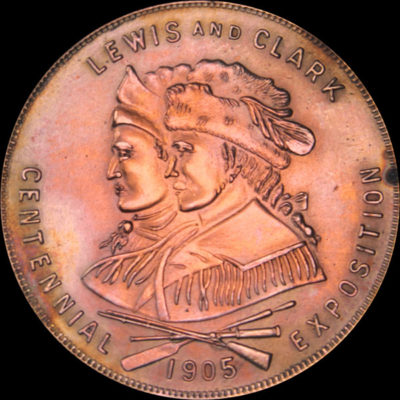
Captain Meriwether Lewis and Captain William Clark grace this unofficial medal struck by Joseph Mayer…
Lewis and Clark 34mm
1905 · SH 14-3 ABZ · Antiqued Bronze · 1905 Lewis and Clark Centennial Exposition
Lewis and Clark 38mm / Shattered Reverse Die
1905 · SH 14-5 BZ · Bronze · 1905 Lewis and Clark Centennial Exposition
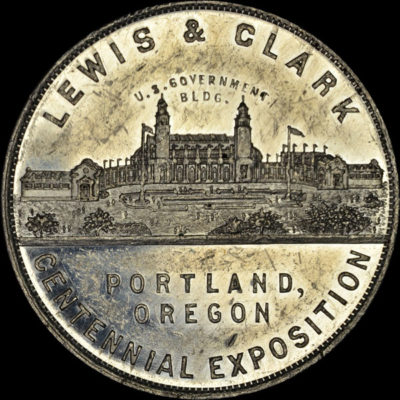
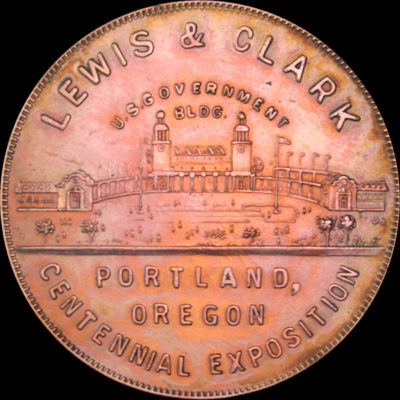
Lewis & Clark Stern Head / Government Building
1905 · SH 14-6 GPBZ · Gold-Plated Bronze · 1905 Lewis and Clark Centennial Exposition
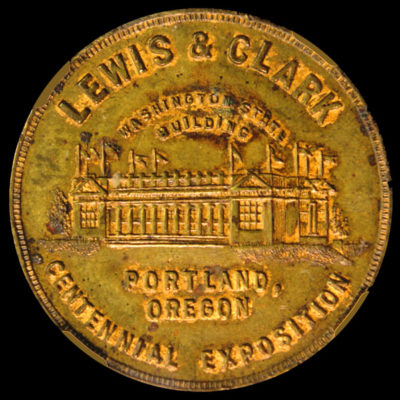
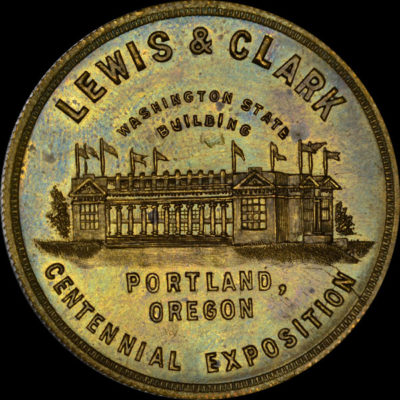
Lewis & Clark Stern Head/Washington Building
1905 · SH 14-8 BS · Brass · 1905 Lewis and Clark Centennial Exposition
Lewis & Clark Silly Head/Washington Building
1905 · SH 14-9 BS · Brass · 1905 Lewis and Clark Centennial Exposition
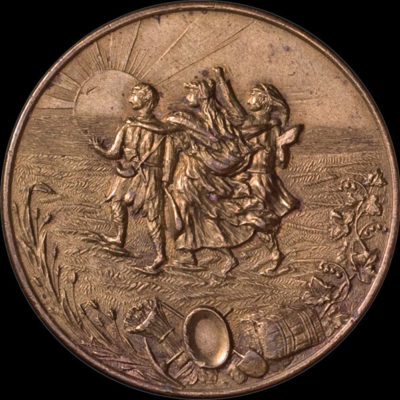
Lewis & Clark Marching to the Sun
1905 · SH 14-12 BS · Brass · 1905 Lewis and Clark Centennial Exposition

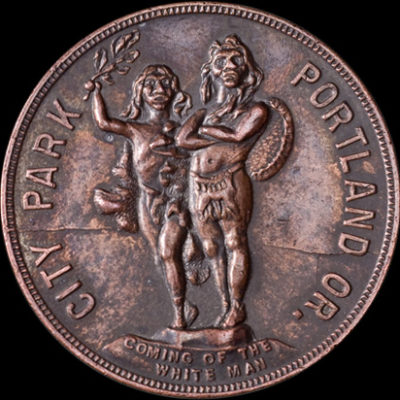
Lewis and Clark Coming of the White Man
1905 · SH 14-13 BZ · Bronze · 1905 Lewis and Clark Centennial Exposition
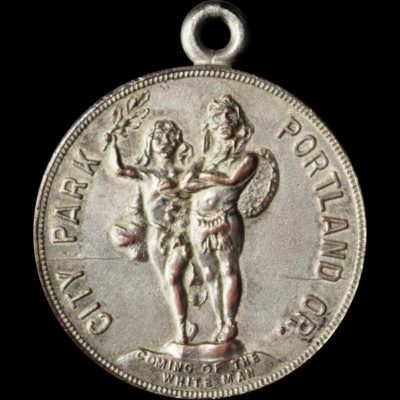
Lewis and Clark Coming of the White Man
1905 · SH 14-13 SP · Silver-Plated · 1905 Lewis and Clark Centennial Exposition

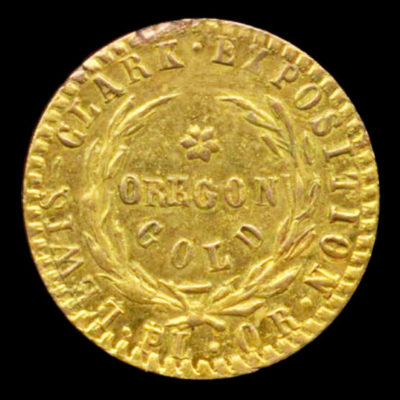
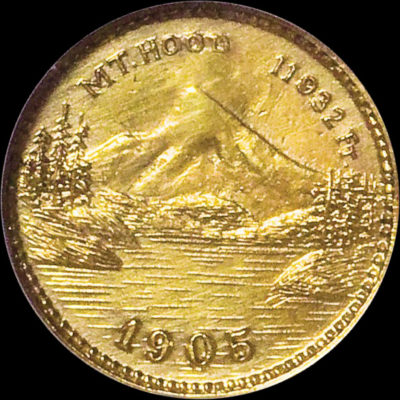
Lewis and Clark Miner Oregon Gold
1905 · SH 14-14 G · Gold · 1905 Lewis and Clark Centennial Exposition
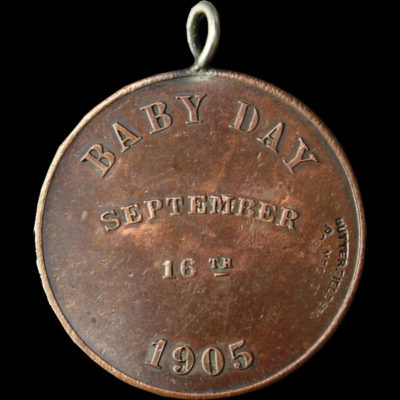
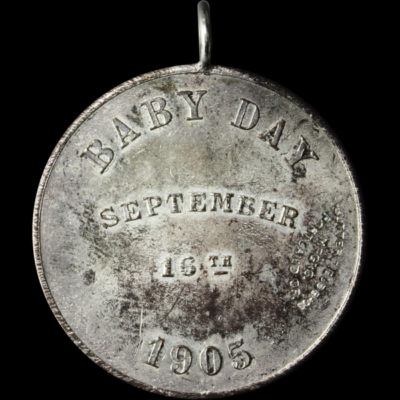
Lewis – Clark Baby Day
1905 · SH 14-15 SP · Silver-Plated · 1905 Lewis and Clark Centennial Exposition
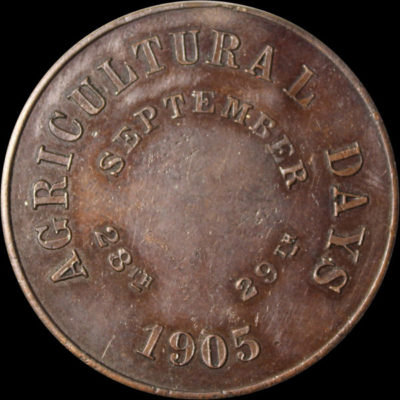
Lewis – Clark Agricultural Days
1905 · SH 14-16 BZ · Bronze · 1905 Lewis and Clark Centennial Exposition
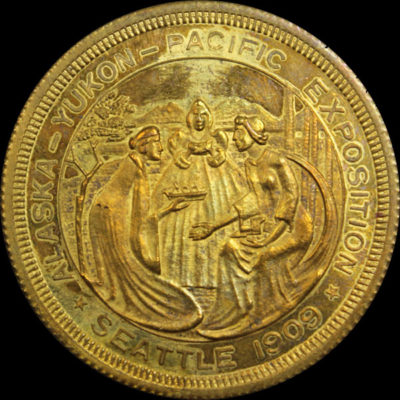
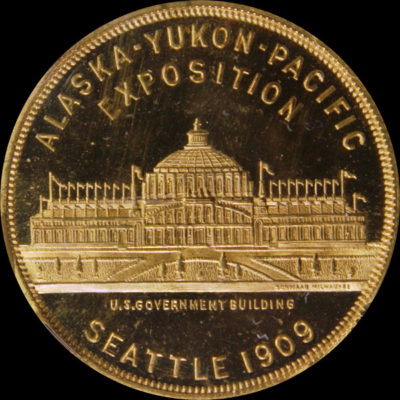
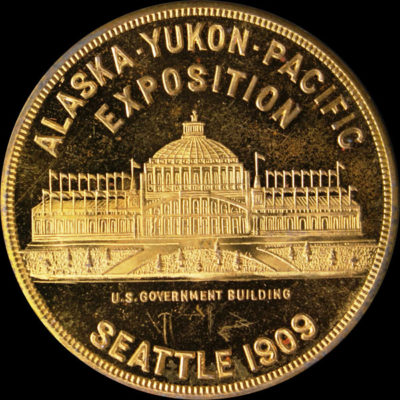
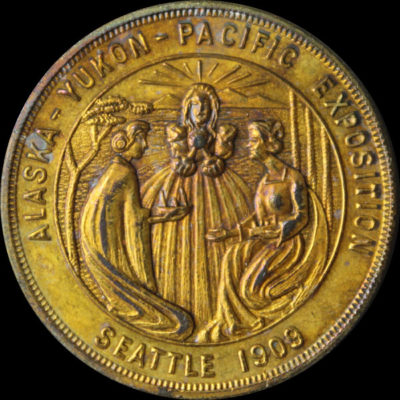
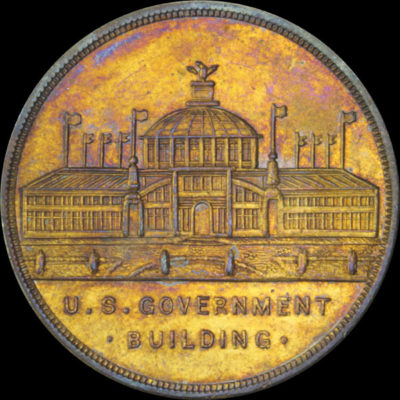
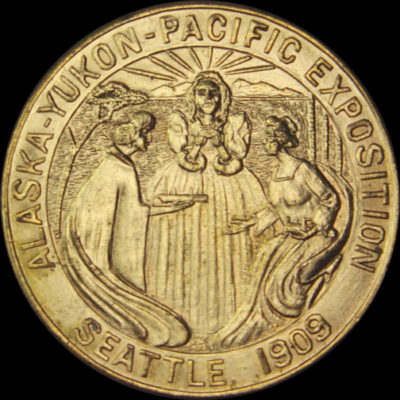
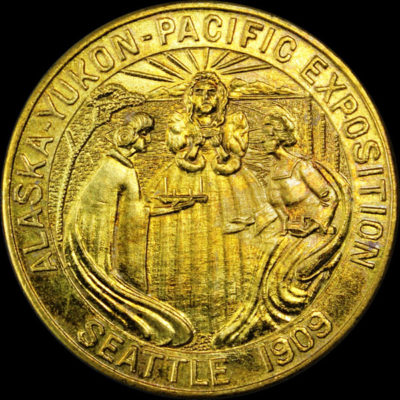
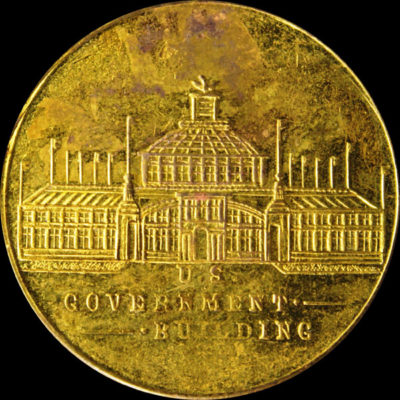
Alaska-Yukon-Pacific Exposition Mint Obverse / Government Building
1909 · SH 16-2 GP · Gold-Plated · 1909 Alaska-Yukon-Pacific Exposition
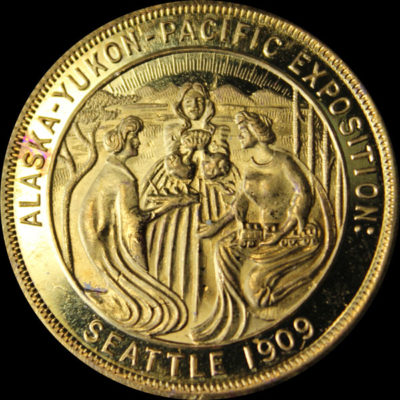
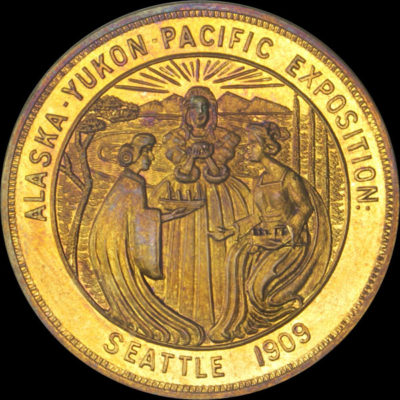
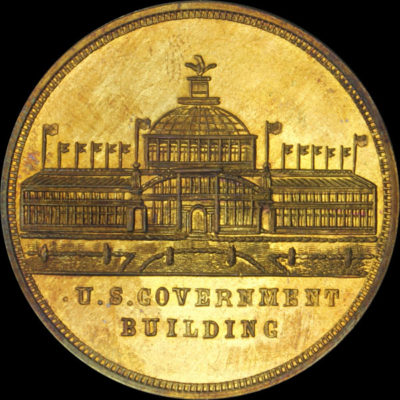
Alaska-Yukon-Pacific Exposition Mint Reverse / Government Building
1909 · SH 16-3 GP · Gold-Plated · 1909 Alaska-Yukon-Pacific Exposition
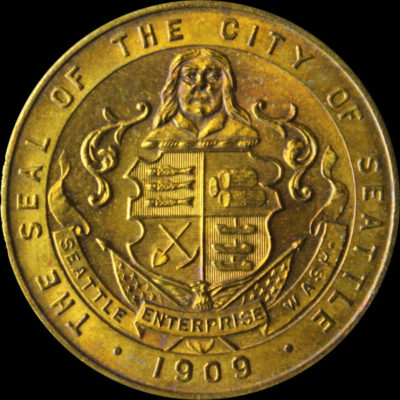
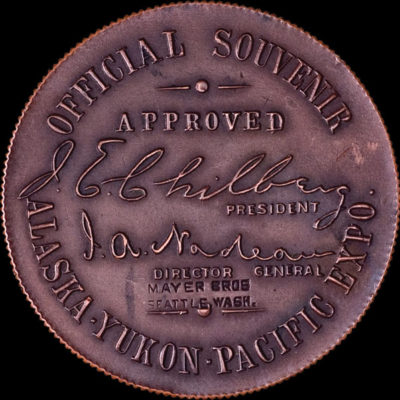
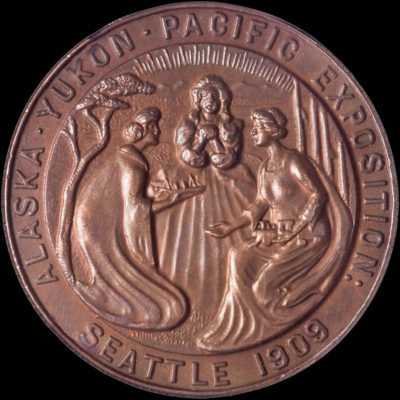
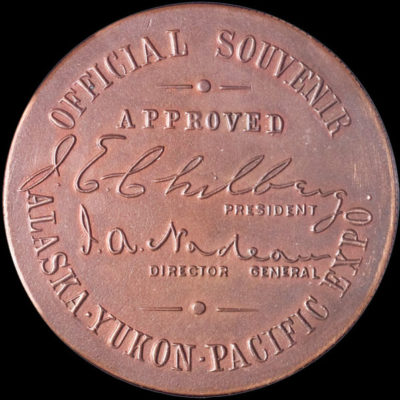
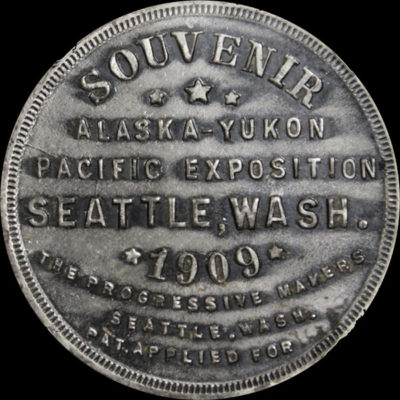
Alaska-Yukon-Pacific Expo. Official Medal
1909 · SH 16-4 SPBS · Silver-Plated Brass · 1909 Alaska-Yukon-Pacific Exposition
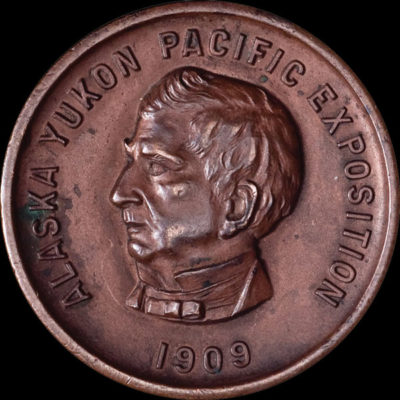
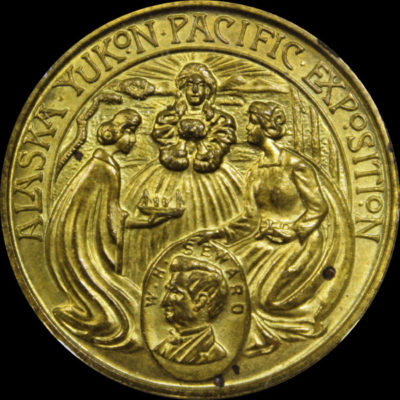
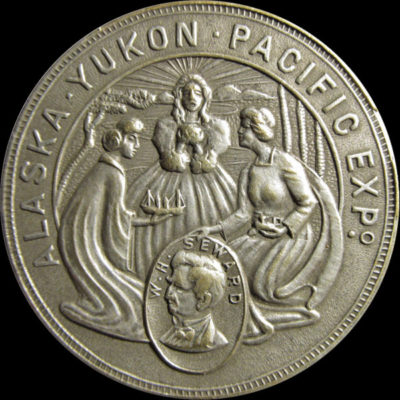
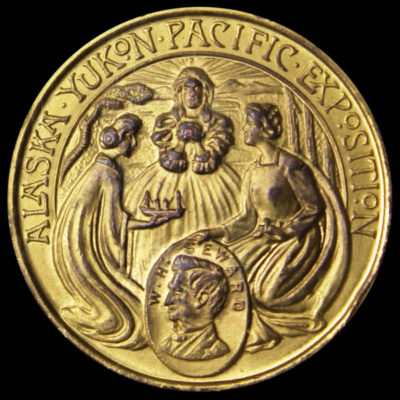
Alaska-Yukon-Pacific Exposition Seward Official Souvenir
1909 · SH 16-9 BZ · Bronze · 1909 Alaska-Yukon-Pacific Exposition

Alaska-Yukon-Pacific Exposition Seward-Seattle N.C.W. & S.
1909 · SH 16-11 GP · Gold-Plated · 1909 Alaska-Yukon-Pacific Exposition
Alaska-Yukon-Pacific Exposition Symmetrical Rays Alaska KA – Schwaab
1909 · SH 16-13 GP · Gold-Plated · 1909 Alaska-Yukon-Pacific Exposition
Alaska-Yukon-Pacific Exposition Symmetrical Rays Alaska SK – Schwaab
1909 · SH 16-14 GP · Gold-Plated · 1909 Alaska-Yukon-Pacific Exposition
Alaska-Yukon-Pacific Exposition Pointed Rays / Unsigned
1909 · SH 16-15 CU · Copper · 1909 Alaska-Yukon-Pacific Exposition
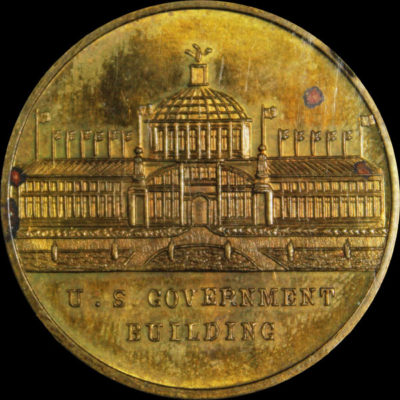
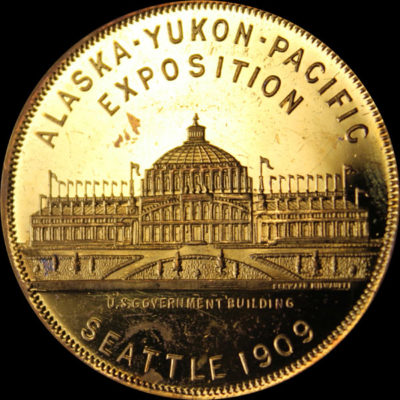
Alaska-Yukon-Pacific Exposition Thin Rays / U.S. Government Building 4 Flags
1909 · SH 16-17 GP · Gold-Plated · 1909 Alaska-Yukon-Pacific Exposition
Alaska-Yukon-Pacific Exposition Nine Rays / U.S. Government Building 3 Flags
1909 · SH 16-18 GP · Gold-Plated · 1909 Alaska-Yukon-Pacific Exposition
Alaska-Yukon-Pacific Exposition Nineteen Rays / U.S. Government Building 5 Flags
1909 · SH 16-19 GP · Gold-Plated · 1909 Alaska-Yukon-Pacific Exposition

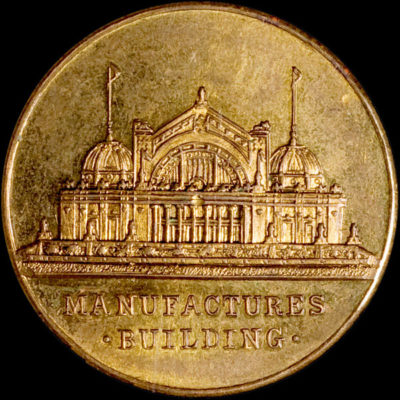
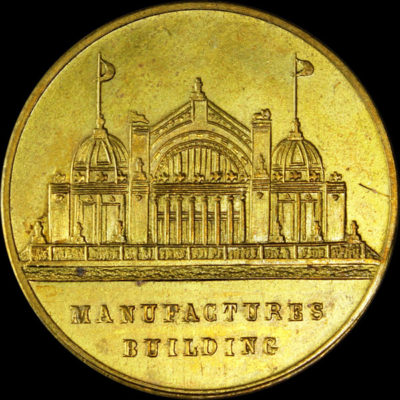
Alaska-Yukon-Pacific Exposition Asymmetrical Rays / Manufactures Building
1909 · SH 16-20 GP · Gold-Plated · 1909 Alaska-Yukon-Pacific Exposition
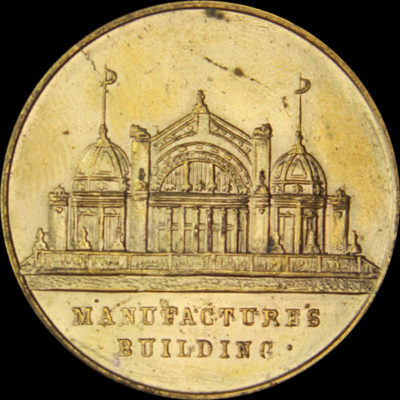
Alaska-Yukon-Pacific Exposition Eight Thick Rays / Manufactures Building Cracked Die
1909 · SH 16-21 GP · Gold-Plated · 1909 Alaska-Yukon-Pacific Exposition
Alaska-Yukon-Pacific Exposition Eight Thick Rays / Manufactures Building No Dots
1909 · SH 16-22 GP · Gold-Plated · 1909 Alaska-Yukon-Pacific Exposition
Alaska-Yukon-Pacific Exposition Uniface Washington Building
1909 · SH 16-23 GP · Gold-Plated · 1909 Alaska-Yukon-Pacific Exposition
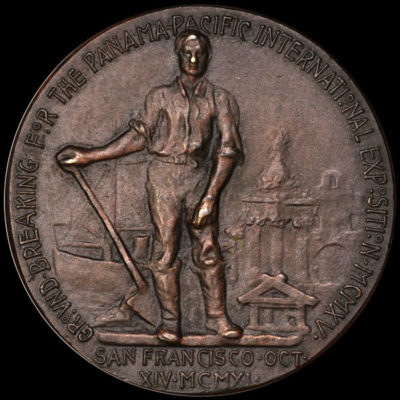
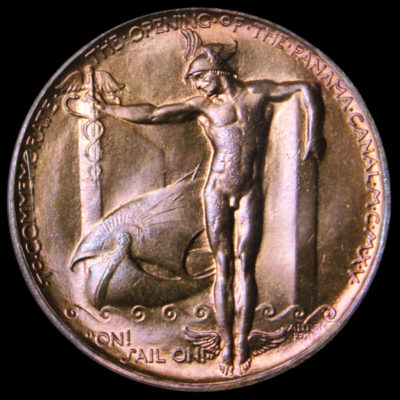
Taft Ground Breaking
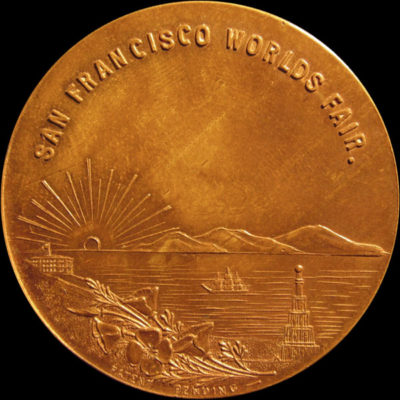
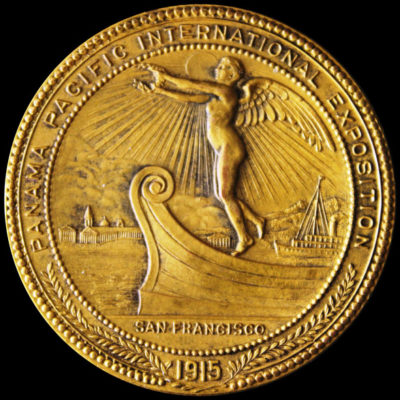
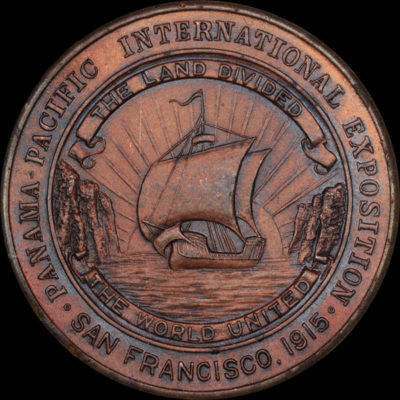
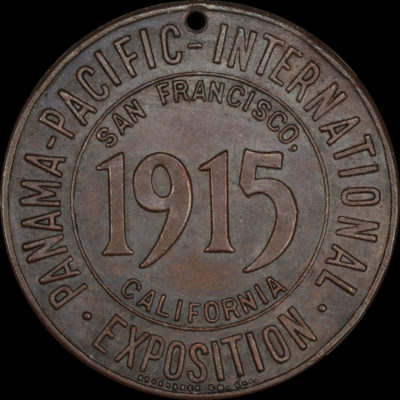
1915 · SH 18-2 BZ · Bronze · 1915 Panama-Pacific International Exposition
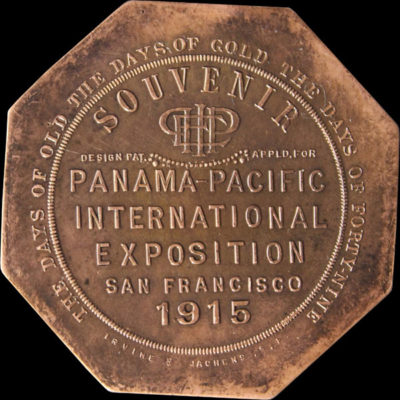
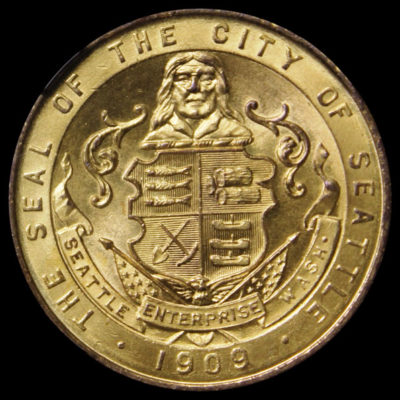
Joseph Mayer & Bros, a Seattle jewelry manufacturing firm, struck this commemorative medal for the…
Standing Minerva / Battleship Multiple Portholes
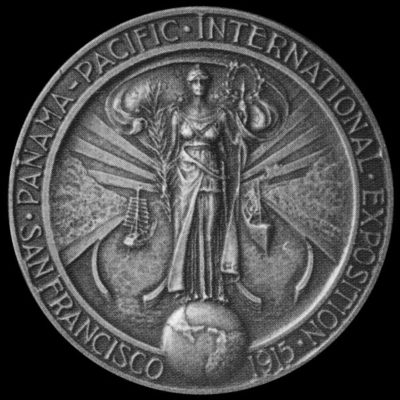
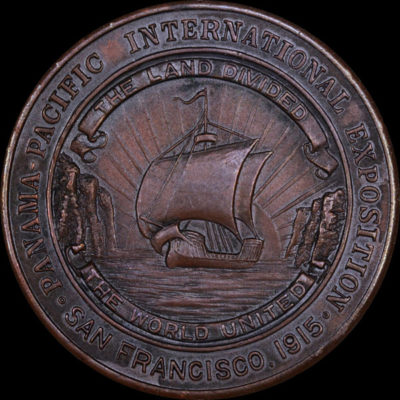
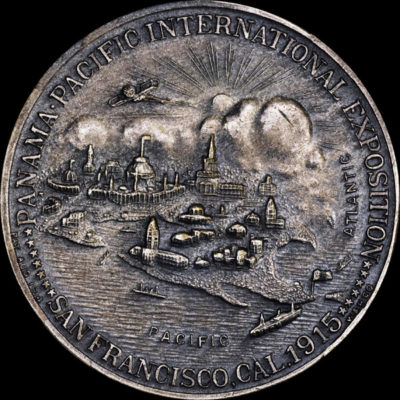
1915 · SH 18-4 BZ · Bronze · 1915 Panama-Pacific International Exposition
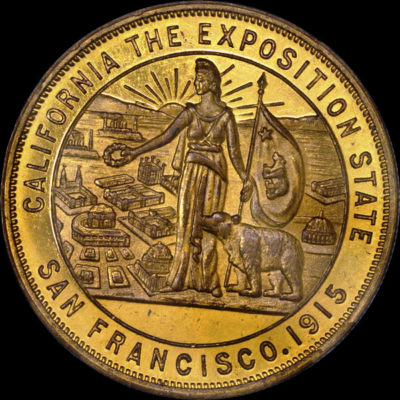
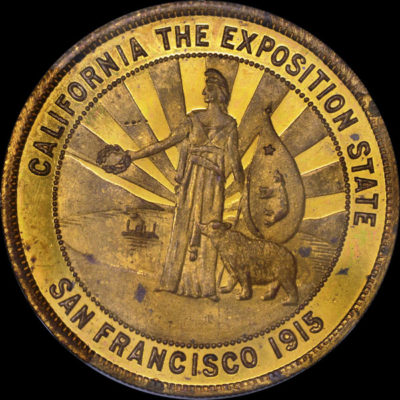
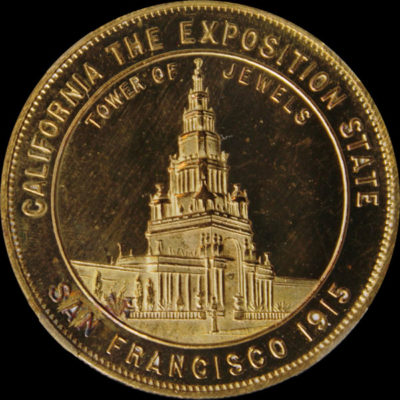
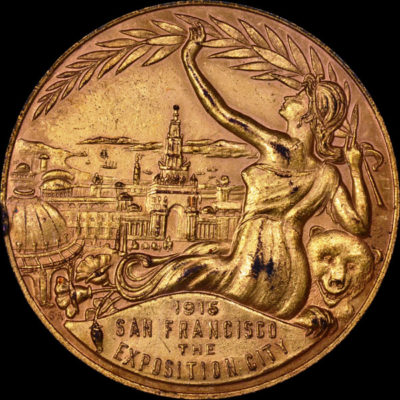
Standing Minerva with a grizzly bear at her side and the exposition grounds in the…
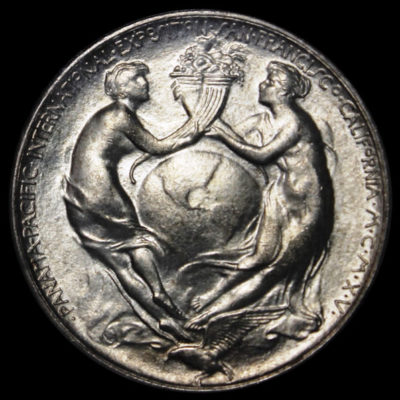
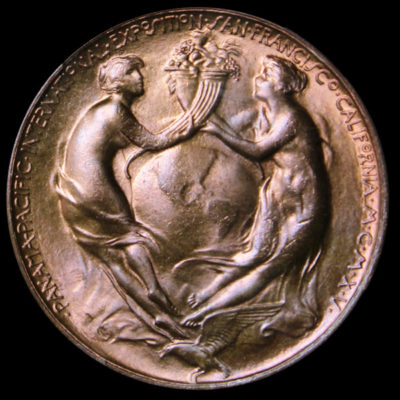
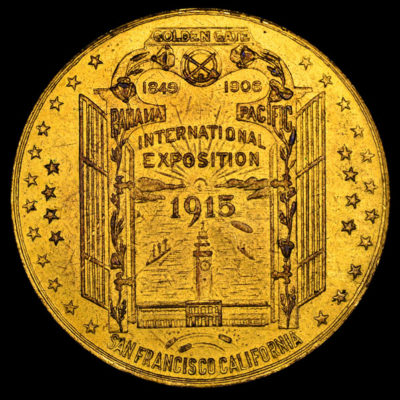
Uniface Columbia
1915 · SH 18-27 S · Silver · 1915 Panama-Pacific International Exposition
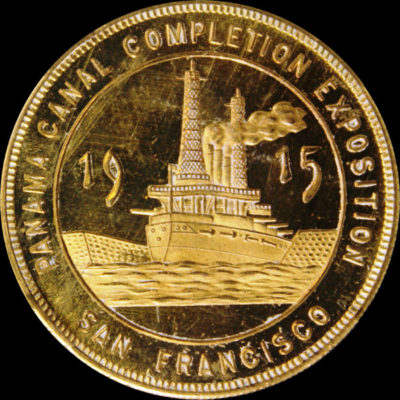
Obverse features Columbia standing on a world globe, behind her are several ships passing through…
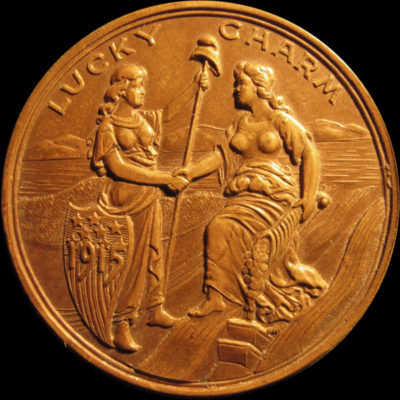
Lucky Charm
1915 · SH 18-28 CU · Copper · 1915 Panama-Pacific International Exposition
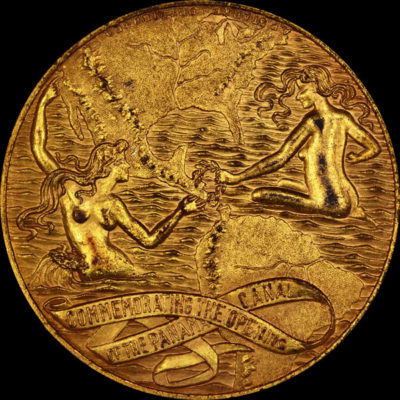
Two females, one standing and one seated looking at each other are shaking hands, likely…
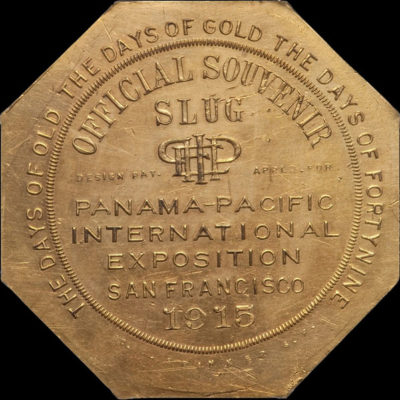
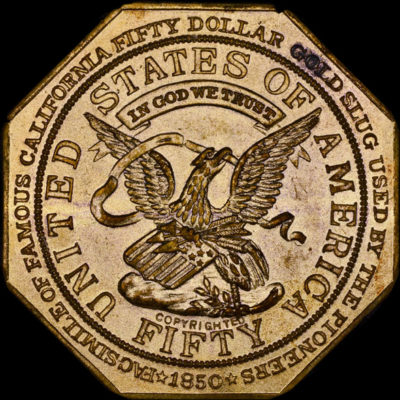
Official Souvenir Slug
1915 · SH 18-29 GP · Gold-Plated · 1915 Panama-Pacific International Exposition
Official Souvenir Slug legend is centered above within the center beaded circle, PPIE below in…
Souvenir Slug Design.Pat Right
1915 · SH 18-30 BZ · Bronze · 1915 Panama-Pacific International Exposition
Souvenir slug legend, without Official, is centered above within the center beaded circle, PPIE below…
Columbia Slug
1915 · SH 18-33 GP · Gold-Plated · 1915 Panama-Pacific International Exposition
A slug facsimile with a design very similar to SH 18-27 with Columbia standing on…
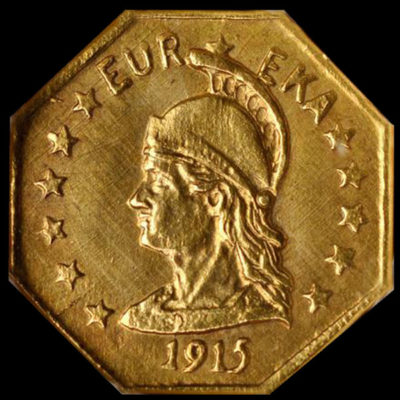
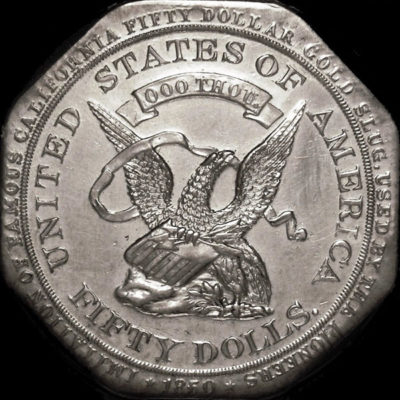
Hart’s Gold Coins of the West 1915, Round Minerva
1915 · SH 18-34 G · Gold · 1915 Panama-Pacific International Exposition
From the M.E. Hart Coins of the Golden West, which is a set of 39…
Hart’s Gold Coins of the West 1915, Octagonal Minerva
1915 · SH 18-35 G · Gold · 1915 Panama-Pacific International Exposition
From the M.E. Hart Coins of the Golden West, which is a set of 39…
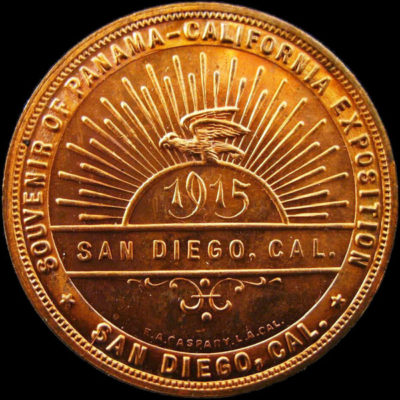
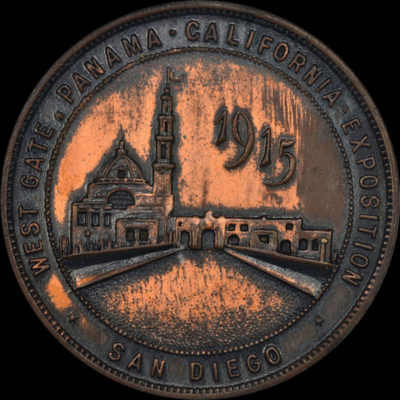
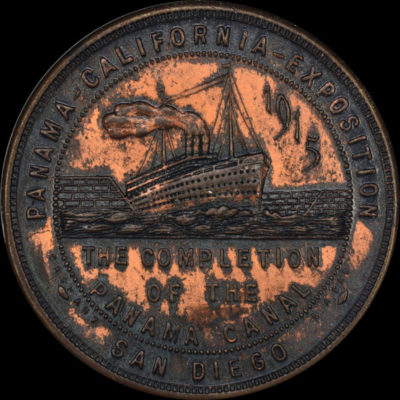
Panama-California West Gate / Canal Opening
1915 · SH 19-4 GP · Gold-Plated · 1915-16 Panama-California Exposition
Panama-California Souvenir with Rays / Canal Opening
1915 · SH 19-5 CU · Copper · 1915-16 Panama-California Exposition
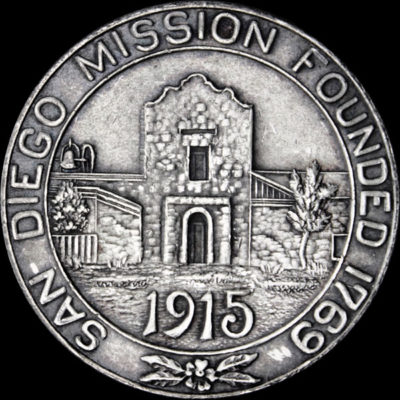
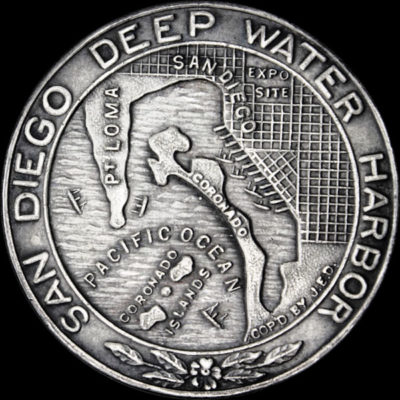
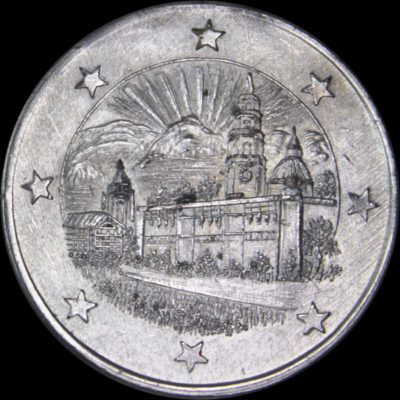
Panama-California Mission / Deep Water Harbor
1915 · SH 19-6 SPBS · Silver-Plated Brass · 1915-16 Panama-California Exposition
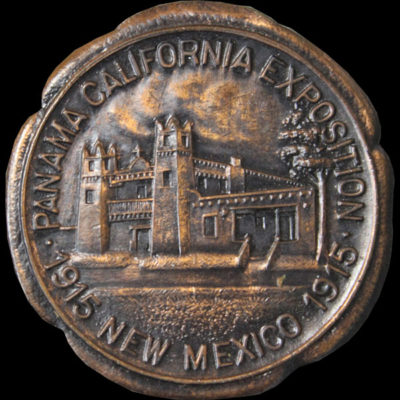
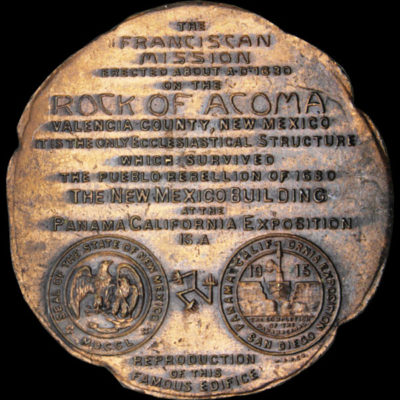
Panama-California New Mexico State
1915 · SH 19-8 ABZ · Antiqued Bronze · 1915-16 Panama-California Exposition

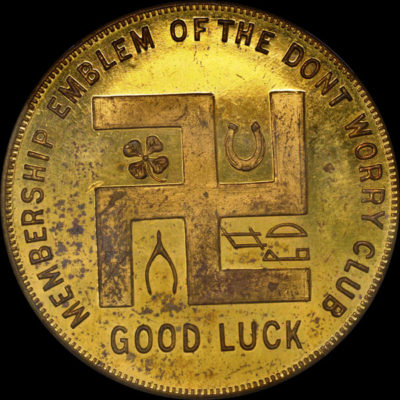
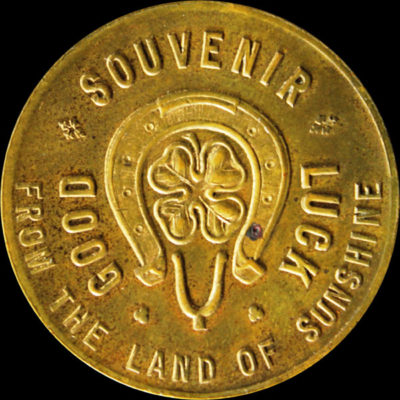
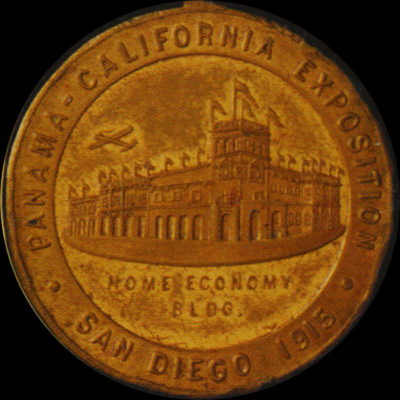
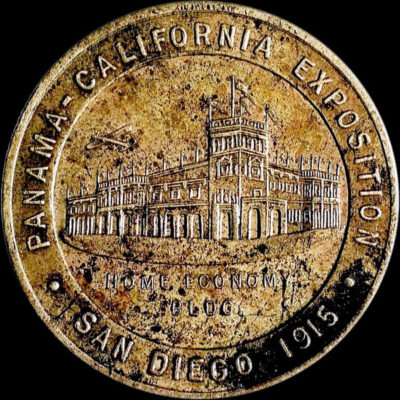
Panama-California Home Economy / Good Luck
1915 · SH 19-9 GP · Gold-Plated · 1915-16 Panama-California Exposition
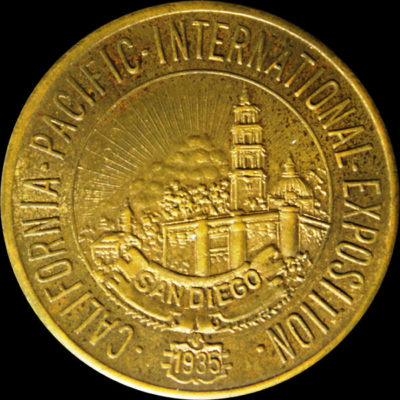
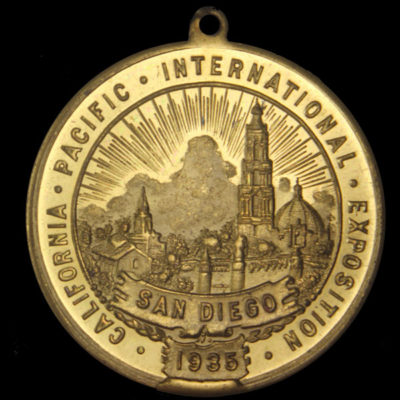
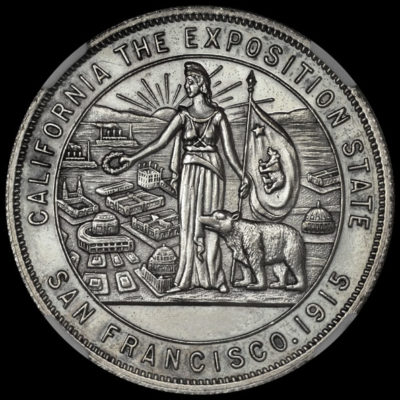
California Pacific International Exposition
1935 · SH 22-1 · 1935-36 California Pacific International Exposition
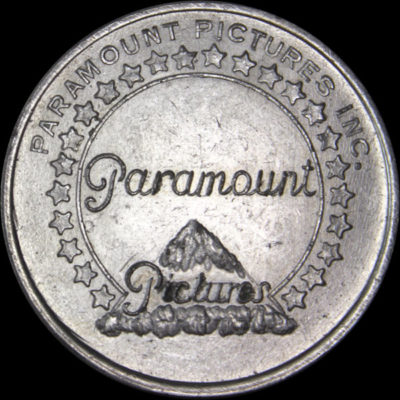
California Pacific Paramount Pictures
1935 · SH 22-2 NPC · Nickel-Plated Copper · 1935-36 California Pacific International Exposition
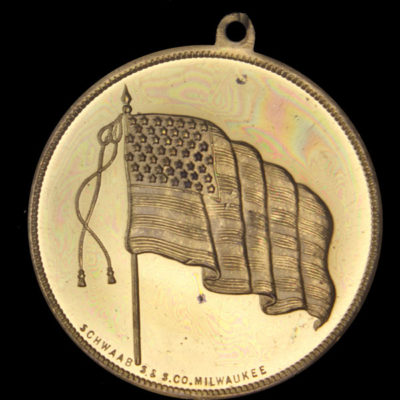
California Pacific U.S. Flag
1935 · SH 22-3 GP · Gold-Plated Brass · 1935-36 California Pacific International Exposition
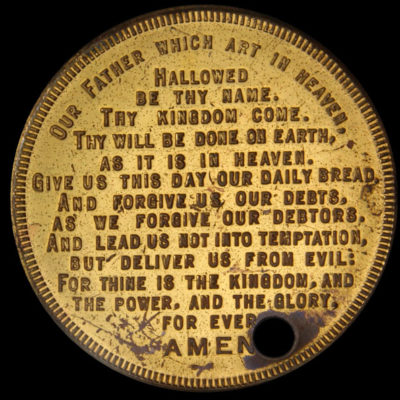
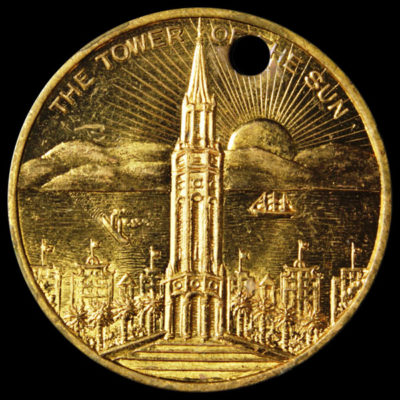
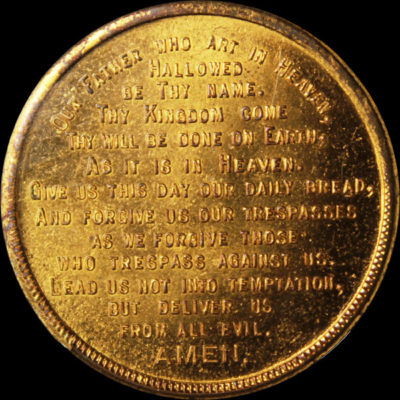
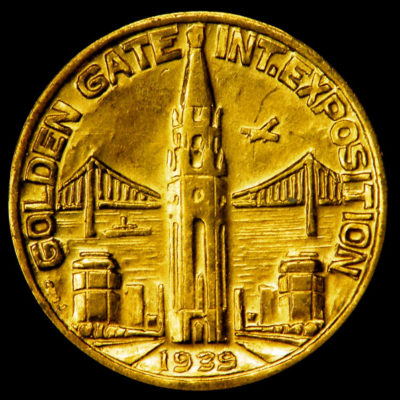
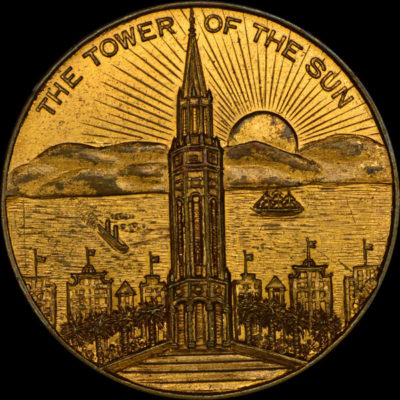
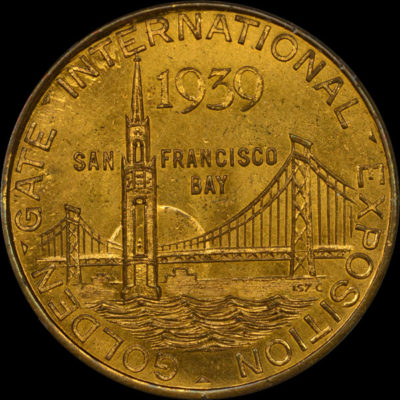
Golden Gate International Exposition Protestant Lord’s Prayer / Tower of Sun
1939 · SH 23-7 GP · Gold-Plated · 1939-40 Golden Gate International Exposition
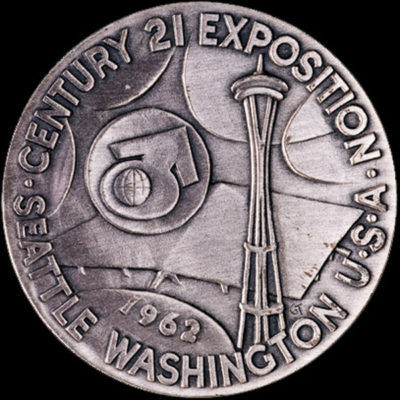
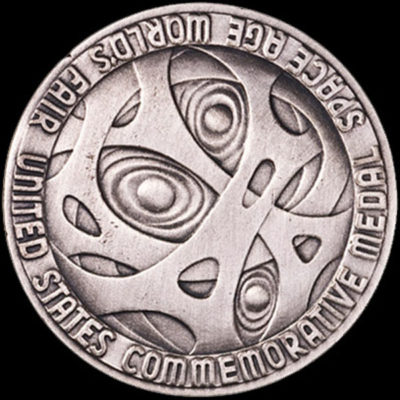
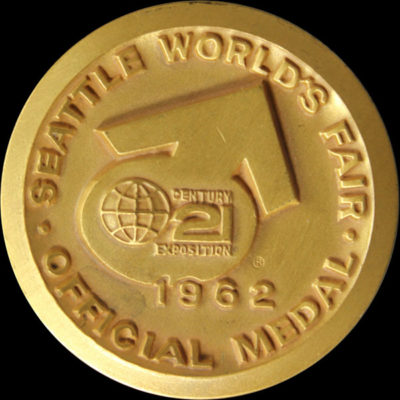
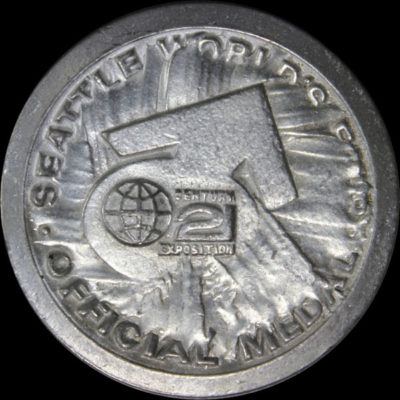
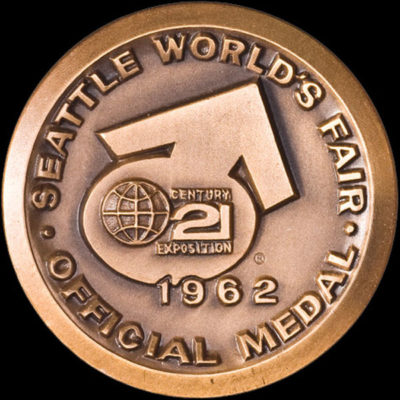
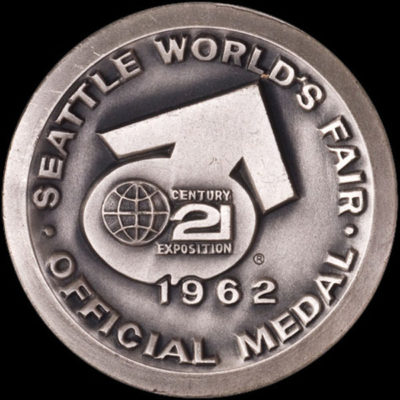
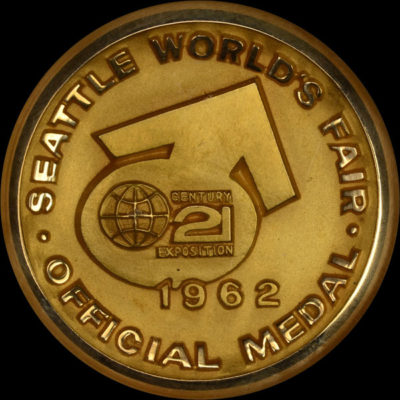
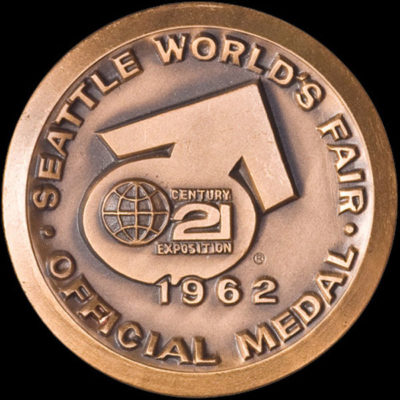
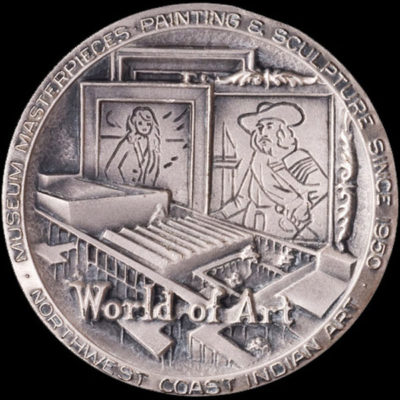
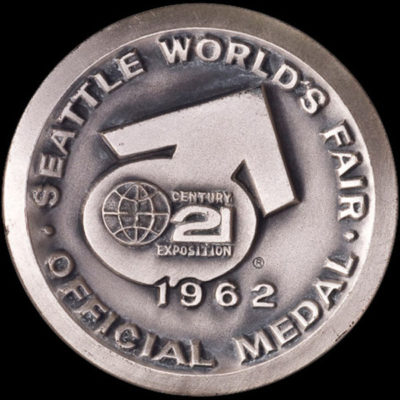
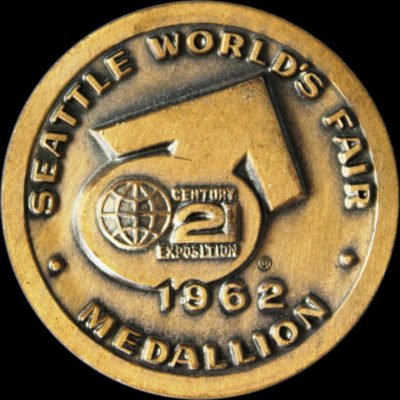
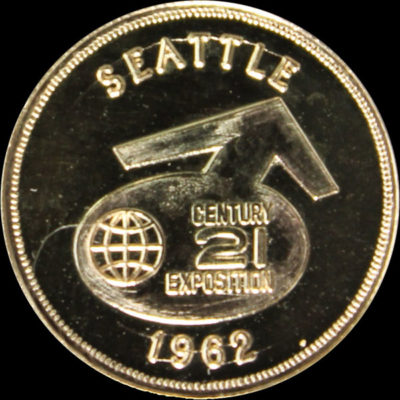
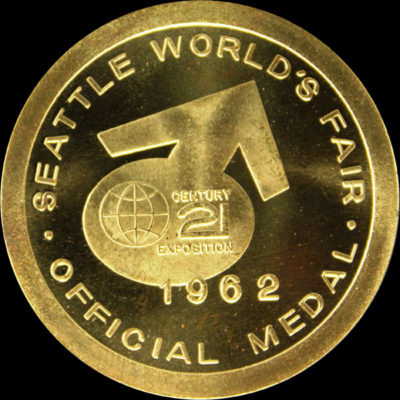
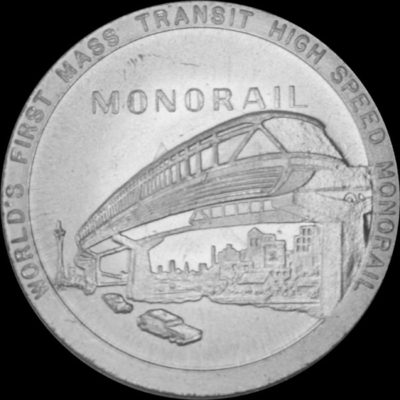
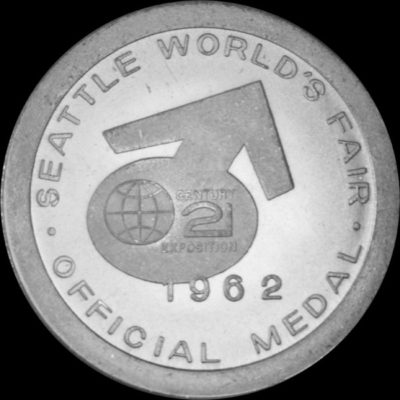
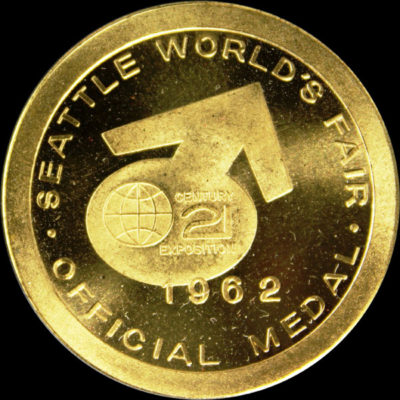
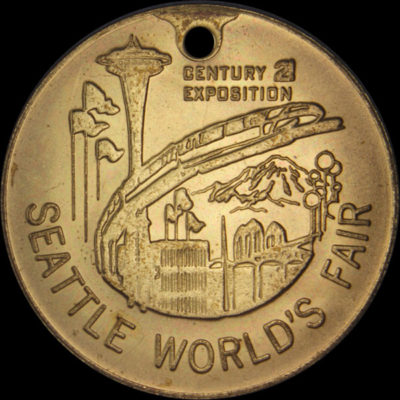
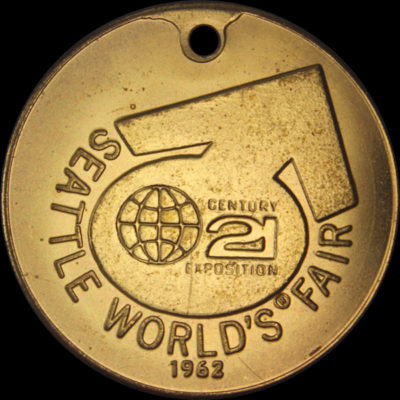
Century 21 Exposition Official
1962 · SH 25-1 · Antiqued Silver · 1962 Seattle World's Fair Exposition
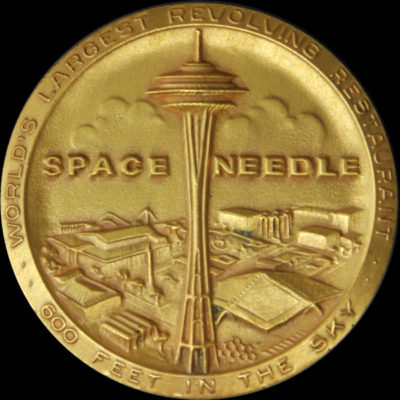
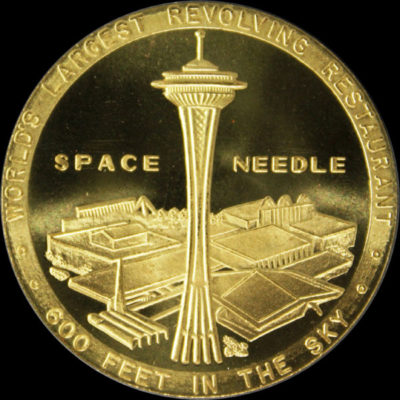
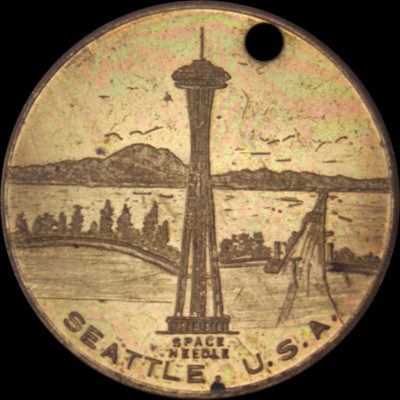
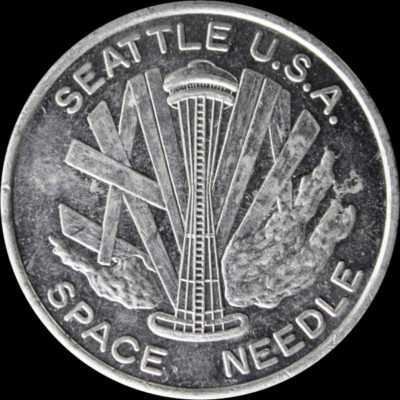
High Relief Space Needle
1962 · SH 25-2 GPBZ · Gold-Plated Bronze · 1962 Seattle World's Fair Exposition


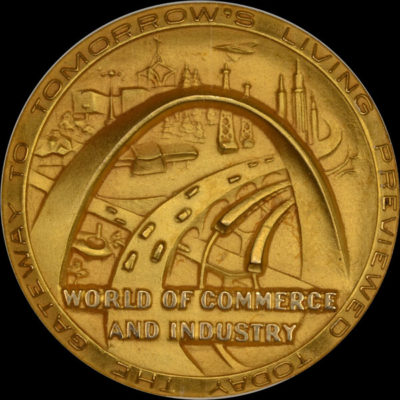
High Relief World of Commerce and Industry
1962 · SH 25-7 G · Gold · 1962 Seattle World's Fair Exposition
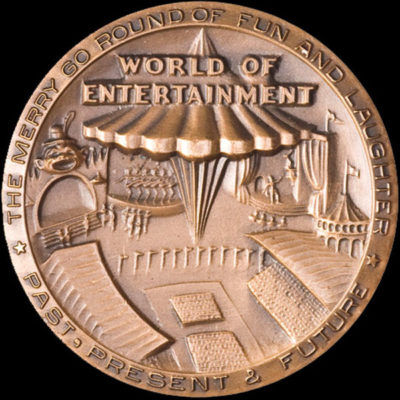
High Relief World of Entertainment
1962 · SH 25-8 BZ · Bronze · 1962 Seattle World's Fair Exposition
High Relief Century 21 Uniface Medallion
1962 · SH 25-10 AYBZ · Antiqued Yellow Bronze · 1962 Seattle World's Fair Exposition
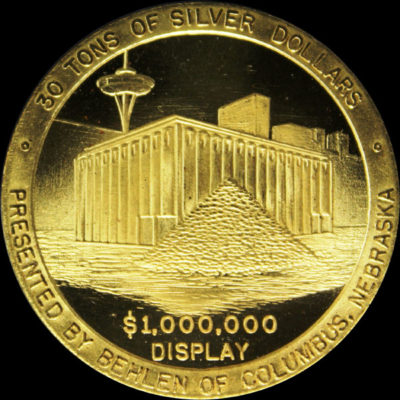
Low Relief Million Dollar Display
1962 · SH 25-14 GP · Gold-Plated · 1962 Seattle World's Fair Exposition


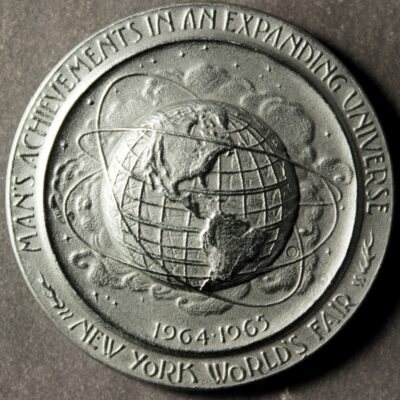
1964 New York World’s Fair Official SCD
1964 · SH 26-1 P · Pewter · 1964 New York World's Fair
The official souvenir medal was copyrighted in 1961 by the New York World’s Fair Corp.…
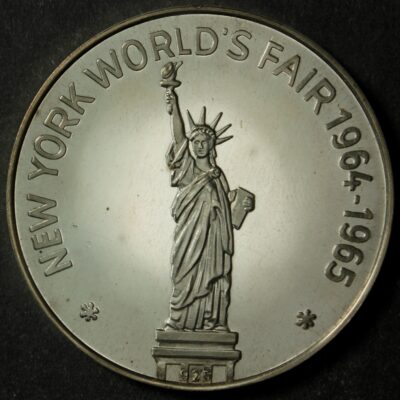

1964 NYWF Hall of Education SCD
1964 · SH 26-2 S · Silver · 1964 New York World's Fair
The Statue of Liberty on the obverse with 925 for silver purity below the base.…
1964 NYWF New York State Exhibit SCD
1964 · SH 26-3 · Antiqued Silver · 1964 New York World's Fair
The NY State Pavilion is superimposed over a low relief map of the state of…
1964 NYWF Georgia Day SCD
1964 · SH 26-4 BZ · Bronze · 1964 New York World's Fair
The authors have never seen this medal, but the American Numismatic Society reportedly has one…
1964 NYWF Illinois Lincoln Peace through Understanding SCD
1964 · SH 26-5 BS · Brass · 1964 New York World's Fair
The obverse depicts a frontal portrait of Abraham Lincoln, with a legend on the reverse.…
1964 NYWF Illinois Lincoln with State Seal SCD
1964 · SH 26-6 BS · Brass · 1964 New York World's Fair
Created by Stafford Manufacturing Company of Brooklyn, N.Y., the obverse features a three-fourths facing view…
1964 NYWF Illinois Lincoln Profile Bust SCD
1964 · SH 26-7 BS · Brass · 1964 New York World's Fair
Created by Stafford Manufacturing Company of Brooklyn, N.Y. with a left facing profile view of…
1964 NYWF Lincoln & Kennedy SCD
1964 · SH 26-8 BS · Brass · 1964 New York World's Fair
Created by Stafford Manufacturing Company of Brooklyn, N.Y. with a right facing profile view of…
1964 NYWF Louisiana Pavilion Rex King SCD
1964 · SH 26-9 GP · Gold-Plated · 1964 New York World's Fair
Mardi Gras style bearded male facing left with a crown and wearing a kingly robe.…
1964 NYWF John F. Kennedy SCD
1964 · SH 26-10 SP · Silver-Plated · 1964 New York World's Fair
Obverse features the bust of Kennedy facing left, 1917 to the left, 1963 to the…
1964 NYWF Kennedy 35th President SCD
1964 · SH 26-11 S · Silver · 1964 New York World's Fair
The obverse features a three fourths facing right bust of Kennedy. The Kennedy Family Crest…
1964 NYWF Kennedy 35th President SCD
1964 · SH 26-11 S · Silver · 1964 New York World's Fair
The obverse features a three fourths facing right bust of Kennedy. The Kennedy Family Crest…
1964 NYWF Jacqueline Kennedy SCD
1964 · SH 26-12 G · Gold · 1964 New York World's Fair
An interesting frontal view of First Lady Jacqueline Kennedy, she is smiling and her eyes…
1964 NYWF Maryland Francis Scott Key Member SCD
1964 · SH 26-13 · Platinum · 1964 New York World's Fair
Designed by James Pearl, a Frederick, MD, artist. Sold to members of the Maryland Francis…
1964 NYWF Oklahoma State Exhibit SCD
1964 · SH 26-14 BZ · Bronze · 1964 New York World's Fair
The Oklahoma medal features an Indian “dream catcher” in the center with six oval circles…
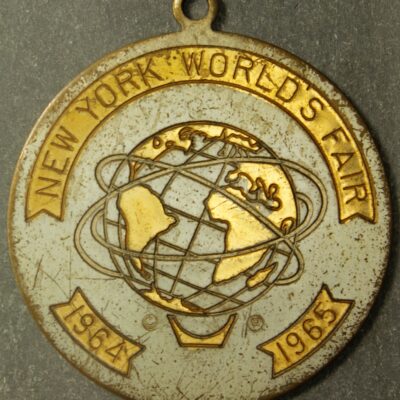

1964 NYWF Unisphere with Dates SCD
1964 · SH 26-15 GP, SP · Gold-Plated, Silver-Plated · 1964 New York World's Fair
A two dimension engraving of the Unisphere on the obverse with NEW YORK WORLD’S FAIR…
1964 NYWF U.S. Steel Corporation SCD
1964 · SH 26-16 WM · White Metal · 1964 New York World's Fair
High relief Unisphere on the obverse. Reverse legend gives information related to the Unisphere, a…
1964 NYWF Morley Studios SCD
1964 · SH 26-17 BS · Brass · 1964 New York World's Fair
The obverse features images of the fair, microscopic signature below MORLEY STUDIOS. A two-dimensional engraving…
1964 NYWF Boy Scout SCD
1964 · SH 26-18 BS · Brass · 1964 New York World's Fair
The Boy Scout emblem, based on a fleur-de-lis symbol, with an eagle and a shield…
1964 NYWF Boy Scout SCD
1964 · SH 26-18 BS · Brass · 1964 New York World's Fair
The Boy Scout emblem, based on a fleur-de-lis symbol, with an eagle and a shield…
1964 NYWF Olympic Team Trials SCD
1964 · SH 26-19 BZ · Bronze · 1964 New York World's Fair
The United States Olympic Team Trials were held in conjunction with the Fair. 2,000 medals…
1964 NYWF Olympic Team Trials SCD
1964 · SH 26-19 BZ · Bronze · 1964 New York World's Fair
The United States Olympic Team Trials were held in conjunction with the Fair. 2,000 medals…
1964 NYWF Singer Bowl Stadium SCD
1964 · SH 26-20 SP · Silver-Plated · 1964 New York World's Fair
The Singer Bowl was an open-air outdoor stadium which held 15,000 people and was used…
1964 NYWF Singer Bowl Stadium SCD
1964 · SH 26-20 SP · Silver-Plated · 1964 New York World's Fair
The Singer Bowl was an open-air outdoor stadium which held 15,000 people and was used…
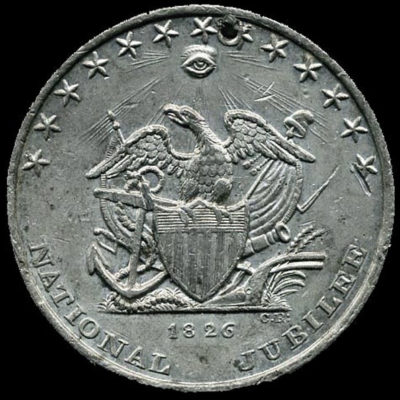
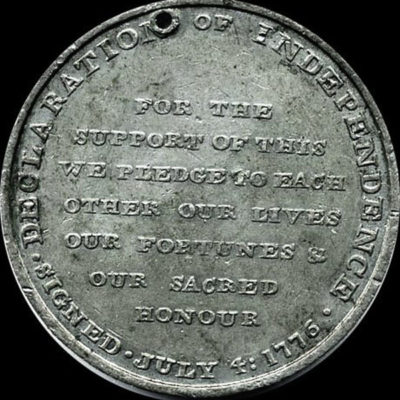
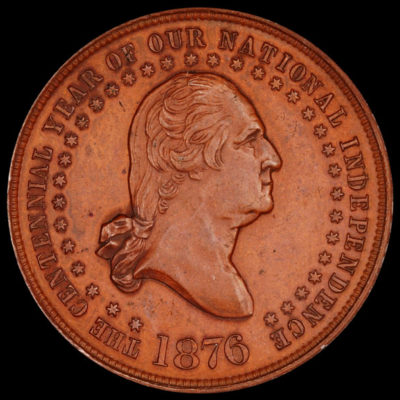
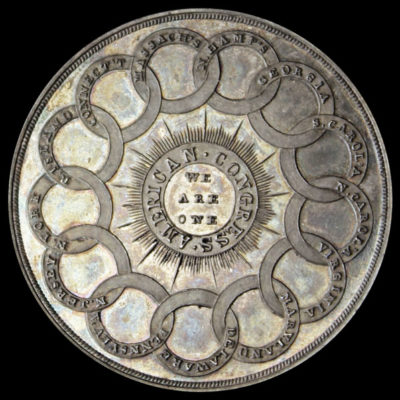
1826 U.S. Semicentennial SCD
1826 · HK-4 · White Metal · 1820
Struck to commemorate the 50th anniversary of the Declaration of Independence. An eagle perched on…
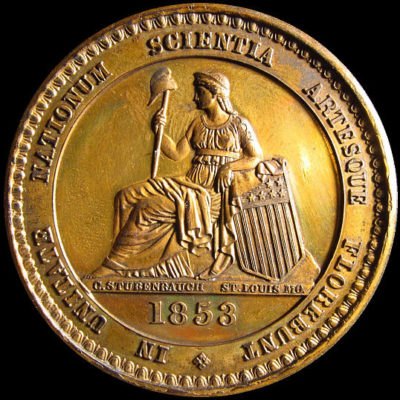
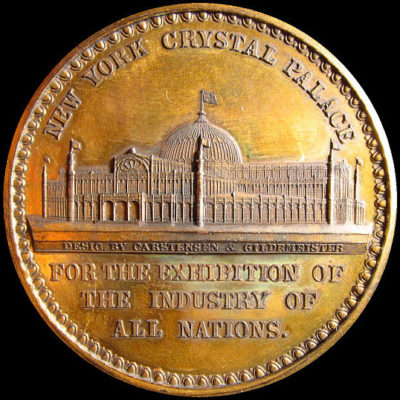
New York Crystal Palace Official Medal
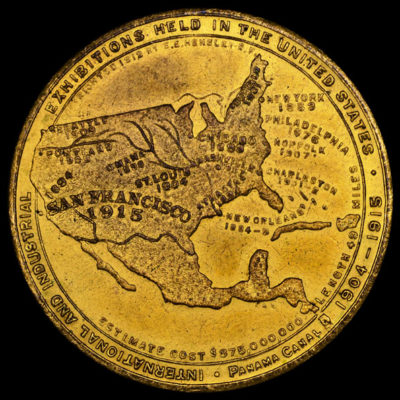
1853 · SH 1-1 BS · HK-5 · Brass · 1853 New York Crystal Palace
Struck for the first “International” Exposition held in the United States, hosted in New York…
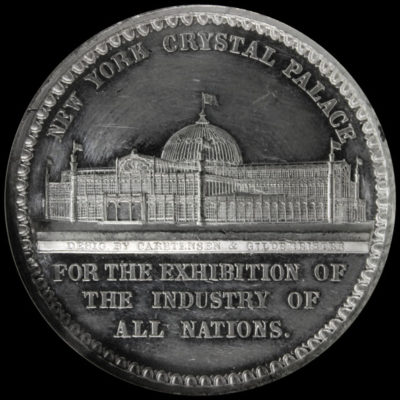
New York Crystal Palace Official Medal
1853 · SH 1-1 WM · HK-6 · White Metal · 1853 New York Crystal Palace
Struck for the first “International” Exposition held in the United States and hosted in New…
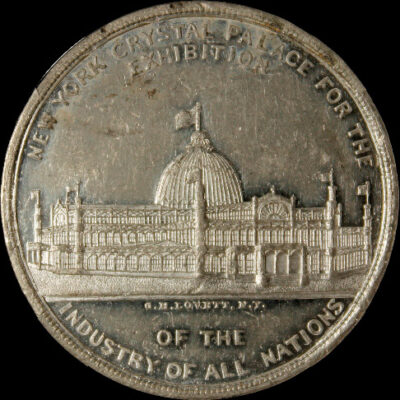
Crystal Palace Industry of All Nations
1853 · SH 1-2 WM · HK-7A · White Metal · 1853 New York Crystal Palace
Engraved by George Hampden Lovett, micro signature G.H. Lovett N.Y. below the building. George Lovett…
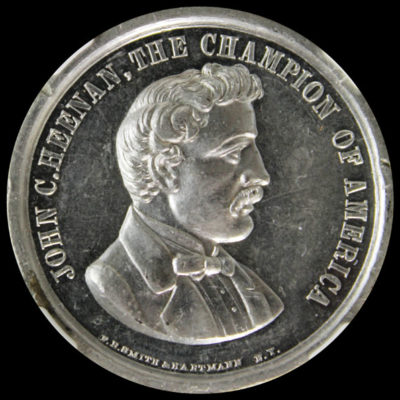
Heenan Boxing Champion of America
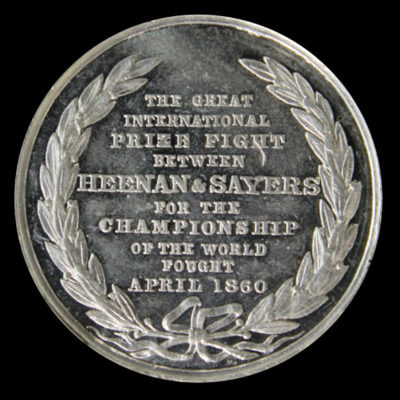
1860 · HK-10 · White Metal · 1860
Bust features John C. Heenan the “Benicia Boy” who won the first clear claim to…
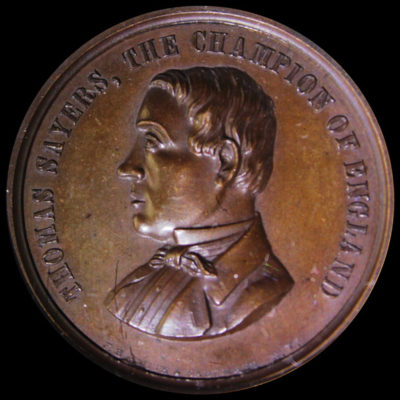
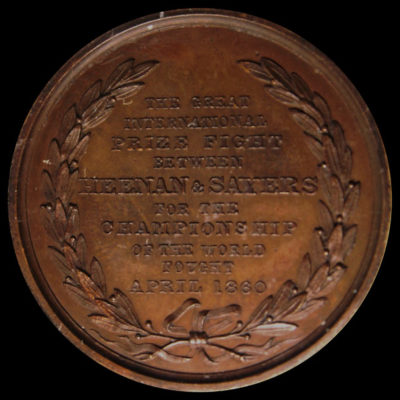
Sayers Boxing Champion of England
1860 · HK-10B · Copper · 1860
The Boxing Champion of England, Thomas Sayers bust adorns the obverse. Struck to commemorate the…
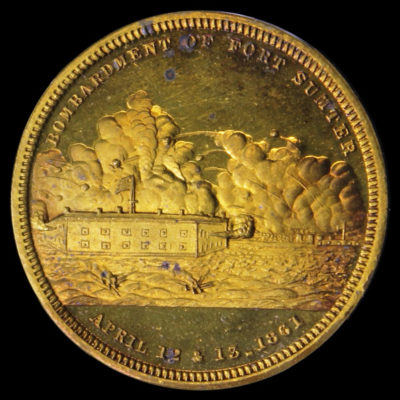
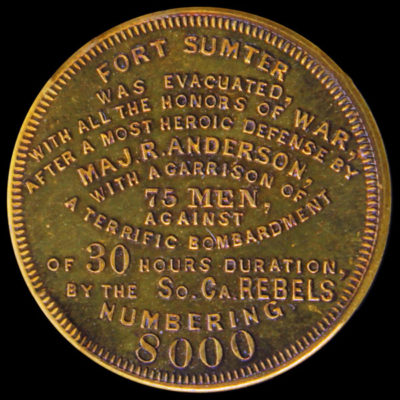
Bombardment of Fort Sumter
1861 · HK-11B · 1860
A battle scene on the obverse depicts exploding bombs and smoke as Fort Sumter is…
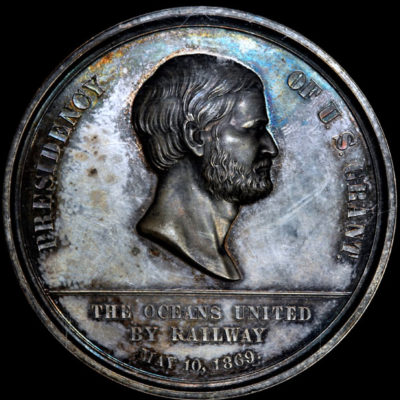
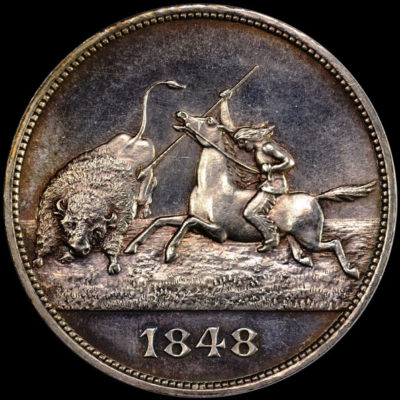
Grant Transcontinental Railway Completion
1869 · HK-12A · 1860
The completion of the first transcontinental railroad was a major technological accomplishment. Only 20 years…
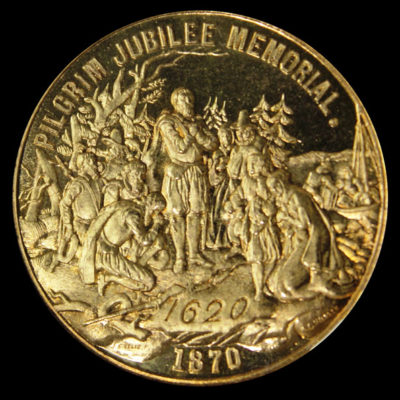
Pilgrim Jubilee Memorial
1870 · HK-15 · Brass · 1870
Struck in 1870 to commemorate the 250th anniversary of the pilgrims voyage on the Mayflower…
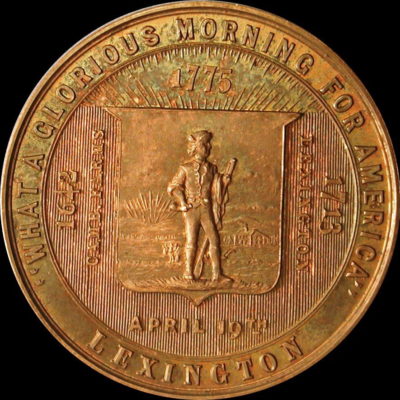
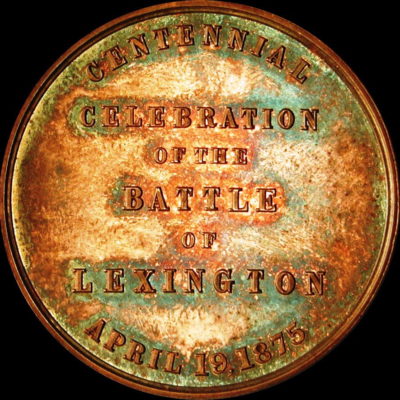
Battle of Lexington Centennial
1875 · HK-16 · 1870
“What a glorious morning for America” Samuel Adams exclaimed after the Battle of Lexington, April…
Battle of Lexington Centennial
1875 · HK-17 · 1870
“What a glorious morning for America” Samuel Adams exclaimed after the Battle of Lexington, April…
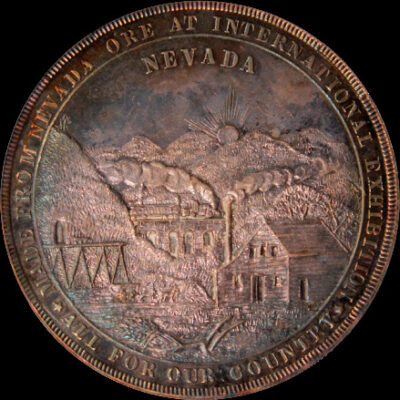
Centennial Exposition Nevada
1876 · SH 2-2 S · HK-19 · Silver · 1876 U.S. Centennial Exposition
Made of pure silver crushed from Nevada ores at the Nevada quartz mill located in…
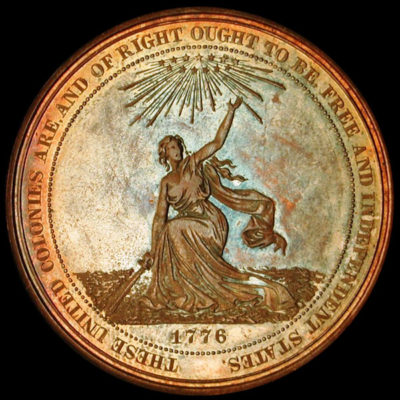
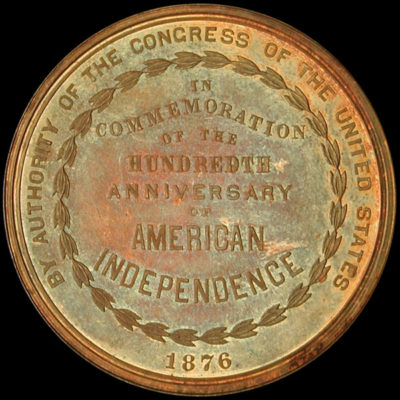
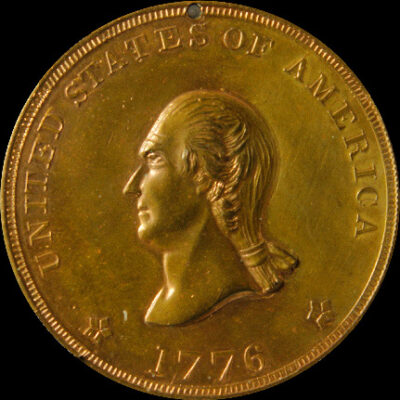
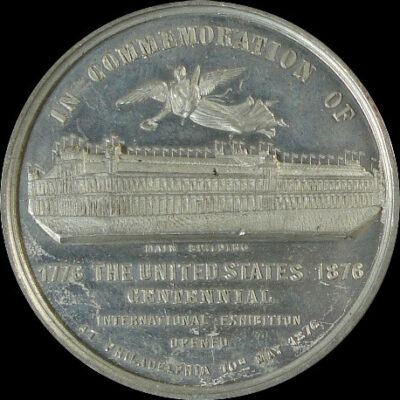
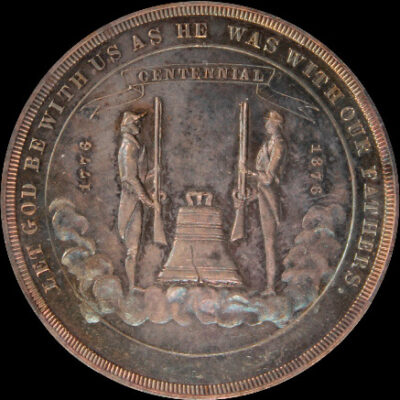
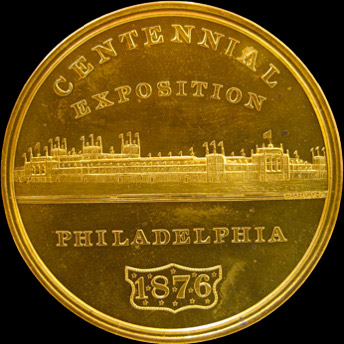
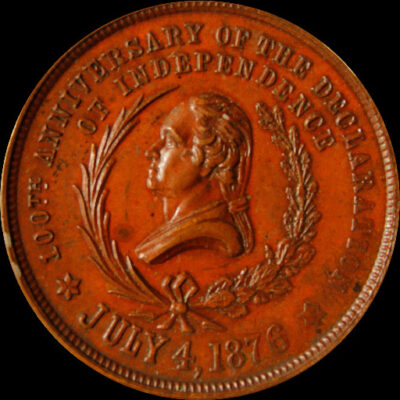
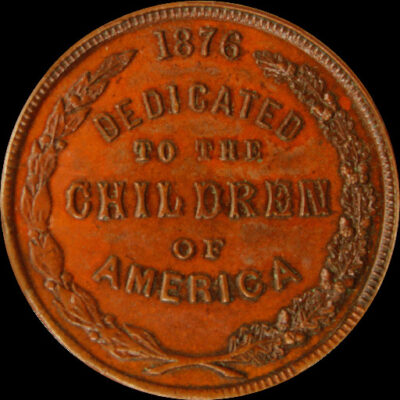
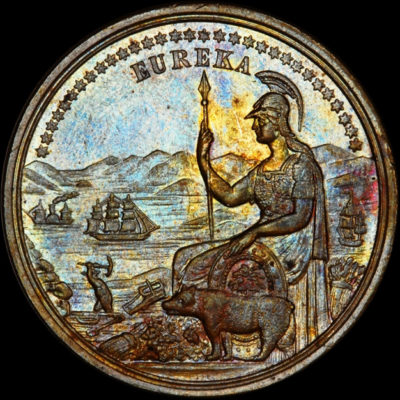
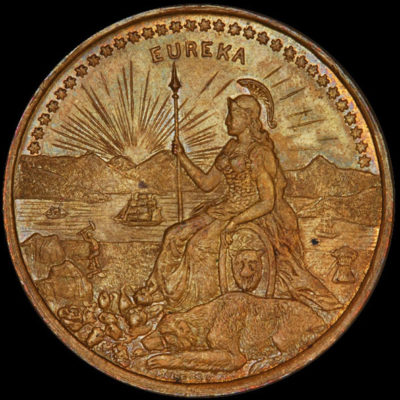
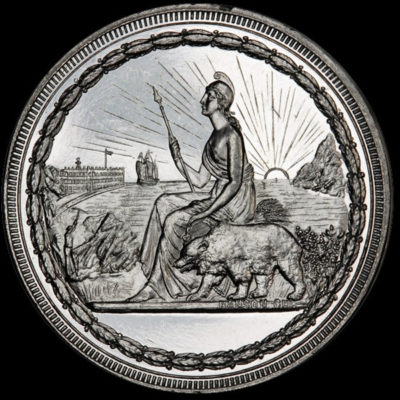
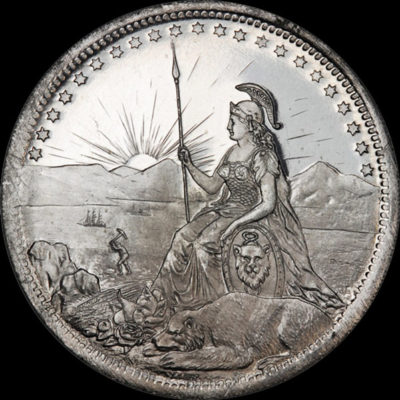
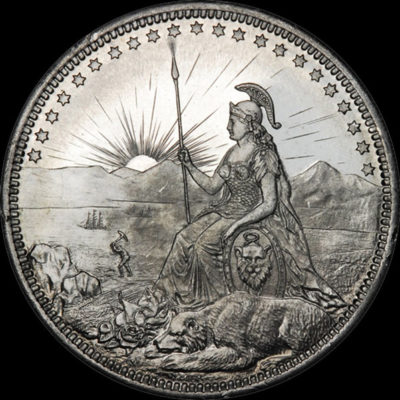
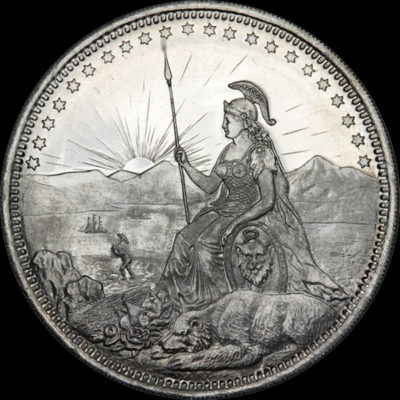
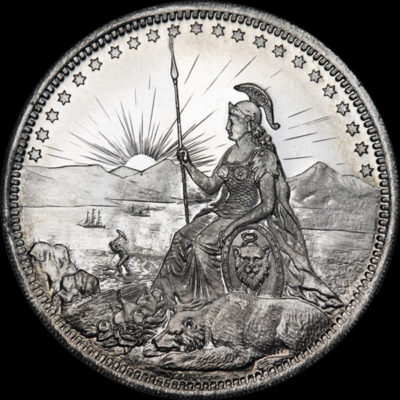
Centennial Exposition Official Medal
1876 · SH 2-1 S · HK-20 · Silver · 1876 U.S. Centennial Exposition
This medal depicts a female (Liberty) as a symbol of the United States rising up…
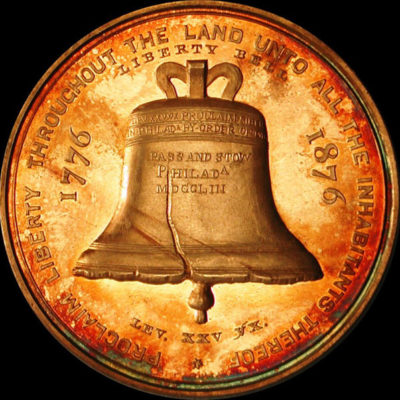
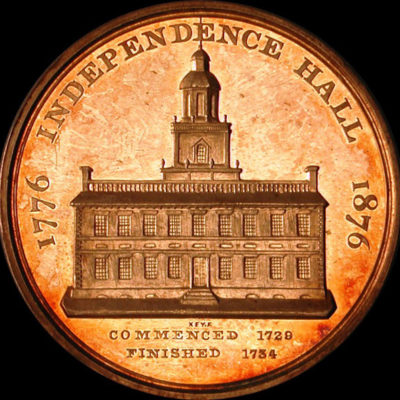
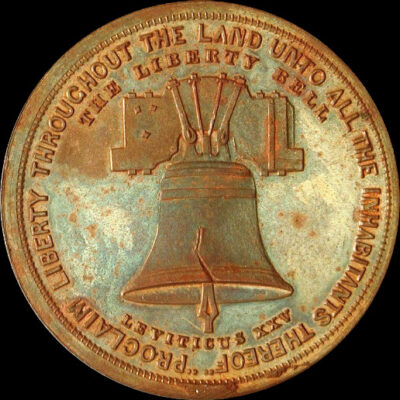
Centennial Exposition Liberty Bell/Independence Hall
1876 · SH 2-3 S PR · HK-23 · Silver Proof · 1876 U.S. Centennial Exposition
The Liberty Bell was on display at the Centennial Exposition held in Philadelphia. The dates…

Centennial Small Liberty Bell No Star / Independence Hall With Trees
1876 · SH 2-46 CU · HK-27 · Copper · 1876 U.S. Centennial Exposition
The smaller Liberty Bell no star variety is considerably scarcer than the star variety. Struck…
Centennial Small Liberty Bell With Star / Independence Hall With Trees
1876 · SH 2-45 S · HK-27B · Silver · 1876 U.S. Centennial Exposition
The smaller Liberty Bell design is found with and without a star at 6:00 in…
Centennial Washington Military Bust / Liberty Bell
1876 · SH 2-5 CU · HK-31 · Copper · 1876 U.S. Centennial Exposition
The military bust of Washington is signed Key F. below the bust, made by William…
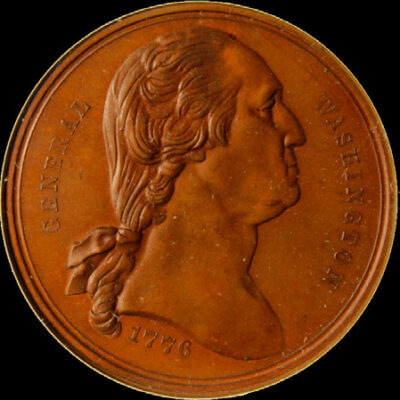
Centennial Washington Large Bust / Liberty Bell
1876 · SH 2-11 CU · HK-32A · Copper · 1876 U.S. Centennial Exposition
The Washington bust design engraved by Soley is combined with the Liberty Bell design engraved…
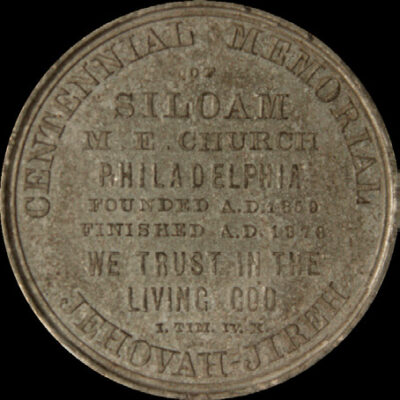
Centennial Liberty Bell / Siloam M.E. Church
1876 · SH 2-35 WM · HK-33B · White Metal · 1876 U.S. Centennial Exposition
As with the prior cataloged so-called dollar, the authors could have opted to exclude this…
Centennial Liberty Bell / Cumberland M.E. Church
1876 · SH 2-36 WM · HK-34B · White Metal · 1876 U.S. Centennial Exposition
As with the two prior cataloged so-called dollars, the authors could have opted to exclude…
Centennial Liberty Bell / Sunday School
1876 · SH 2-34 CU · HK-35 · Copper · 1876 U.S. Centennial Exposition
Authorized to be struck by a church, so an argument could be made that this…
Centennial Liberty Bell / G.A.R. Badge
1876 · SH 2-9 CU · HK-37 · Copper · 1876 U.S. Centennial Exposition
An argument could be made that since the reverse die has a G.A.R Grand Army…
Centennial Washington Military Bust / Independence Hall
1876 · SH 2-6 S · HK-39 · Silver · 1876 U.S. Centennial Exposition
Engraver William H. Key’s signed military bust of Washington is combined with the large Independence…
Centennial Washington Large Bust / Small Independence Hall
1876 · SH 2-13 S · HK-42 · Silver · 1876 U.S. Centennial Exposition
Both dies were engraved by George B. Soley. Soley’s Washington Large Bust die is also…

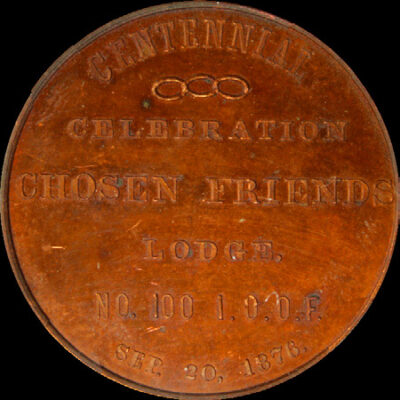
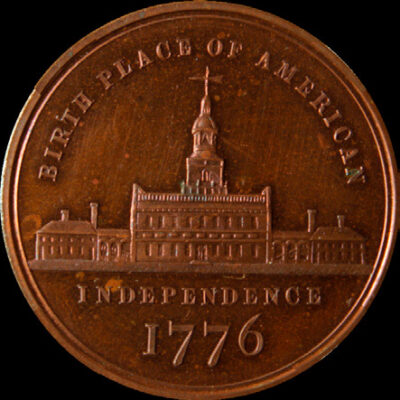
Centennial Independence Hall / Chosen Friends
1876 · SH 2-8 CU · HK-46A · Copper · 1876 U.S. Centennial Exposition
A medal authorized by the Independent Order of Odd Fellows, a non-political and non-sectarian international…
Centennial Small Independence Hall / Star
1876 · SH 2-19 CU · HK-47A · Copper · 1876 U.S. Centennial Exposition
Soley’s Independence Hall obverse die and his Star reverse die with legend stating it was…
Centennial Seated Liberty / Small Independence Hall
1876 · SH 2-26 WM · HK-51 · White Metal · 1876 U.S. Centennial Exposition
Engraved by George B. Soley, who was a diesinker and worked at the U.S. Mint…

Centennial Washington Large Bust / Seated Liberty
1876 · SH 2-14 CU · HK-53 · Copper · 1876 U.S. Centennial Exposition
Soley’s Seated Liberty design with Liberty sitting on a keystone symbolizes the strength of America…
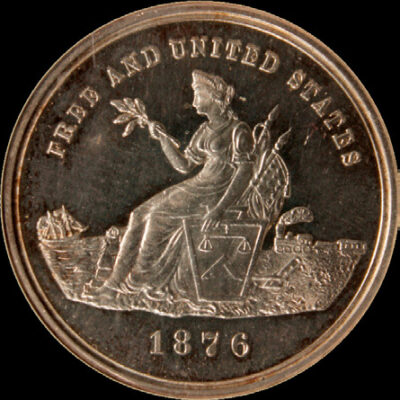
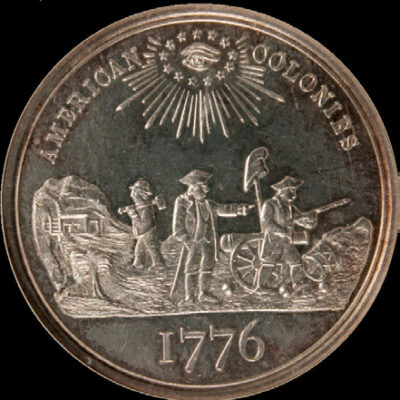
Centennial Seated Liberty / American Colonies
1876 · SH 2-28 S · HK-56 · Silver · 1876 U.S. Centennial Exposition
A seated woman, similar to that on William Barber’s 1873-1885 U.S. Trade Dollars, represents America.…
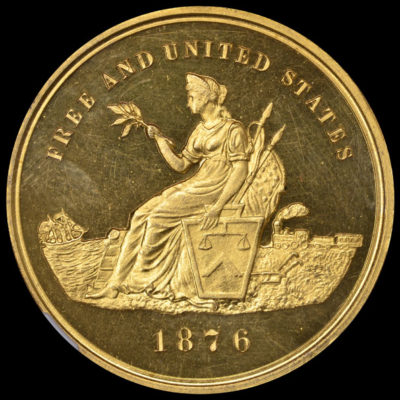
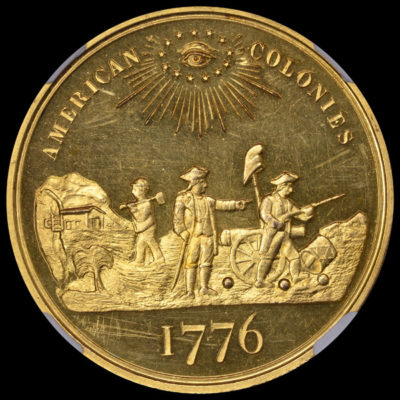
Centennial Seated Liberty / American Colonies
1876 · SH 2-28 GP · HK-58 · Gold-Plated · 1876 U.S. Centennial Exposition
A seated woman, similar to James Longacre’s one-dollar patterns, represents America. The reverse depicts an…

Centennial Fountain / Scrolls
1876 · SH 2-24 S · HK-62 · Silver · 1876 U.S. Centennial Exposition
In the January 1876 issue of the American Journal of Numismatics Henry W. Holland began…

Centennial Washington Large Bust / Centennial Fountain
1876 · SH 2-16 WM · HK-68 · White Metal · 1876 U.S. Centennial Exposition
The Centennial Fountain was funded and built under the direction of the Catholic Church to…
Centennial Fountain / Total Abstinence
1876 · SH 2-23 S · HK-69A · Silver · 1876 U.S. Centennial Exposition
The Centennial Fountain design is found in two varieties, with and without a comma following…
Centennial Washington Military Bust / Scrolls
1876 · SH 2-7 WM · HK-70B · White Metal · 1876 U.S. Centennial Exposition
Key’s signed military bust of Washington with an unsigned arabesque scrolls reverse die. Apparently not…
Centennial American Colonies / Star
1876 · SH 2-21 CU · HK-72C · Copper · 1876 U.S. Centennial Exposition
Soley’s star reverse was struck in five different metals and is found paired with five…
Centennial Declaration of Independence three seated one standing / Commemoration
1876 · SH 2-53 WM · HK-74 · White Metal · 1876 U.S. Centennial Exposition
The obverse, likely engraved by Lovett, features a copy of John Trumbulls painting of the…

Centennial Declaration of Independence Demarest / Washington Ornamental Bust
1876 · SH 2-47 S · HK-75A · Silver · 1876 U.S. Centennial Exposition
The Declaration of Independence die has three different varieties that are found paired with the…

Centennial Declaration of Independence four seated / Washington Ornamental Bust
1876 · SH 2-51 S · HK-79A · Silver · 1876 U.S. Centennial Exposition
The Declaration of Independence die has three different varieties that are found paired with the…


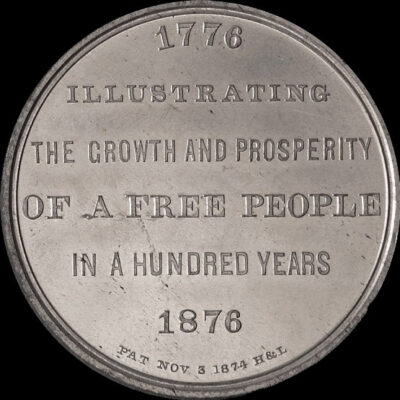
Centennial Main Building / Free People
1876 · SH 2-38 S · HK-81A · Silver · 1876 U.S. Centennial Exposition
The Main Exposition Building adorns the obverse, with microscopic “W.H. Key F” (William H. Key’s…
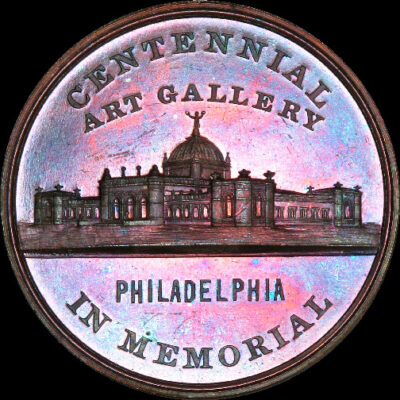
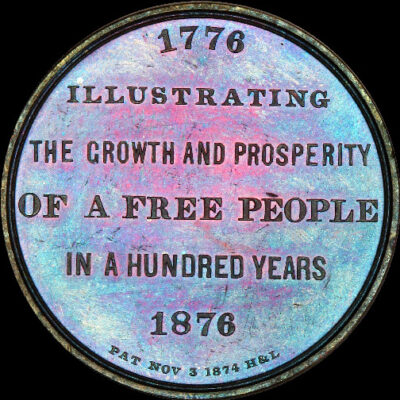
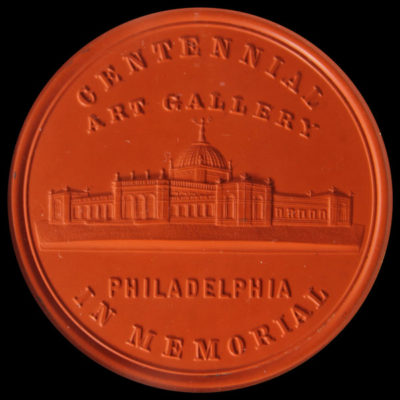
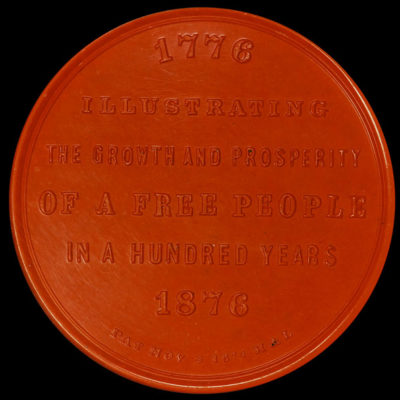
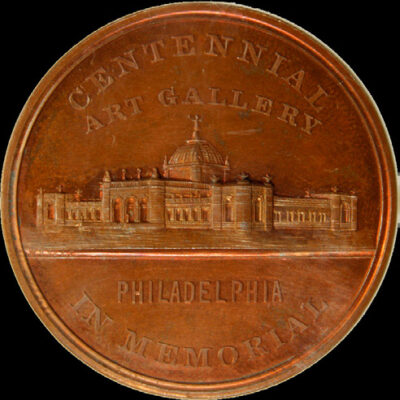
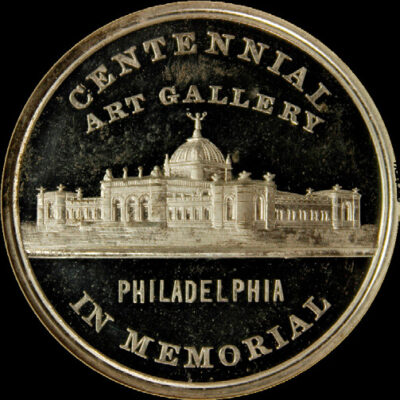
Centennial Art Gallery / Free People
1876 · SH 2-40 CU · HK-83 · Copper · 1876 U.S. Centennial Exposition
The Edifice of the Art Gallery is on the obverse. It is one of the…
Centennial Art Gallery / Free People
1876 · SH 2-40 GUP · HK-86 · Gutta-Percha · 1876 U.S. Centennial Exposition
On the obverse is the Art Gallery Building, constructed for the Centennial Exposition held in…
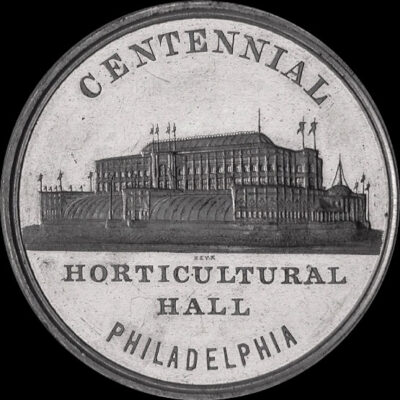
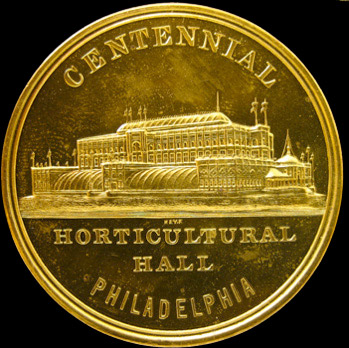
Centennial Horticultural Hall / Free People
1876 · SH 2-39 S · HK-87A · Silver · 1876 U.S. Centennial Exposition
The Horticultural Hall on the obverse, one of the many Centennial So-Called Dollars engraved and…
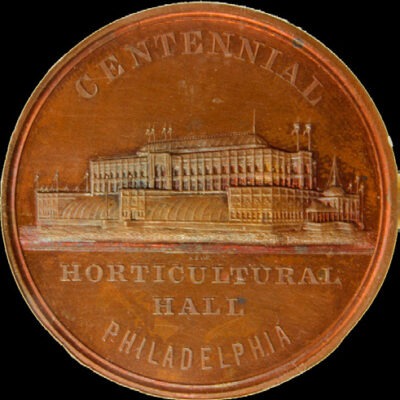
Centennial Art Gallery / Horticultural Hall
1876 · SH 2-43 CU · HK-89 · Copper · 1876 U.S. Centennial Exposition
Key’s Art Gallery die and his Horticultural Hall die are paired on this example.

Centennial Main Building / Art Gallery
1876 · SH 2-41 WM · HK-89A · White Metal · 1876 U.S. Centennial Exposition
Key’s Main Exposition Building die and his Art Gallery die are paired on this example.
Centennial Main Building / Horticultural Hall
1876 · SH 2-42 GP · HK-89F · Gold-Plated · 1876 U.S. Centennial Exposition
Key’s Main Exposition Building die and his Horticultural Hall die are paired on this example.
Centennial Exposition Lovett Battle of Moores Creek Bridge
1876 · SH 2-57 BZ · HK-91 · Bronze · 1876 U.S. Centennial Exposition
The first in a series of eight medals engraved and issued by George Hampden Lovett…
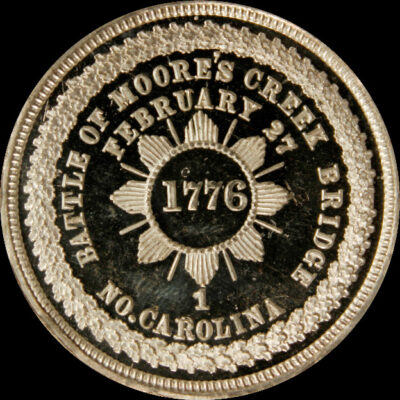
Centennial Lovett Battle of Moores Creek
1876 · SH 2-57 WM · HK-92 · White Metal · 1876 U.S. Centennial Exposition
The first in a series of eight medals with a large bust of Washington, engraved…
Centennial Lovett Battle of Sullivan’s Island
1876 · SH 2-58 S · HK-93 · Silver · 1876 U.S. Centennial Exposition
The second in a series of eight medals with a large bust of Washington, engraved…
Centennial Lovett Battle of Long Island
1876 · SH 2-59 S · HK-96 · Silver · 1876 U.S. Centennial Exposition
The third in a series of eight medals with a large bust of Washington, engraved…
Centennial Lovett Battle of Harlem Plains
1876 · SH 2-60 BZ · HK-100 · Bronze · 1876 U.S. Centennial Exposition
The fourth in a series of eight medals with a large bust of Washington, engraved…

Centennial Lovett Battle of Lake Champlain
1876 · SH 2-61 S · HK-102 · Silver · 1876 U.S. Centennial Exposition
The fifth in a series of eight medals with a large bust of Washington, engraved…
Centennial Lovett Battle of White Plains
1876 · SH 2-62 WM · HK-107 · White Metal · 1876 U.S. Centennial Exposition
The sixth in a series of eight medals with a large bust of Washington, engraved…
Centennial Lovett Battle of Fort Washington
1876 · SH 2-63 S · HK-108 · Silver · 1876 U.S. Centennial Exposition
The seventh in a series of eight medals with a large bust of Washington, engraved…
Centennial Lovett Battle of Trenton
1876 · SH 2-64 BZ · HK-112 · Bronze · 1876 U.S. Centennial Exposition
The eight in a series of eight medals with a large bust of Washington, engraved…
Centennial Children of America
1876 · SH 2-74 BZ · HK-115 · Bronze · 1876 U.S. Centennial Exposition
Another Lovett design using the same central device with a small bust of Washington as…
Centennial Washington and Grant
1876 · SH 2-81 WM · HK-118 · White Metal · 1876 U.S. Centennial Exposition
Standing figures of Washington, who was 6’3’’ tall, and Grant, each with their hand on…
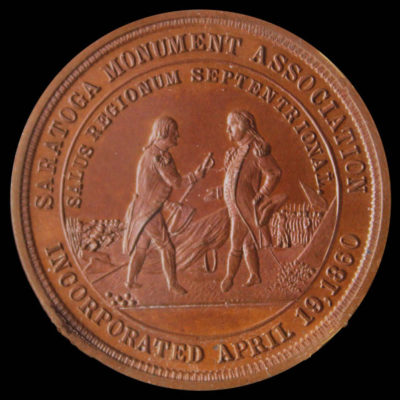
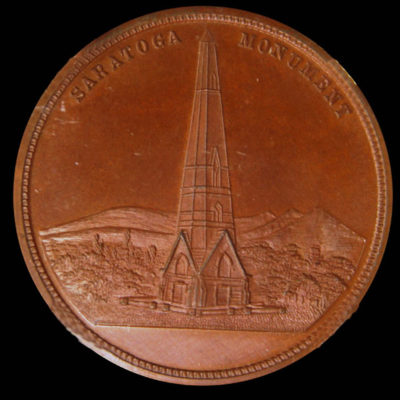
Battle of Saratoga Monument
1877 · HK-119A · Bronze · 1870
Scene portrays British General Burgoyne surrendering to U.S. General Horatio Gates by handing over his…
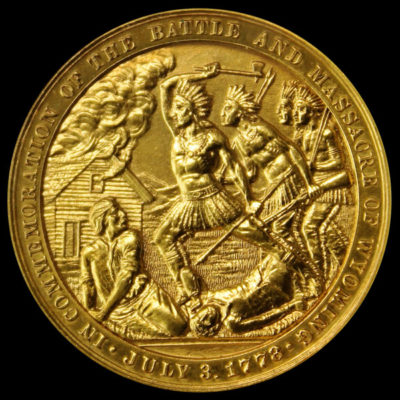
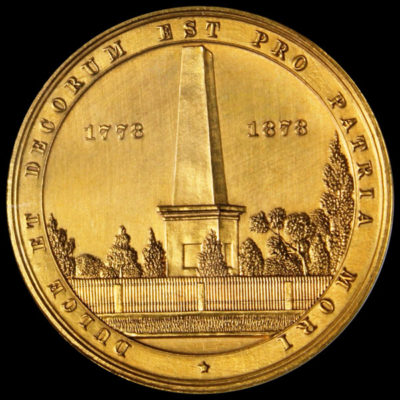
Wyoming Battle & Massacre Centennial
1878 · HK-120C · 1870
Scene on the obverse depicts Indians with tomahawks raised in their hands attacking a family…
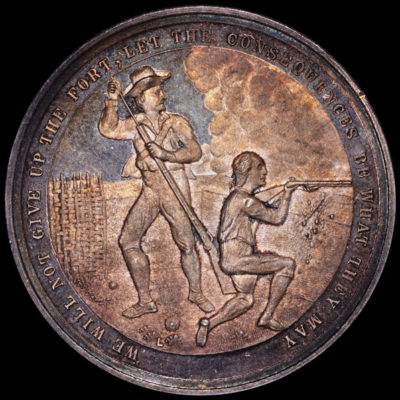
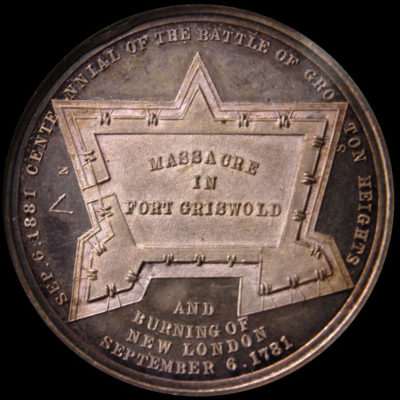
Battle of Groton Heights Centennial
1881 · HK-125C · 1880
The obverse shows two American soldiers reloading and firing their muskets while being attacked by…
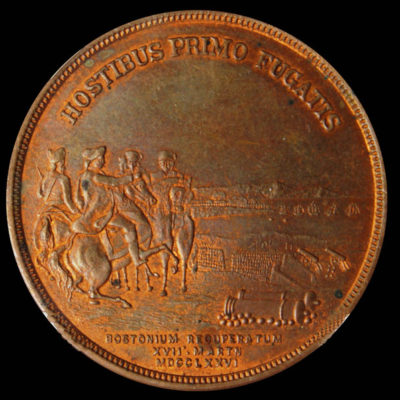
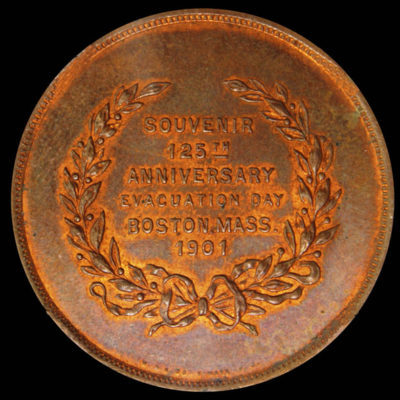
Evacuation of Boston 125th Anniversary
1901 · HK-131 · Copper · 1900
Obverse features General Washington and four aids on horseback at Dorchester Heights overlooking the Boston…
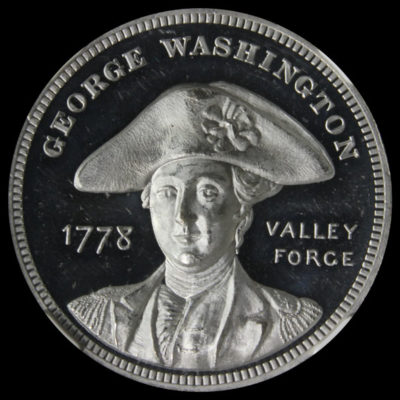
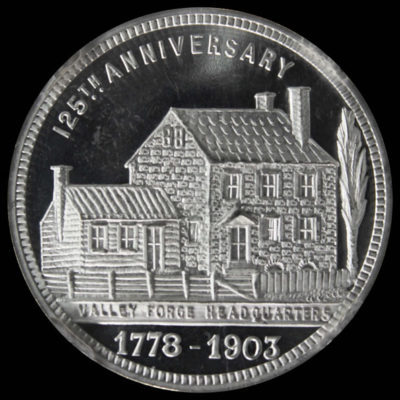
Evacuation of Valley Forge 125th Anniversary
1903 · HK-132 · White Metal · 1900
George Washington in high relief adorns the obverse. Struck to commemorate the 125th anniversary of…

Washington Valley Forge Centennial
1878 · HK-136 · 1870
Engraved by William Barber, the medal commemorates the departure of the Continental Army from Valley…
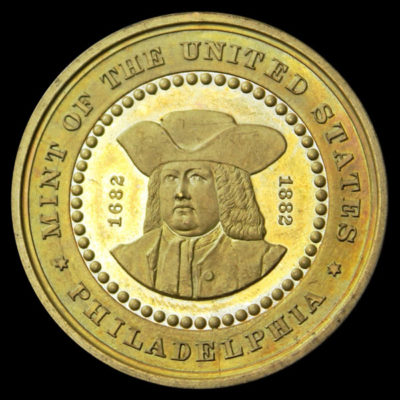
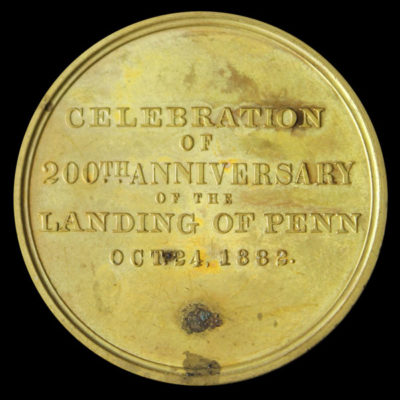
William Penn Pennsylvania Bicentennial Official Medal
1882 · HK-138 · 1880
This medal celebrates the 200th anniversary of the founding of Pennsylvania and the landing of…
William Penn & U.S. Mint Pennsylvania Bicentennial
1882 · HK-139 · 1880
Struck to celebrate the 200th anniversary of the founding of Pennsylvania and the landing of…
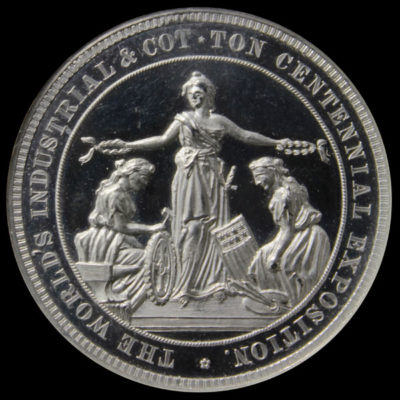
World’s Industrial and Cotton Centennial Exposition Official Medal
1884 · SH 4-1 WM · HK-142 · White Metal · 1884-85 World's Industrial and Cotton Centennial
Engraved by George T. Morgan and struck in the U.S. Mint Exhibit at the Exposition.…
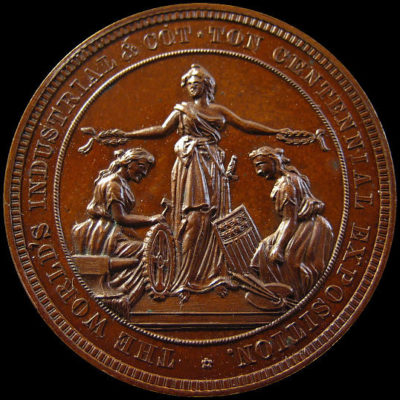
World’s Industrial and Cotton Centennial Exposition Official Medal
1884, 1885 · SH 4-1 BZ · HK-142A · Bronze · 1884-85 World's Industrial and Cotton Centennial
Engraved by George T. Morgan and struck in the U.S. Mint Exhibit at the Exposition.…
Ohio Valley Exposition George Washington
1888 · HK-146 · White Metal · 1888 Ohio Valley and Central States Centennial
The Ohio Valley and Central States Centennial Exposition which ran for 100 days was held…
Ohio Valley and Central States Exposition Official Medal
1888 · SH 5-1 BZ · HK-147A · Bronze · 1888 Ohio Valley and Central States Centennial
A view of the exposition grounds on the obverse, a wreath and legend on the…
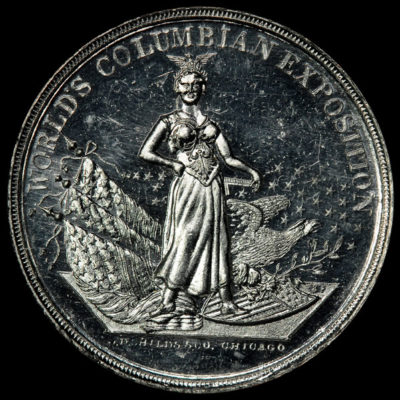
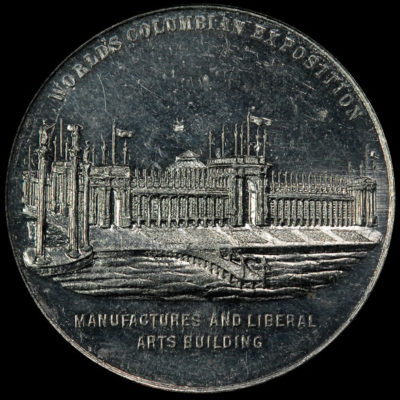
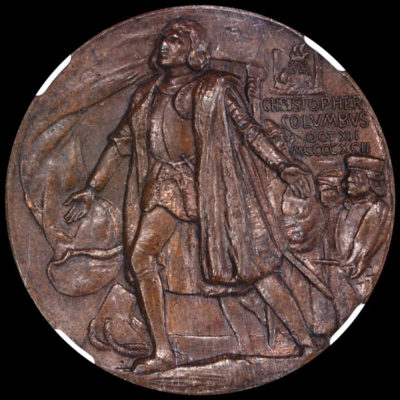
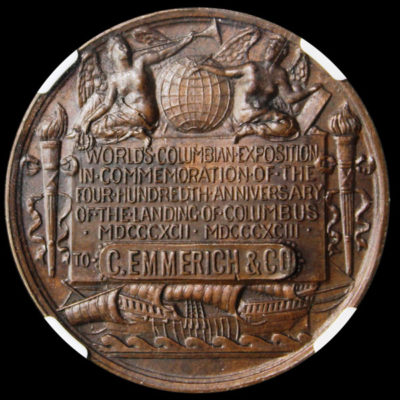
Worlds Columbian Exposition Official Medal Large Letters
1893 · HK-154 · 1893 World's Columbian Exposition
This is the official medal from the Columbian Exposition held to commemorate the 400th anniversary…
Worlds Columbian Exposition Official Medal Small Letters
1893 · HK-155 · 1893 World's Columbian Exposition
Official medal from the Columbian Exposition held to commemorate the 400th anniversary of the Columbus’s…
World’s Columbian Exposition Standing Female/Manufacturers Building
1893 · HK-206 · Aluminum · 1893 World's Columbian Exposition
On the obverse is a standing female, perhaps inviting everyone to come to Chicago and…
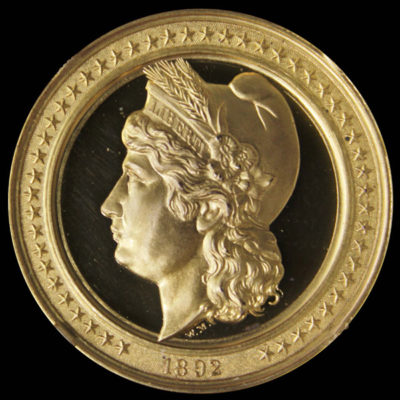
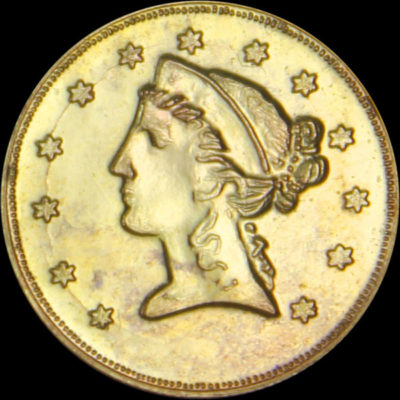
World’s Columbian Exposition Liberty Head Dollar
1893 · HK-221 · Gilt · 1893 World's Columbian Exposition
This beautiful medal which is similar to the bust of a Morgan dollar was struck…
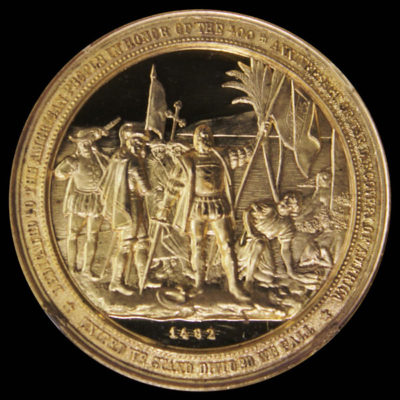
Worlds Columbian Exposition St. Gaudens
1893 · HK-223 · 1893 World's Columbian Exposition
The obverse portrays a smaller version of the Official Award Medal engraved by Augustus Saint…
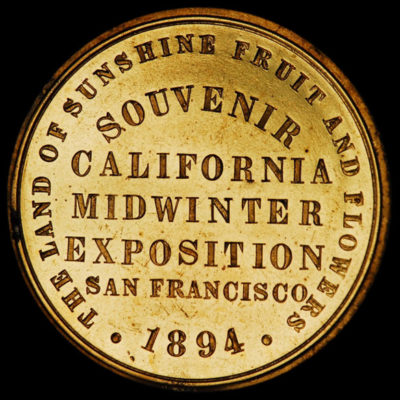
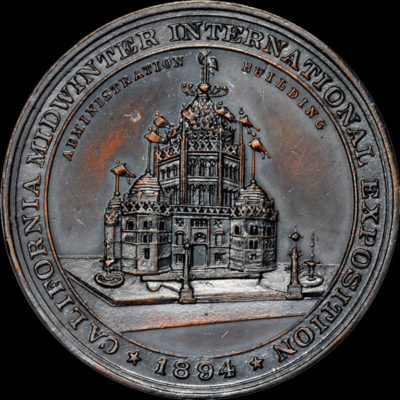
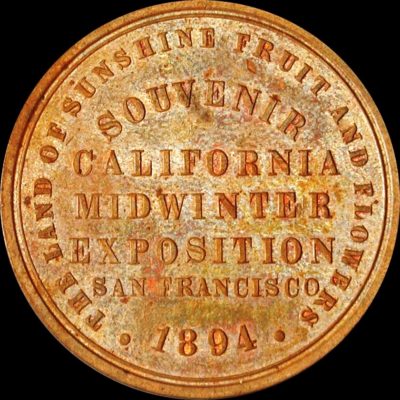
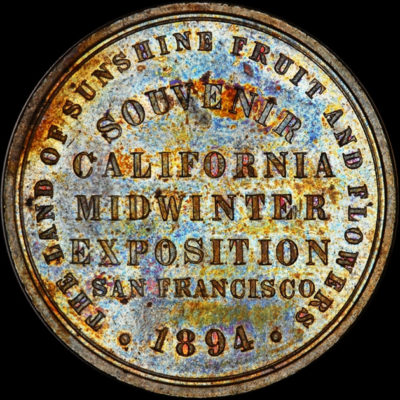
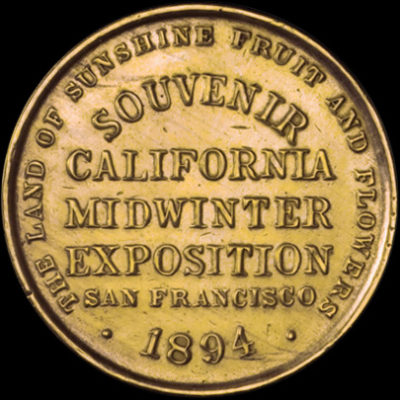
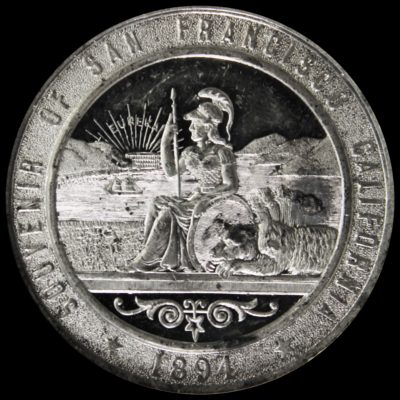
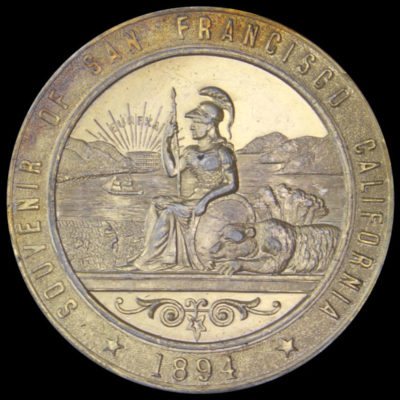
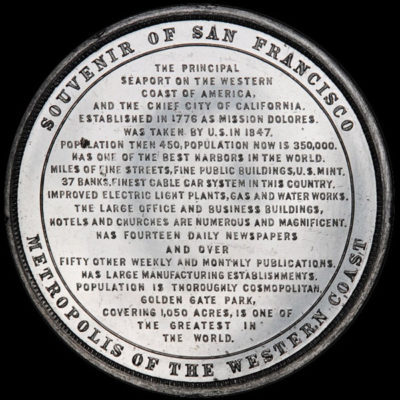
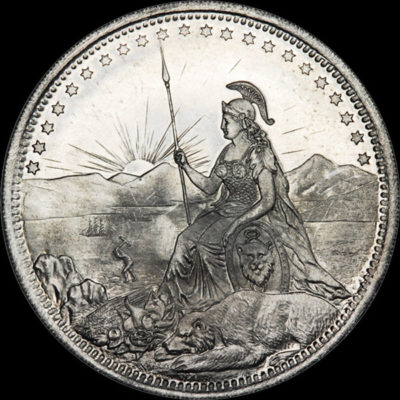
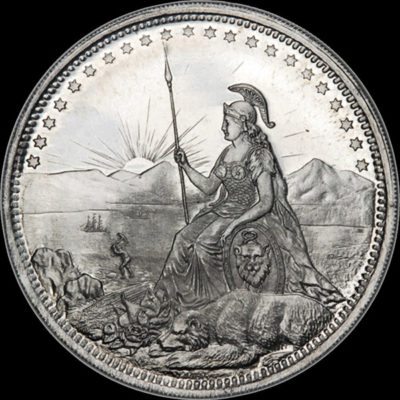
California Midwinter Exposition Official Medal
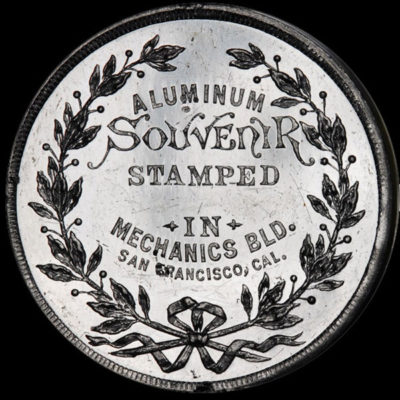
1894 · SH 7-1 GP · HK-245 · Gold-Plated Brass · 1894 California Midwinter International Exposition
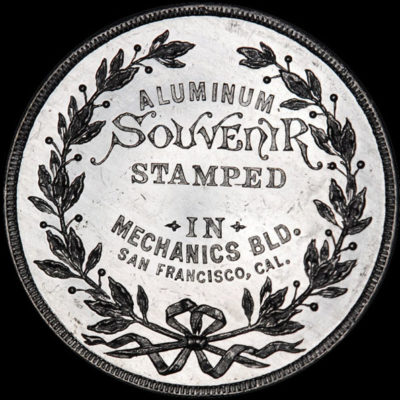
The exposition official medal was struck in the Mechanics Building at the exposition under contract…
California Midwinter Exposition Official Medal
1894 · SH 7-1 BS · HK-245 · Brass · 1894 California Midwinter International Exposition
The exposition official medal was struck in the Mechanics Building at the exposition under contract…
California Midwinter Exposition Official Medal
1894 · SH 7-1 SP · HK-245 · Silver-Plated · 1894 California Midwinter International Exposition
The exposition official medal was struck in the Mechanics Building at the exposition under contract…
Moise State Seal
1894 · SH 7-2 BS · HK-245A · Brass · 1894 California Midwinter International Exposition
Moise State Seal
1894 · SH 7-2 AL · HK-245A · Aluminum · 1894 California Midwinter International Exposition
Moise State Seal
1894 · SH 7-2 GP · HK-245A · Gold-Plated · 1894 California Midwinter International Exposition
Electric Tower – Blumenfield
1894 · SH 7-5 AL · HK-246 · Aluminum · 1894 California Midwinter International Exposition

Firth Wheel – Blumenfield
1894 · SH 7-6 AL · HK-247 · Aluminum · 1894 California Midwinter International Exposition

Michael de Young – Blumenfield
1894 · SH 7-4 WM · HK-248 · White Metal · 1894 California Midwinter International Exposition
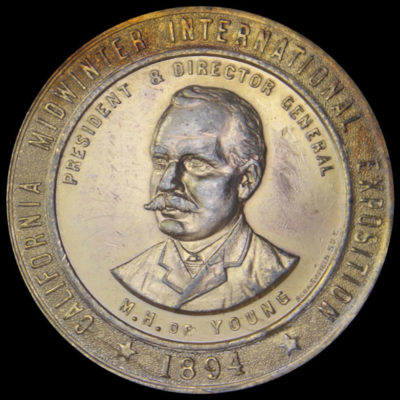
Michael de Young – Blumenfield
1894 · SH 7-4 GPWM · HK-248A · Gold-Plated White Metal · 1894 California Midwinter International Exposition
Early Electric Tower / State Seal – Hanson
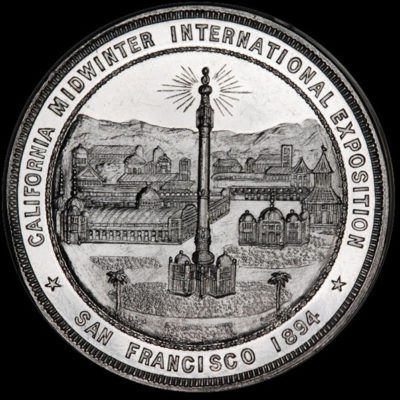
1894 · SH 7-27 AL · HK-249 · Aluminum · 1894 California Midwinter International Exposition
Chicago die engraver C. H. Hanson created a medal based on an artist’s conception of…
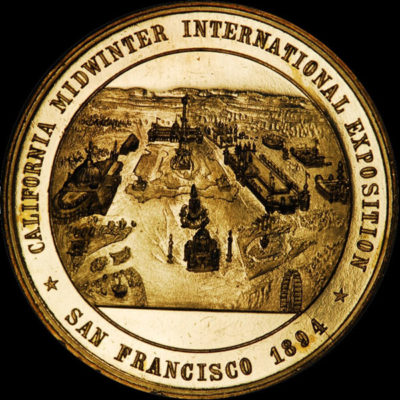
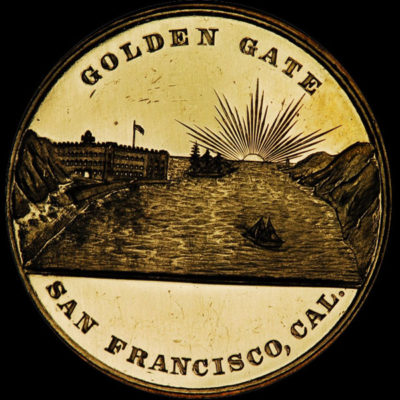
Exposition View / Golden Gate
1894 · SH 7-28 AL · HK-250 · Aluminum · 1894 California Midwinter International Exposition
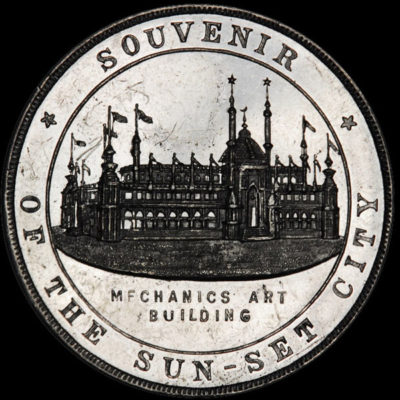
Electric Tower / Mechanics Art
1894 · SH 7-8 AL · HK-251 · Aluminum · 1894 California Midwinter International Exposition
Electric Tower / Stamped in Mechanics Building
1894 · SH 7-9 AL · HK-252 · Aluminum · 1894 California Midwinter International Exposition
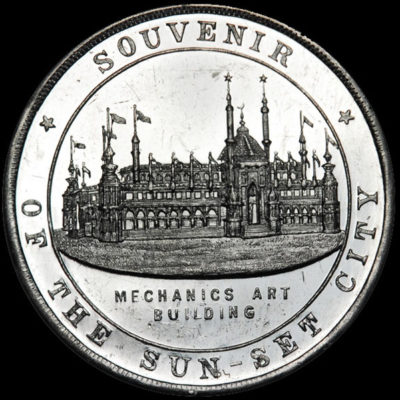
Mechanics Art / Stamped in Mechanics Building
1894 · SH 7-10 AL · HK-253 · Aluminum · 1894 California Midwinter International Exposition
Exposition View / Ornate Five Edifaces – Schwaab
1894 · SH 7-16 AL · HK-254 · Aluminum · 1894 California Midwinter International Exposition
Exposition View / San Francisco Facts – Schwaab
1894 · SH 7-17 AL · HK-255 · Aluminum · 1894 California Midwinter International Exposition
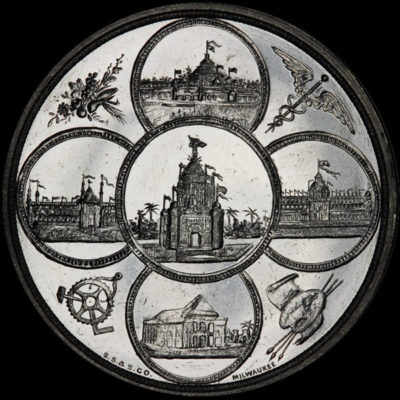
State Seal / Ornate Five Edifaces – Schwaab
1894 · SH 7-18 AL · HK-256 · Aluminum · 1894 California Midwinter International Exposition
State Seal / San Francisco Facts – Schwaab
1894 · SH 7-19 AL · HK-257 · Aluminum · 1894 California Midwinter International Exposition
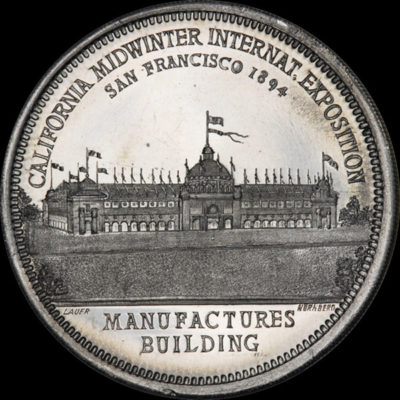
Administration Building – Noble
1894 · SH 7-14 AL · HK-258 · Aluminum · 1894 California Midwinter International Exposition
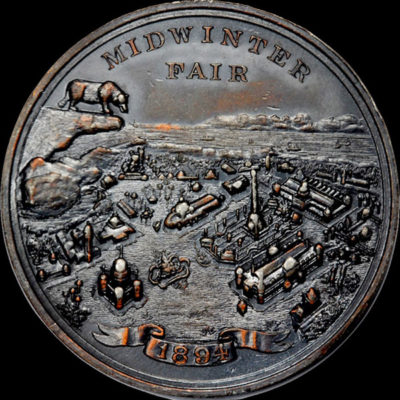
California Midwinter Exposition Grizzly Bear/Exposition View
1894 · SH 7-13 AL · HK-259 · Aluminum · 1894 California Midwinter International Exposition
Obverse shows a California Grizzly Bear on a crag high atop a mountain looking down…

State Seal / Plain Five Edifaces
1894 · SH 7-20 AL · HK-260 · Aluminum · 1894 California Midwinter International Exposition
Ground Breaking Souvenir
1894 · SH 7-3 AL · HK-261 · Aluminum · 1894 California Midwinter International Exposition
Lauer Exposition View
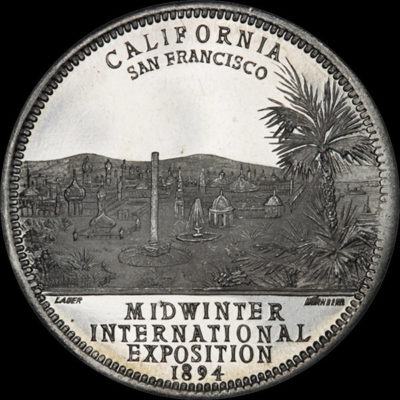
1894 · SH 7-21 AL · HK-262 · Aluminum · 1894 California Midwinter International Exposition
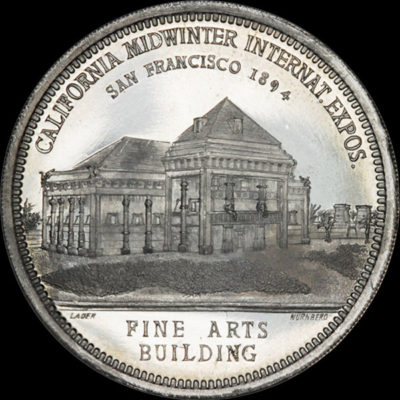
Lauer Fine Arts Building
1894 · SH 7-23 AL · HK-263 · Aluminum · 1894 California Midwinter International Exposition
Lauer Mechanics Building
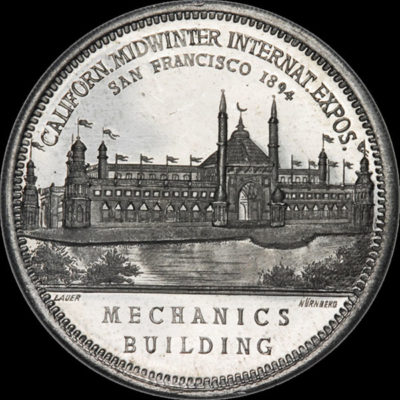
1894 · SH 7-25 AL · HK-264 · Aluminum · 1894 California Midwinter International Exposition
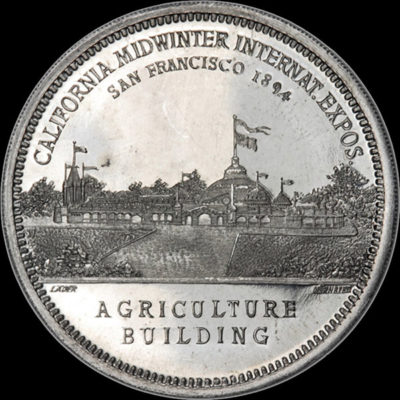
Lauer Agricultural Building
1894 · SH 7-24 AL · HK-265 · Aluminum · 1894 California Midwinter International Exposition
Lauer Manufactures Building
1894 · SH 7-26 AL · HK-266 · Aluminum · 1894 California Midwinter International Exposition
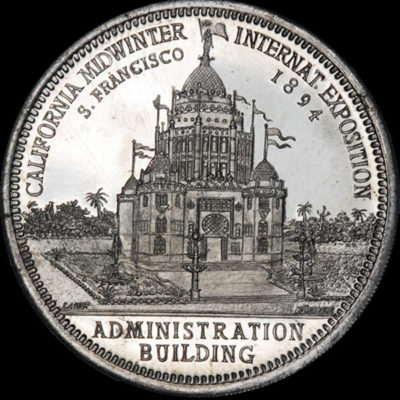
Lauer Administration Building
1894 · SH 7-22 AL · HK-267 · Aluminum · 1894 California Midwinter International Exposition

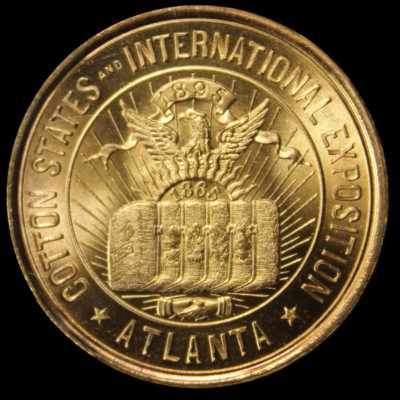
Cotton States & International Exposition Official Medal
1895 · HK-268 · 1895 Cotton States and International Exposition
Designed by Philip Martinez and struck at the U.S. Mint, Philadelphia, the medal symbolizes that…

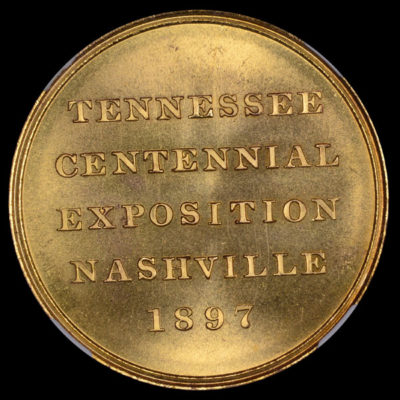
Tennessee Centennial Exposition Official Medal
1897 · HK-274 · 1896-97 Tennessee Centennial Exposition
The official medal designed by Charles E. Barber was struck and sold in the U.S.…
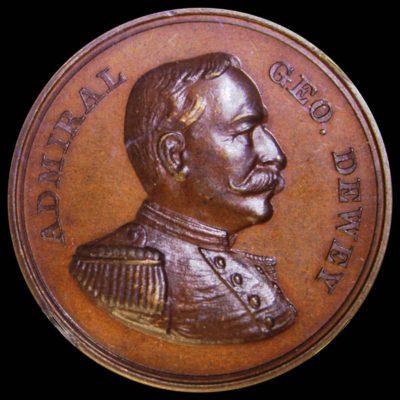
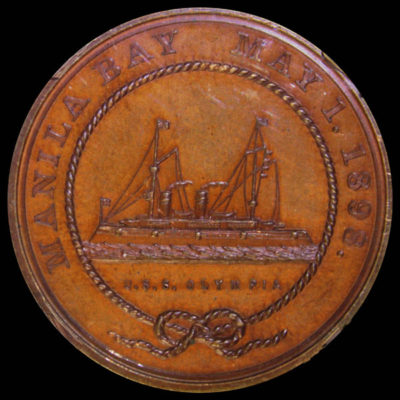
Battle of Manila Bay Admiral George Dewey
1898 · HK-280A · Bronze · 1890
The Spanish–American war began after the U.S. Navy Battleship Maine was mysteriously sunk in Havana…
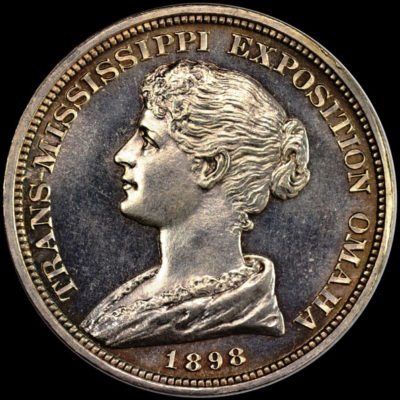
Trans-Mississippi & International Exposition Official Medal
1898 · HK-281 · 1898 Trans-Mississippi and International Expo
On the obverse, a composite picture of the most beautiful women in the Trans-Mississippi portion…
Trans-Mississippi & International Exposition Floral Parade
1898 · HK-281A · 1898 Trans-Mississippi and International Expo
Produced by the U.S. Mint as a souvenir for the Floral Day Parade at the…

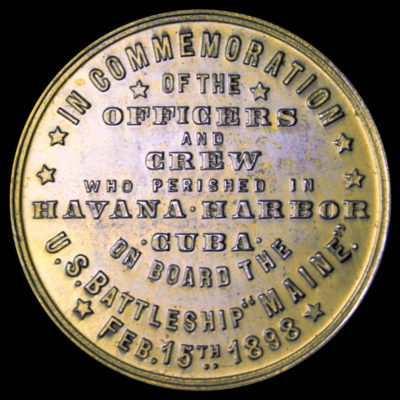
Remember the Maine
1898 · HK-285 · White Metal · 1890
The U.S. Battleship Maine was sent to Havana Cuba in January 1898 on a goodwill…
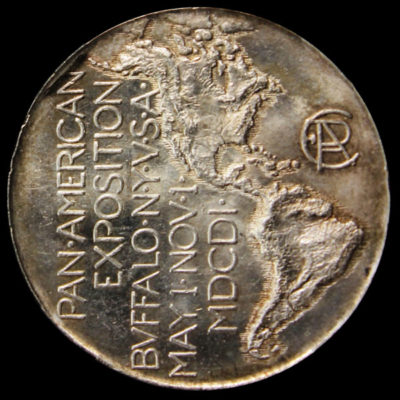
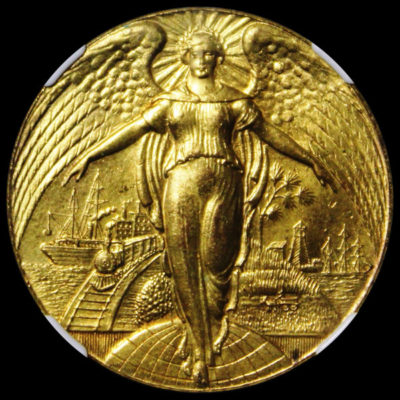
Pan-American Exposition Official Medal
1901 · HK-287 · 1901 Pan-American Exposition
Designed by G.T. Brewster the dies were engraved at the Philadelphia Mint and the medals…
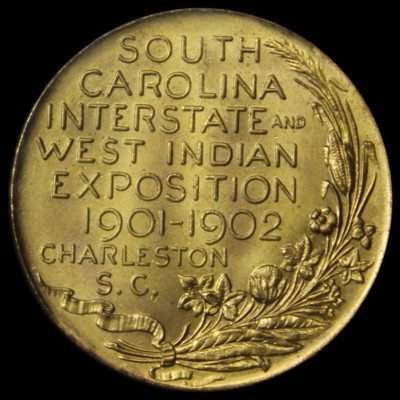
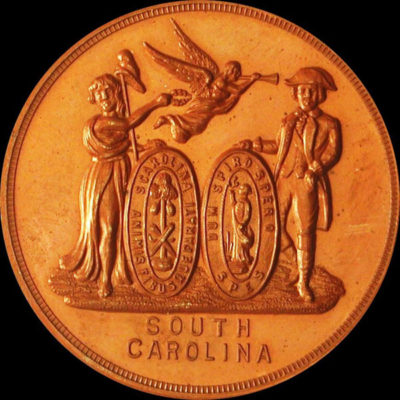
South Carolina Exposition Official Medal
1901 · HK-294 · 1901-02 South Carolina Inter-State and West Indian Exposition
The winged female standing on a globe with ships, trains, buildings and agriculture in the…
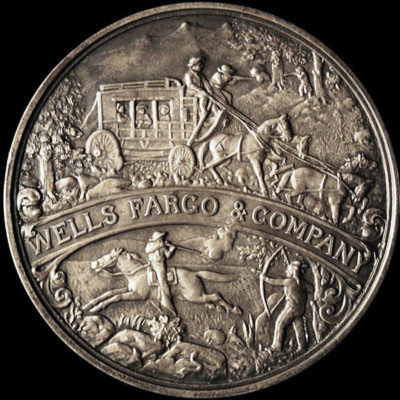
Wells Fargo Semicentennial
1902 · HK-296 · Silver · 1900
Struck in silver in 1902, the medal was given to each employee who had worked…
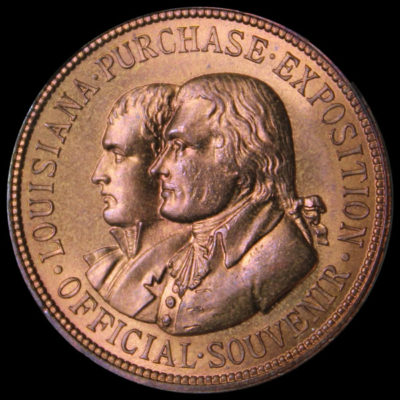

Louisiana Purchase Exposition Official Medal
1904 · HK-301 · 1904 Louisiana Purchase Exposition
The design depicts and commemorates the 100th anniversary of the Louisiana Purchase by Thomas Jefferson…
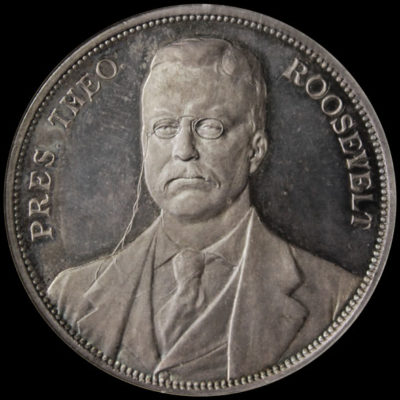

Louisiana Purchase Exposition President Roosevelt
1904 · HK-308 · Silver · 1904 Louisiana Purchase Exposition
Struck in 1904 to commemorate the Louisiana Purchase Exposition held in St. Louis. President Roosevelt…

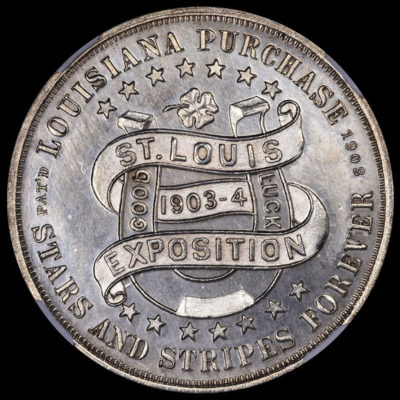
Louisiana Purchase Exposition Napoleon & Jefferson/Good Luck
1904 · HK-311A · 1904 Louisiana Purchase Exposition
Conjoined busts of Napoleon and Jefferson are depicted on the obverse with an inscription around,…
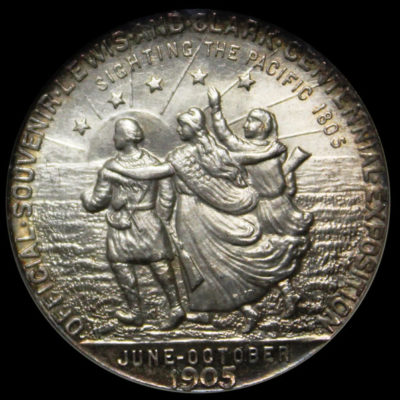
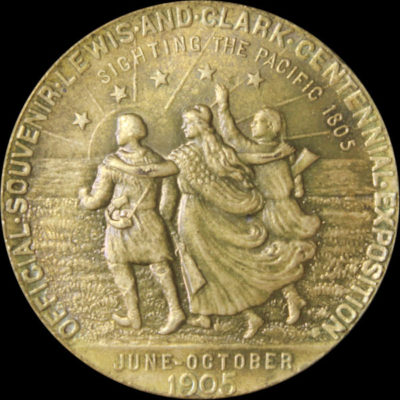
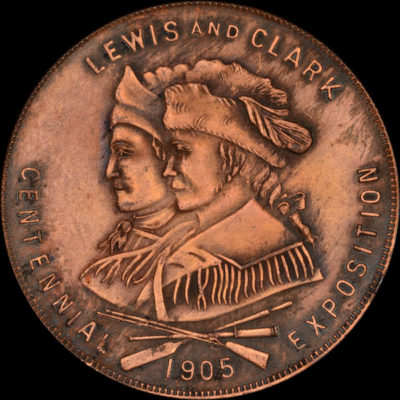
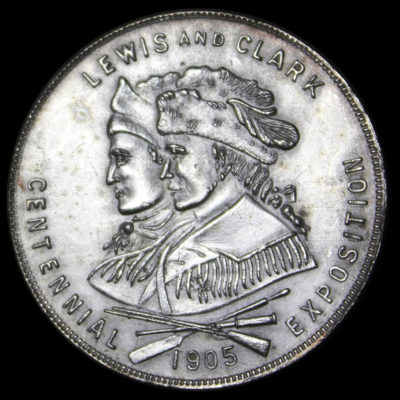
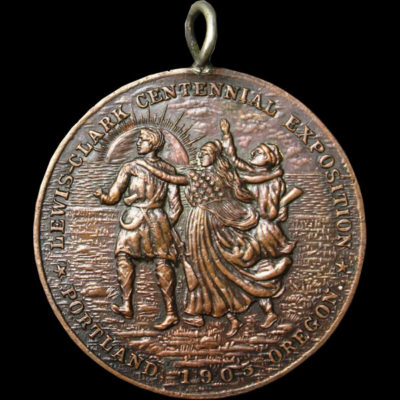
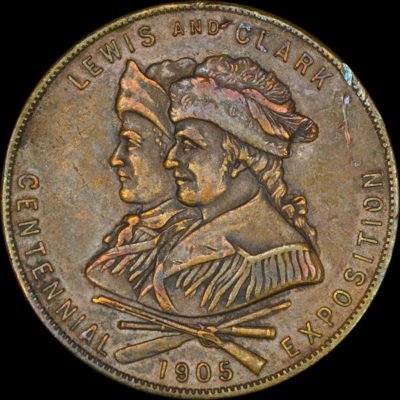
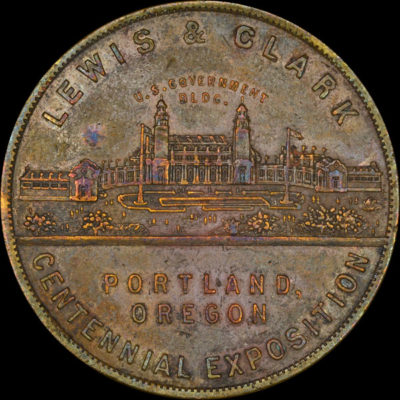
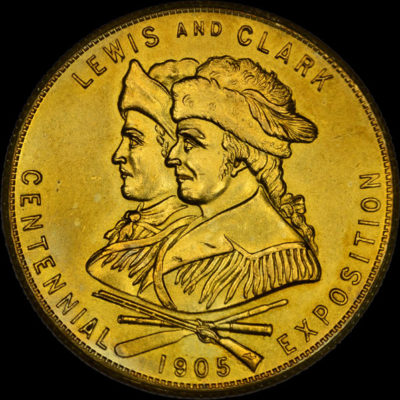
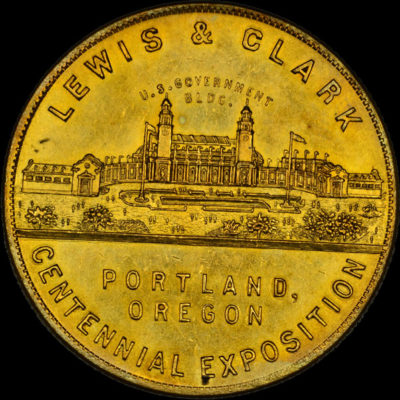
Lewis and Clark Centennial Exposition Official Medal
1905 · SH 14-1 S · HK-325 · Silver · 1905 Lewis and Clark Centennial Exposition
In the arms of Lady America, Captains Meriwether Lewis and William Clark sight the Pacific…
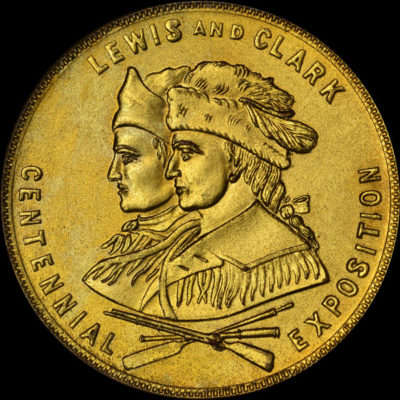
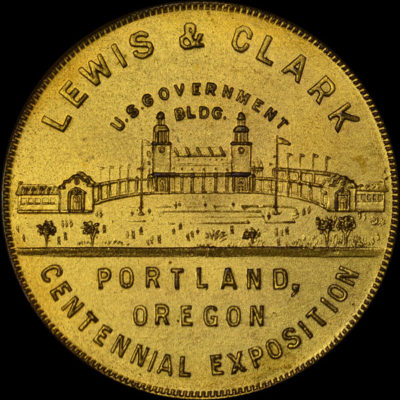
Lewis and Clark Centennial Exposition Official Medal
1905 · SH 14-1 GP · HK-326 · Gold-Plated · 1905 Lewis and Clark Centennial Exposition
In the arms of Lady America, Captains Meriwether Lewis and William Clark sight the Pacific…
Lewis and Clark Centennial Exposition Official Medal
1905 · SH 14-1 BZ · HK-327 · Bronze · 1905 Lewis and Clark Centennial Exposition
In the arms of Lady America, Captains Meriwether Lewis and William Clark sight the Pacific…
Lewis and Clark 34mm
1905 · SH 14-3 BZ · HK-329 · Bronze · 1905 Lewis and Clark Centennial Exposition
Lewis and Clark 36mm
1905 · SH 14-4 BZ · HK-331 · Bronze · 1905 Lewis and Clark Centennial Exposition
Lewis and Clark 36mm
1905 · SH 14-4 GPBZ · HK-331A · Gold-Plated Bronze · 1905 Lewis and Clark Centennial Exposition
Lewis and Clark No Date
1905 · SH 14-2 BZ · HK-333 · Bronze · 1905 Lewis and Clark Centennial Exposition
Lewis and Clark No Date
1905 · SH 14-2 GP · HK-333A · Gold-Plated · 1905 Lewis and Clark Centennial Exposition
Lewis and Clark 38mm / Washington Building
1905 · SH 14-7 BS · HK-334 · Brass · 1905 Lewis and Clark Centennial Exposition
Pike’s Peak Southwest Centennial Exposition Official Medal
1906 · HK-337 · 1907 Jamestown Tercentennial Exposition
Designed by Charles E. Barber and struck at the Philadelphia Mint, this medal commemorates the…
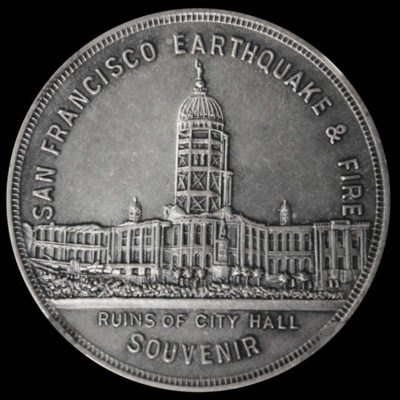
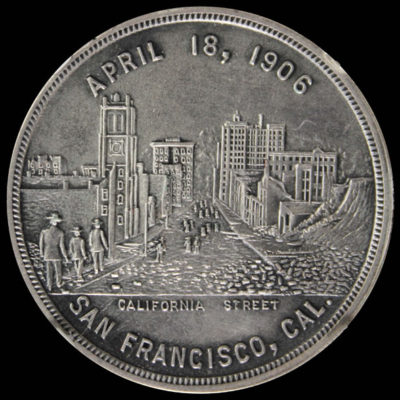
San Francisco Earthquake and Fire
1906 · HK-340 · Silver · 1900
The April 18, 1906 San Francisco earthquake was the most severe earthquake in the history…
Jamestown Tercentennial Exposition Official Medal
1907 · HK-344 · 1907 Jamestown Tercentennial Exposition
With Pocahontas on the obverse and Captain John Smith’s sailing ship on the reverse ,…
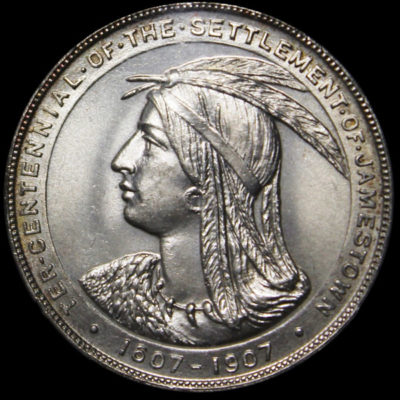
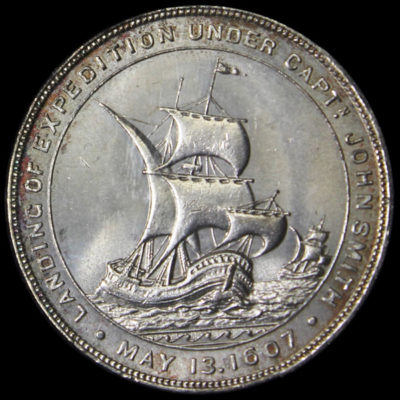
Jamestown Tercentennial Exposition Official Medal
1907 · HK-345 · 1907 Jamestown Tercentennial Exposition
With Pocahontas on the obverse and Captain John Smith’s sailing ship on the reverse ,…
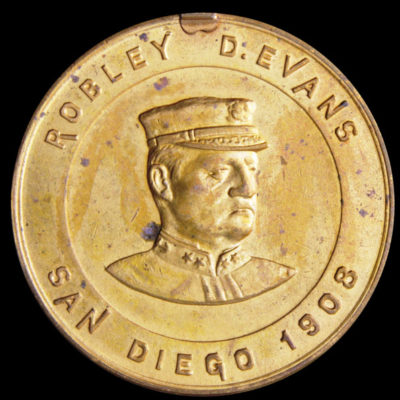

United States Navy World Voyage Admiral Evans
1908 · HK-350 · Gold-Plated · 1900
This medal commemorates the United States Naval Battle Fleets visit to San Diego in 1908…
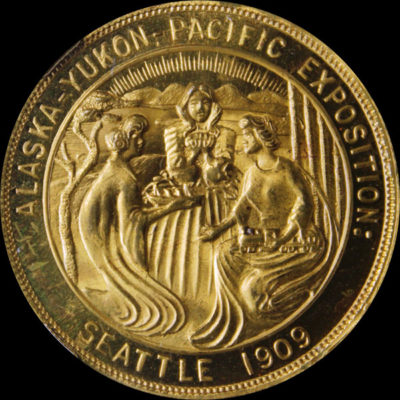
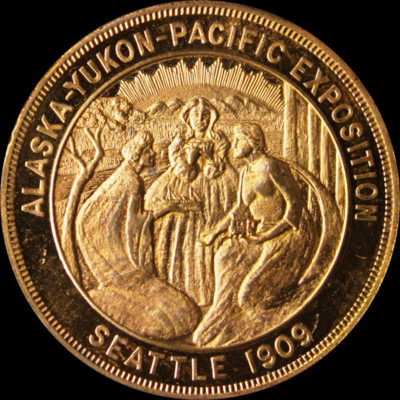
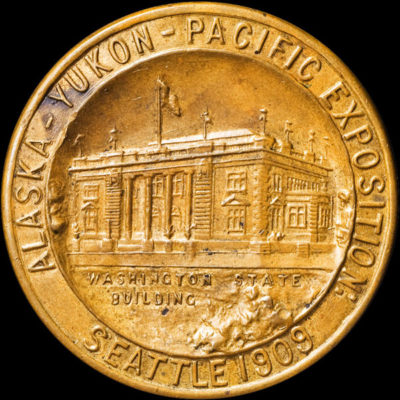
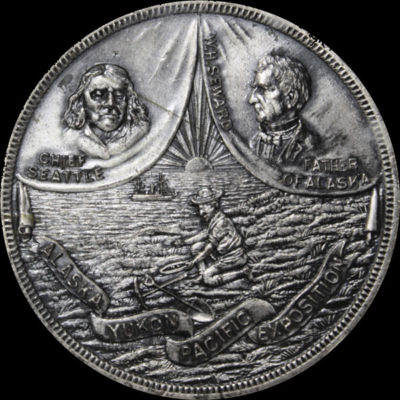
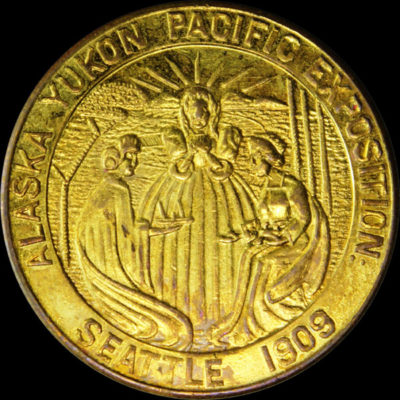
Alaska-Yukon-Pacific Exposition Official Medal
1909 · SH 16-1 S · HK-353 · Silver · 1909 Alaska-Yukon-Pacific Exposition
The exposition and official medal were designed to promote the “enormous value of Alaska” and…
Alaska-Yukon-Pacific Exposition Official Medal
1909 · SH 16-1 BZ · HK-354 · Bronze · 1909 Alaska-Yukon-Pacific Exposition
The exposition and official medal were designed to promote the “enormous value of Alaska” and…
Alaska-Yukon-Pacific Exposition Official Medal
1909 · SH 16-1 CU · HK-355 · Copper · 1909 Alaska-Yukon-Pacific Exposition
The exposition and official medal were designed to promote the “enormous value of Alaska” and…
Alaska-Yukon-Pacific Exposition Official Medal
1909 · SH 16-1 GPBZ · HK-356 · Gold-Plated Bronze · 1909 Alaska-Yukon-Pacific Exposition
The exposition and official medal were designed to promote the “enormous value of Alaska” and…
Alaska-Yukon-Pacific Exposition Official Souvenir
1909 · SH 16-10 BZ · HK-357 · Bronze · 1909 Alaska-Yukon-Pacific Exposition
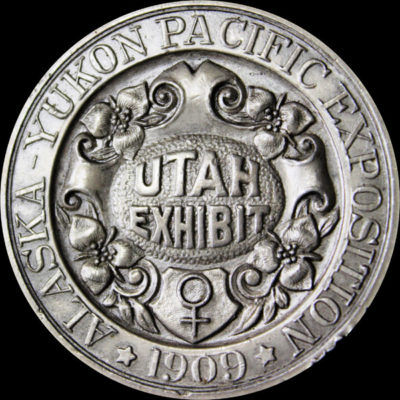

Alaska-Yukon-Pacific Exposition Silver Utah Exhibit
1909 · SH 16-7 S · HK-358 · Silver · 1909 Alaska-Yukon-Pacific Exposition
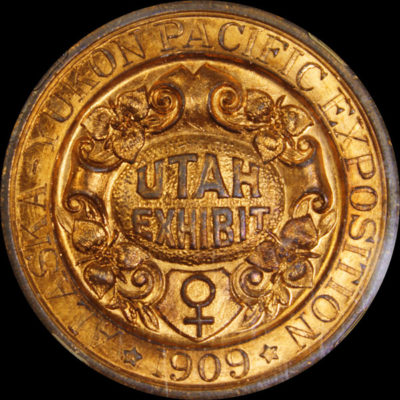
Alaska-Yukon-Pacific Exposition Copper Utah Exhibit
1909 · SH 16-8 CU · HK-359 · Copper · 1909 Alaska-Yukon-Pacific Exposition
This beautiful copper medal was struck by the state of Utah and was sold in…
Alaska-Yukon-Pacific Exposition Charbneau Alaska Gold
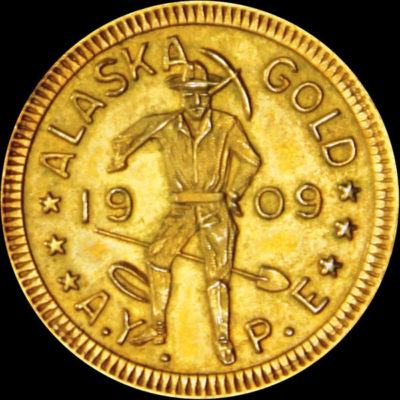
1909 · SH 16-6 G · HK-360 · Gold · 1909 Alaska-Yukon-Pacific Exposition

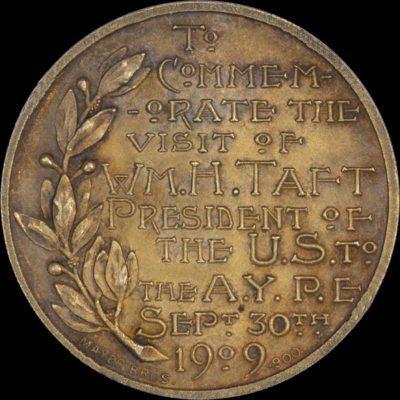
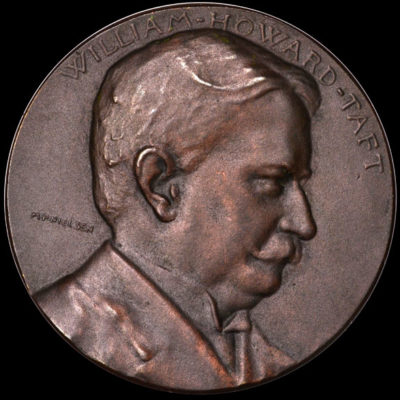
Alaska-Yukon-Pacific Exposition President Taft
1909 · SH 16-5 GPS · HK-361 · Gold-Plated Silver · 1909 Alaska-Yukon-Pacific Exposition
The visit of President William H. Taft to Seattle on September 30, 1909 is commemorated…
Alaska-Yukon-Pacific Exposition Gold-Planner Souvenir
1909 · SH 16-12 ASP · HK-363A · Antiqued Silver-Plate · 1909 Alaska-Yukon-Pacific Exposition
Alaska-Yukon-Pacific Exposition Seven Rays / U.S. Government-Building
1909 · SH 16-16 GP · HK-365 · Gold-Plated · 1909 Alaska-Yukon-Pacific Exposition
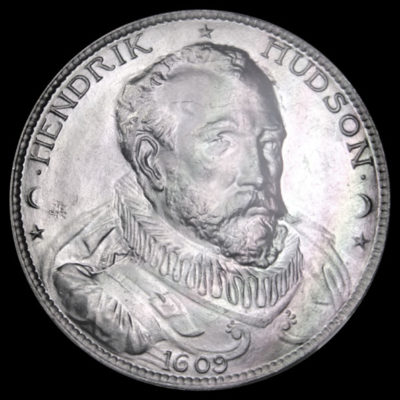
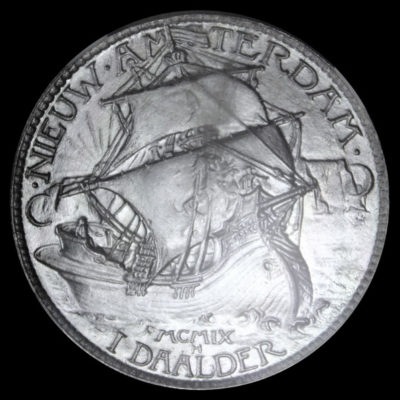
Hudson-Fulton Celebration Large Hendrik Hudson Daalder
1909 · HK-370 · Aluminum · 1900
Struck by New York City coin dealer Thomas L. Elder as part of the Hudson–Fulton…
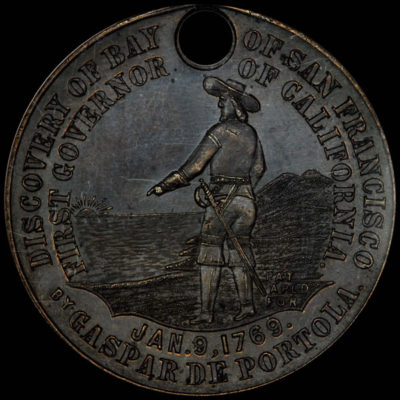
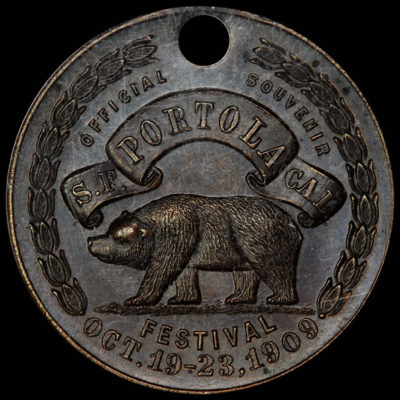
Portola Festival Bear/Gaspar De Portola
1909 · HK-389 · Bronze · 1900
The Portola Festival was held to recognize the fact that the city of San Francisco…
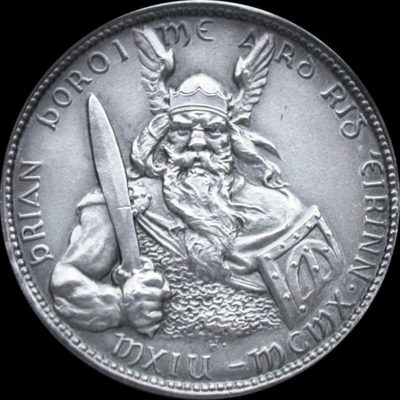
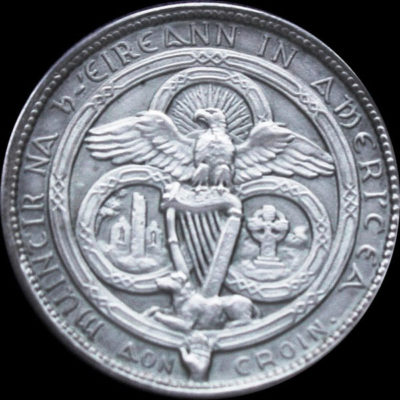
Brian Boru
1910 · HK-390 · 1910
Brian Boru was King of Ireland from 1002-1014 AD. Considered the George Washington of Ireland,…
Ohio Valley Exposition Official Medal
1910 · HK-393 · 1910 Ohio Valley Exposition
Like the exposition, the official medal celebrates and promotes the “industrial prowess of Ohio Valley,”…
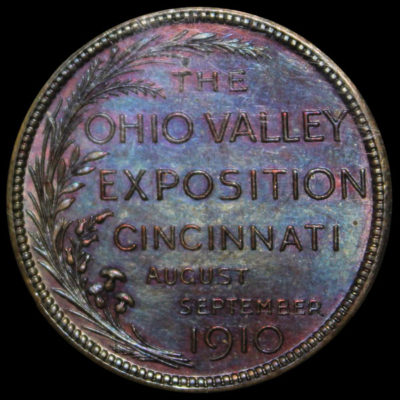
Ohio Valley Exposition Official Medal
1910 · HK-395 · 1910 Ohio Valley Exposition
Like the exposition, the official medal celebrates and promotes the “industrial prowess of Ohio Valley,”…
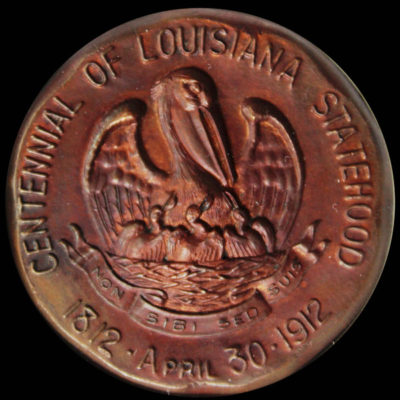
Louisiana Statehood Centennial Pelican
1912 · HK-396 · Bronze · 1900
Louisiana celebrated the centennial of the statehood in New Orleans and this bronze scalloped official…
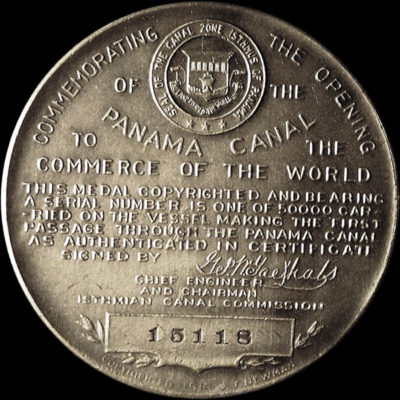
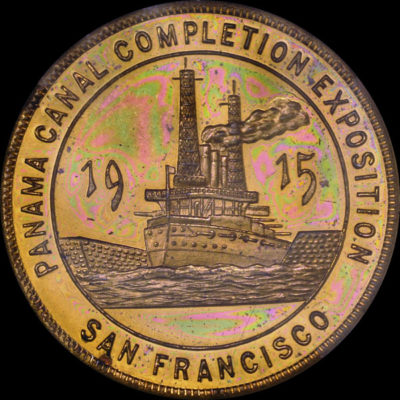
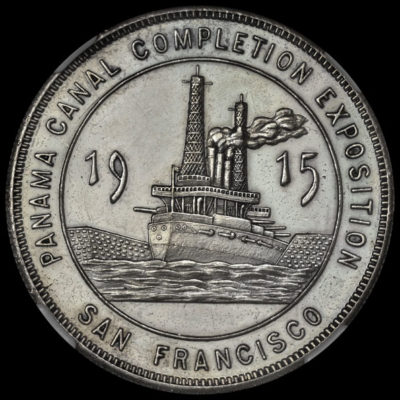
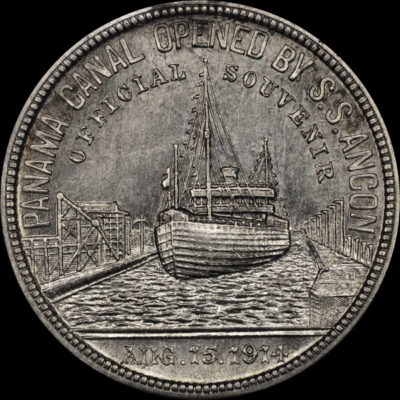
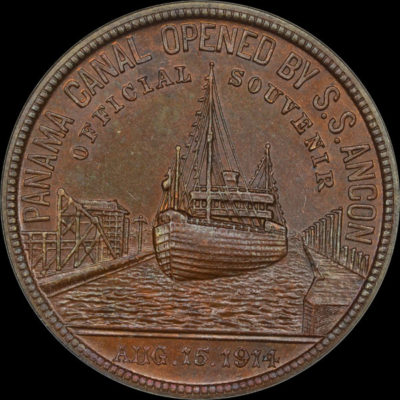
Panama Canal Completion
1914 · HK-398 · Bronze · 1910
The first vessel passing through the Panama Canal on August 3, 1914 carried a reported…
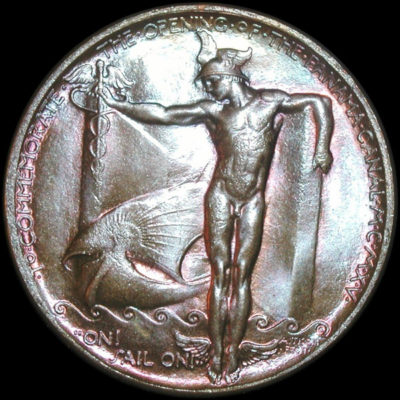
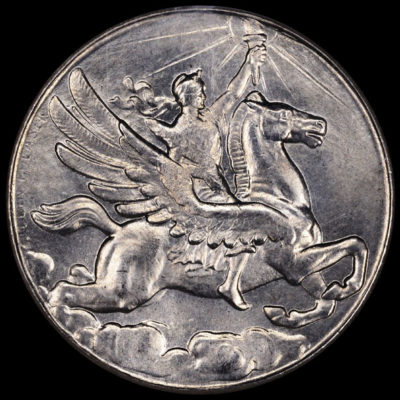
Panama Pacific International Exposition Official Medal
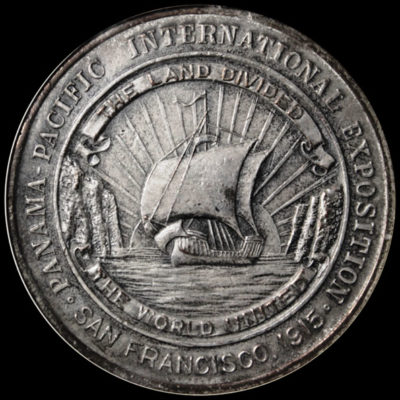
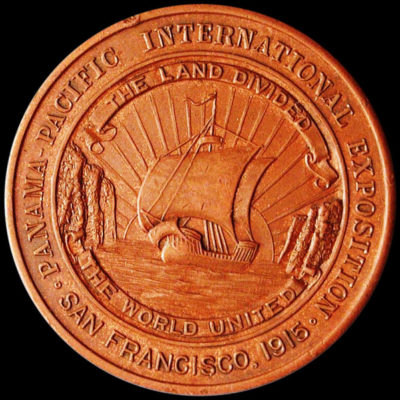
1915 · SH 18-1 S · HK-399 · Silver · 1915 Panama-Pacific International Exposition
This official medal celebrates the opening of the Panama Canal. Winged Mercury opens the Canal…
Panama Pacific International Exposition Official Medal
1915 · SH 18-1 BBZ · HK-400 · Bright Bronze · 1915 Panama-Pacific International Exposition
This official medal celebrates the opening of the Panama Canal. Winged Mercury opens the Canal…
Panama Pacific International Exposition Official Medal
1915 · SH 18-1 GPBZ · HK-401 · Gold-Plated Bronze · 1915 Panama-Pacific International Exposition
This official medal celebrates the opening of the Panama Canal. Winged Mercury opens the Canal…
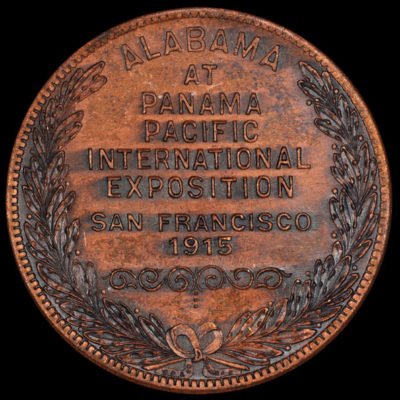
Alabama State
1915 · SH 18-12 BZ · HK-402 · Bronze · 1915 Panama-Pacific International Exposition
Whitehead and Hoag produced several PPIE State Fund so-called dollars which were sold to help…
Alabama State
1915 · SH 18-12 SP · HK-402A · Silver-Plated · 1915 Panama-Pacific International Exposition
Whitehead and Hoag produced several PPIE State Fund so-called dollars which were sold to help…
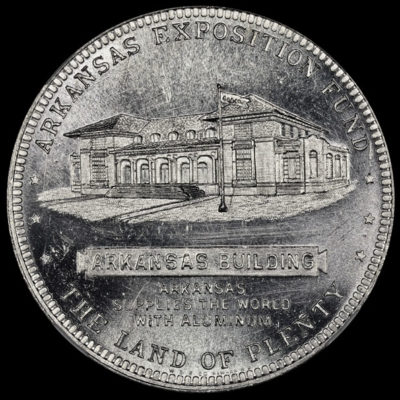
Arkansas State
1915 · SH 18-13 AL · HK-403 · Aluminum · 1915 Panama-Pacific International Exposition
The Arkansas State Fund so-called dollar, produced by Whitehead & Hoag of Newark, NJ, celebrates…
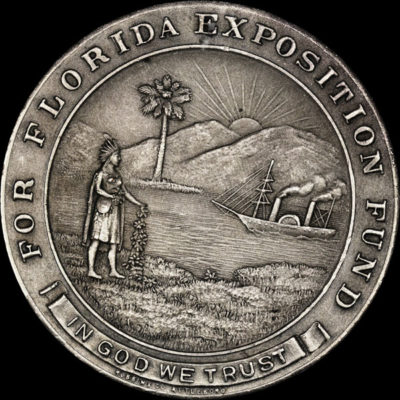
Florida State
1915 · SH 18-14 SP · HK-404A · Silver-Plated · 1915 Panama-Pacific International Exposition
Headless Winged Victory or Winged Nike standing on the prow of a ship which is…

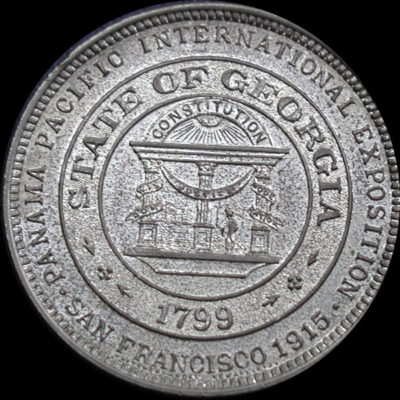
Georgia State
1915 · SH 18-15 SP · HK-405 · Silver-Plated · 1915 Panama-Pacific International Exposition
A striding female wearing a long gown is carrying a cornucopia overflowing with fruits and…
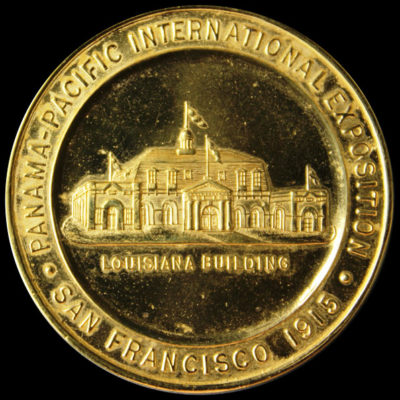
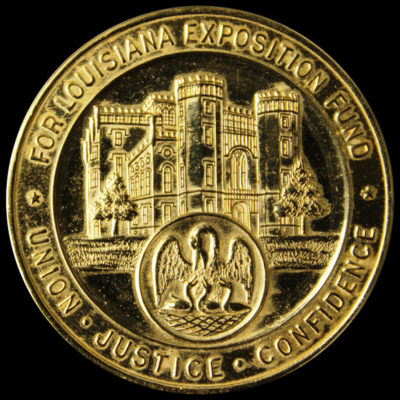
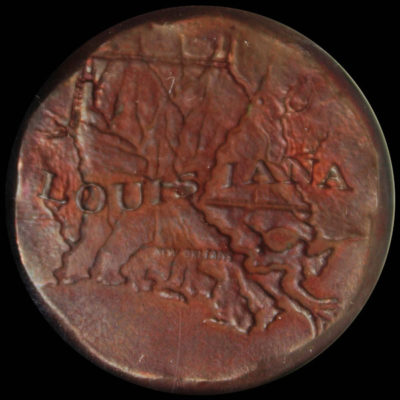
Louisiana State
1915 · SH 18-17 GP · HK-406 · Gold-Plated · 1915 Panama-Pacific International Exposition
A view of the Louisiana State Building at the exposition on the obverse, the State…
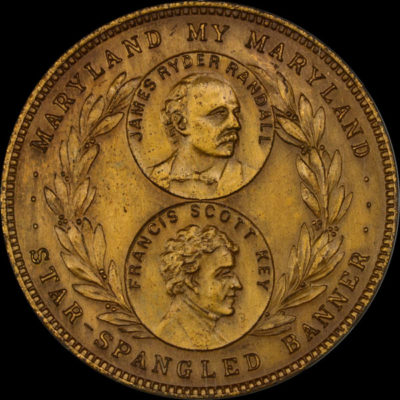
Maryland State
1915 · SH 18-18 YBZ · HK-407 · Yellow Bronze · 1915 Panama-Pacific International Exposition
Maryland honored two of its native sons who, through their songs, made the state famous.…


Mississippi State
1915 · SH 18-19 BZ · HK-408 · Bronze · 1915 Panama-Pacific International Exposition
Portraits of Jefferson Davis, president of the Confederate States during the Civil War and John…
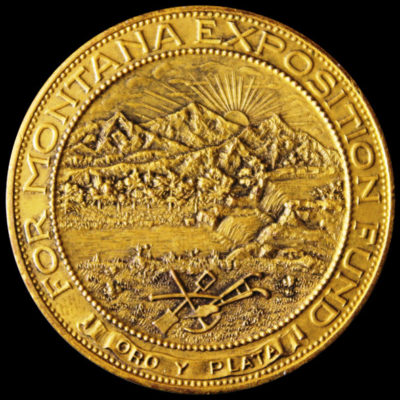
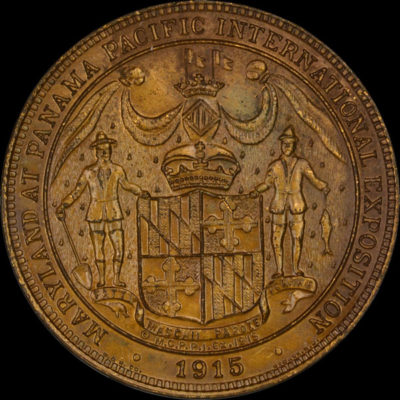
Montana State
1915 · SH 18-20 GP · HK-409 · Gold-Plated · 1915 Panama-Pacific International Exposition
Winged Victory or Nike stands on the prow of a ship, the exposition buildings can…
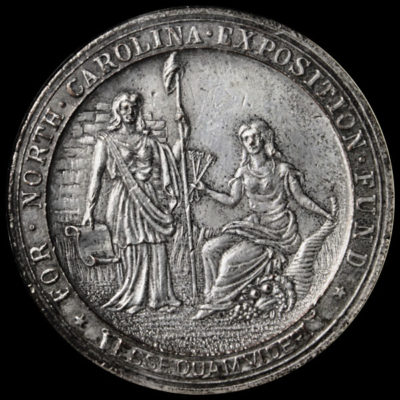
North Carolina State
1915 · SH 18-23 SP · HK-410A · Silver-Plated · 1915 Panama-Pacific International Exposition
The North Carolina State seal with two women, one holding a staff with a cap…
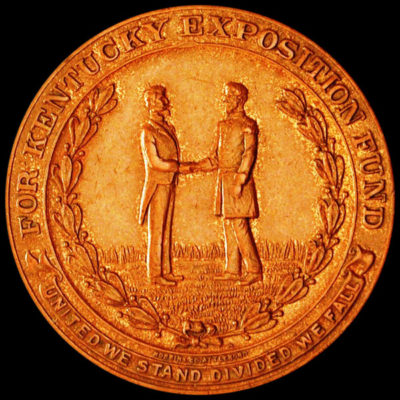
Kentucky State
1915 · SH 18-16 BZ · HK-410B · Bronze · 1915 Panama-Pacific International Exposition
The Kentucky State seal is on the obverse, microscopic signature Robbins Co Attleboro near the…
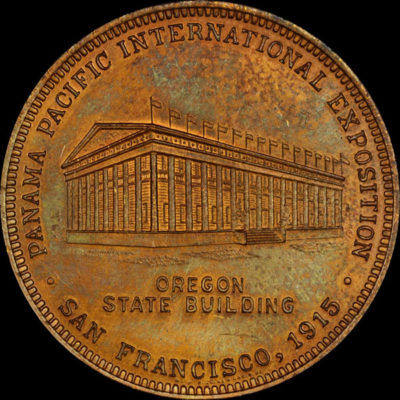
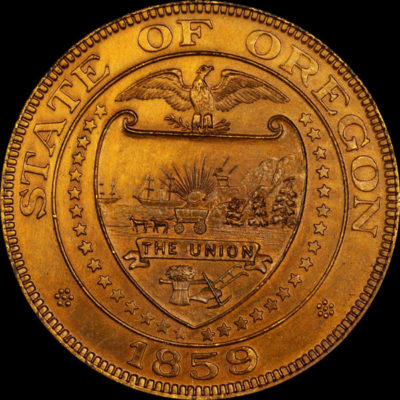
Oregon State
1915 · SH 18-24 YBZ · HK-411 · Yellow Bronze · 1915 Panama-Pacific International Exposition
Built for the exposition the Oregon State Building with gigantic wood columns is on the…
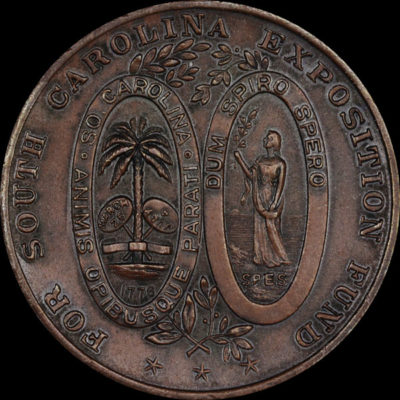
South Carolina State
1915 · SH 18-25 BZ · HK-412 · Bronze · 1915 Panama-Pacific International Exposition
The South Carolina State seal, which was adopted in 1776, adorns the obverse. The common…
Tennessee State
1915 · SH 18-26 BZ · HK-413 · Bronze · 1915 Panama-Pacific International Exposition
The Tennessee State seal with symbols of agriculture above and a ship representing commerce below.…
Standing Minerva / Battleship No Lower Portholes
1915 · SH 18-3 SP · HK-414 · Silver-Plated · 1915 Panama-Pacific International Exposition
On the obverse is Minerva standing facing left. The exposition grounds stretch out behind her…
Standing Minerva / Tower of Jewels
1915 · SH 18-5 GP · HK-415 · Gold-Plated · 1915 Panama-Pacific International Exposition
Standing Minerva with a grizzly bear at her side and the exposition grounds in the…
Standing Minerva with Rays / Tower of Jewels Type C
1915 · SH 18-6 GP · HK-415A · Gold-Plated · 1915 Panama-Pacific International Exposition
Minerva standing with broad bands representing rays of light emanating behind her. The Tower of…
Tower of Jewels / Battleship No Lower Portholes
1915 · SH 18-7 GP · HK-416 · Gold-Plated · 1915 Panama-Pacific International Exposition
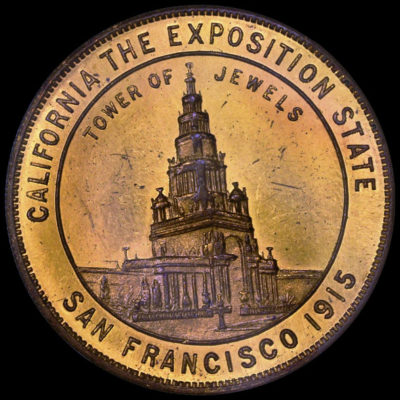
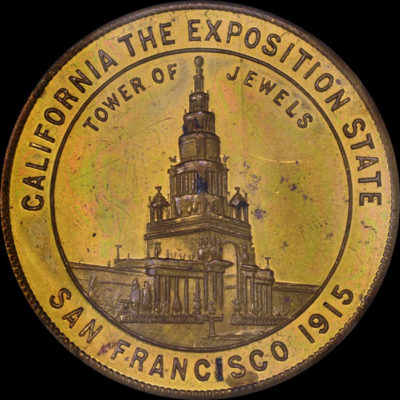
The Tower of Jewels, one of the major attractions at the exposition, with thousands of…
Tower of Jewels Gustave Fox Battleship
1915 · SH 18-8 AL · HK-416A · Aluminum · 1915 Panama-Pacific International Exposition
A variation of the Tower of Jewels edifice is on the obverse. The reverse, signed…
Laughing Bear / Water-Nymphs
1915 · SH 18-9 GP · HK-417 · Gold-Plated · 1915 Panama-Pacific International Exposition
A fascinating design with a scantily clad female overlooking the exposition grounds. A grizzly bear…
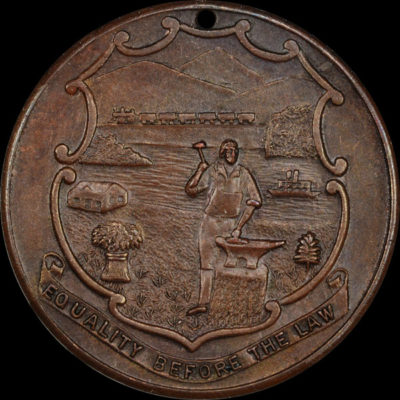
Nebraska State 1915
1915 · SH 18-22 BZ · HK-419 · Bronze · 1915 Panama-Pacific International Exposition
The State seal of Nebraska is on the obverse featuring a blacksmith with a hammer…
Montana State 1915
1915 · SH 18-21 · HK-419A · 1915 Panama-Pacific International Exposition
Two miners with a pick and shovel are gold-panning next to a stream. An Indian…
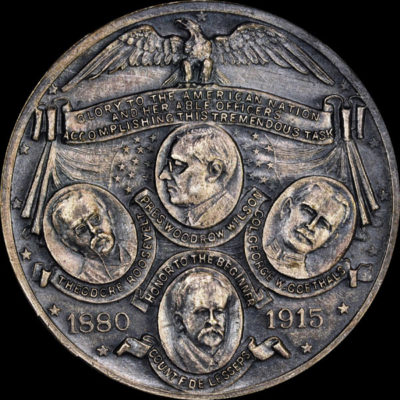
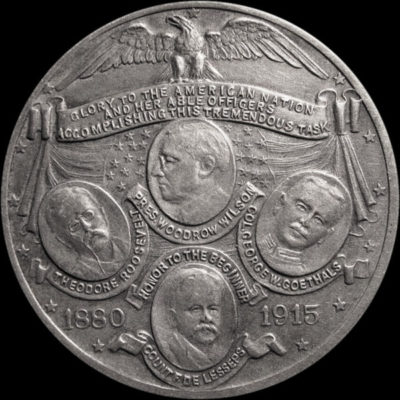
Glory to America
1915 · SH 18-10 ASP · HK-420 · Antiqued Silver-Plate · 1915 Panama-Pacific International Exposition
Four busts adorn the obverse, Woodrow Wilson, president when the canal was completed in 1914;…
Glory to America
1915 · SH 18-10 BZ · HK-421 · Bronze · 1915 Panama-Pacific International Exposition
Four busts adorn the obverse, Woodrow Wilson, president when the canal was completed in 1914;…
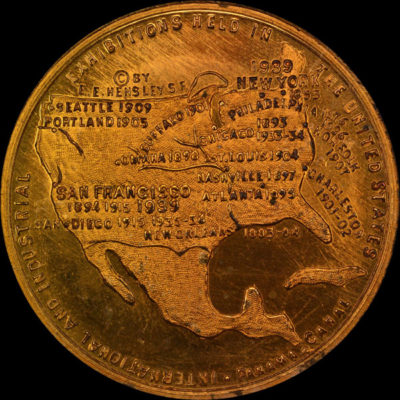
Hensley’s U.S. Expositions
1915 · SH 18-11 GP · HK-422 · Gold-Plated · 1915 Panama-Pacific International Exposition
E.E. Hensley of San Francisco struck this elegant commemorative medal with large golden gates that…
Souvenir Slug Design.Pat Left
1915 · SH 18-31 SP · HK-423 · Silver-Plated · 1915 Panama-Pacific International Exposition
Souvenir slug legend, without Official, is centered above within the center beaded circle, PPIE below…
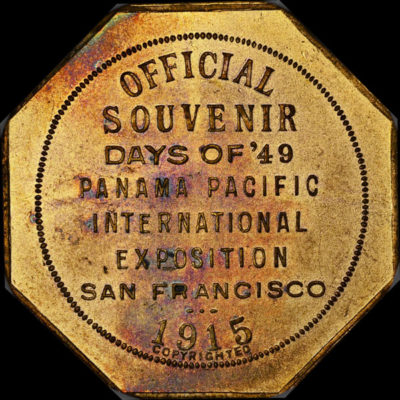
Official Souvenir Days of ’49 Slug
1915 · SH 18-32 GP · HK-425 · Gold-Plated · 1915 Panama-Pacific International Exposition
Days of ’49 in legend below Official Souvenir, microscopic Copyrighted at bottom, this variety is…
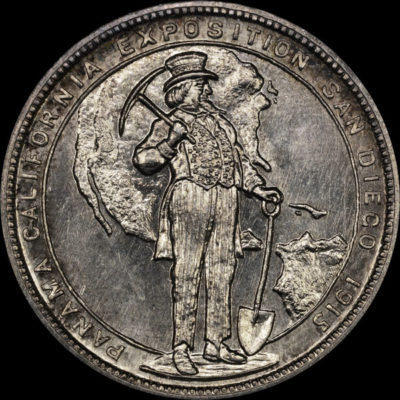
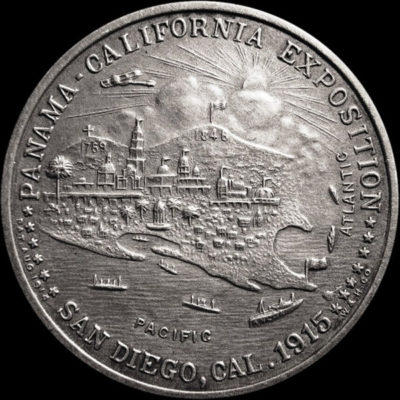
Panama-California Exposition 1915 Official Medal
1915 · SH 19-1 S · HK-426 · Silver · 1915-16 Panama-California Exposition
With North and Central America in the background, Uncle Sam is depicted on the obverse…
Panama-California Exposition 1915 Official Medal
1915 · SH 19-1 BZ · HK-427 · Bronze · 1915-16 Panama-California Exposition
With North and Central America in the background, Uncle Sam is depicted on the obverse…
Panama-California Exposition 1915 Official Medal
1915 · SH 19-1 GPBZ · HK-428 · Gold-Plated Bronze · 1915-16 Panama-California Exposition
With North and Central America in the background, Uncle Sam is depicted on the obverse…
Panama-California Exposition 1915 Official Medal
1915 · SH 19-1 SPBZ · HK-429 · Silver-Plated Bronze · 1915-16 Panama-California Exposition
With North and Central America in the background, Uncle Sam is depicted on the obverse…
Panama-California Exposition 1916 Official Medal
1916 · SH 19-2 BZ · HK-430 · Bronze · 1915-16 Panama-California Exposition
Uncle Sam with shovel design but dated the second year of the Exposition, 1916. Designed…
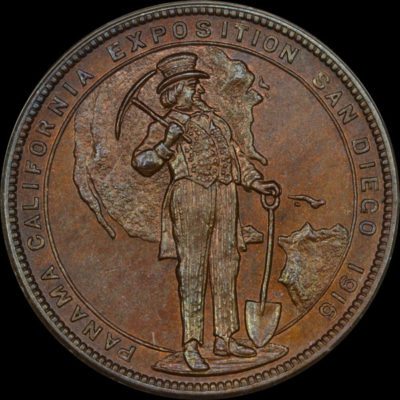
Panama-California West Gate / Canal Completion
1915 · SH 19-3 CU · HK-432A · Copper · 1915-16 Panama-California Exposition
Panama-California Home Economy / Eagle
1915 · SH 19-10 GP · HK-433 · Gold-Plated · 1915-16 Panama-California Exposition
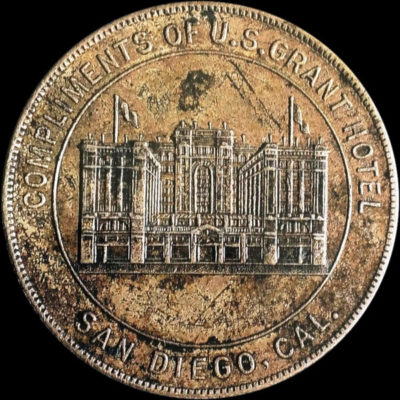
Panama-California Home Economy / Grant Hotel
1915 · SH 19-11 GP · HK-434 · Gold-Plated · 1915-16 Panama-California Exposition
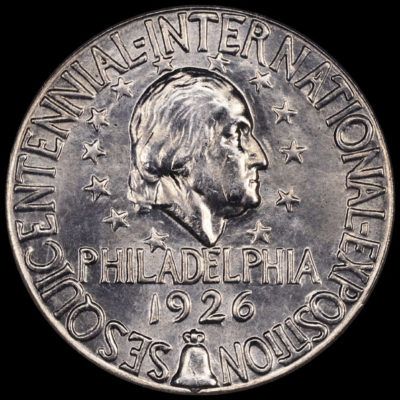
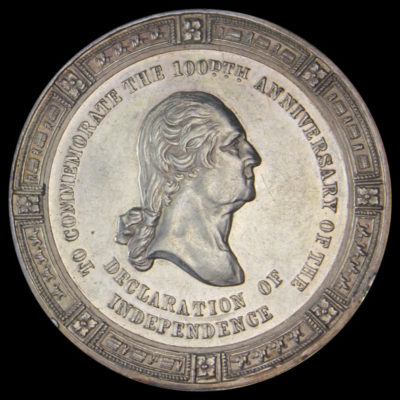
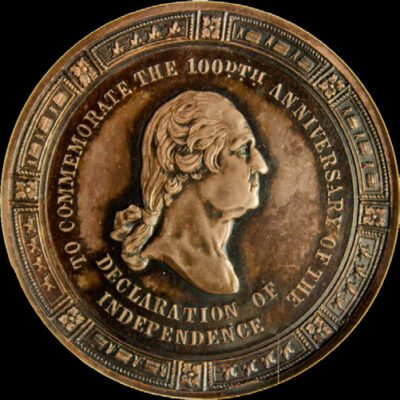
U.S. Sesquicentennial Exposition Official Medal
1926 · HK-454 · 1926 U.S. Sesquicentennial Exposition
To commemorate the 150th anniversary of the Declaration of Independence, this medal displays a bust…
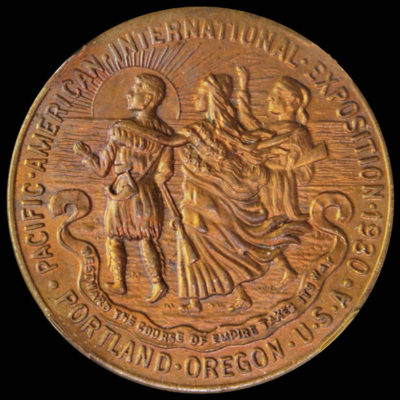
Pacific American International Exposition Anticipation Medal
1930 · HK-459 · Bronze · 1930
This metal was issued in anticipation of this exposition which never took place at all.…


Pacific American International Exposition Official Medal
1930 · SH 20-11 BZ · HK-459 · Bronze · 1930 Pacific American International Exposition
Lady Liberty is leading Lewis and Clark to the Pacific Coast with the setting sun…
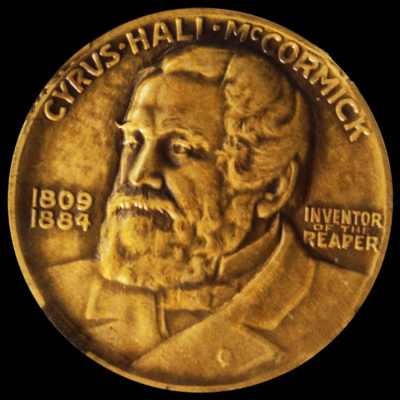
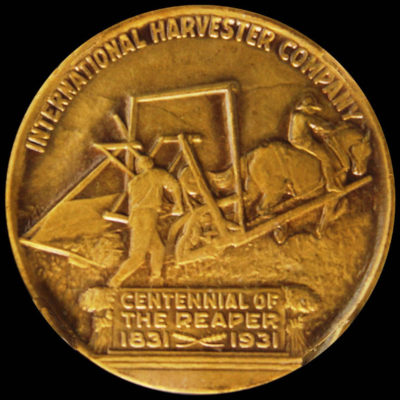
McCormick Reaper Centennial
1931 · HK-460 · Bronze · 1930
Struck to commemorate the 100th anniversary of Cyrus Hall McCormick’s invention of the reaper, the…
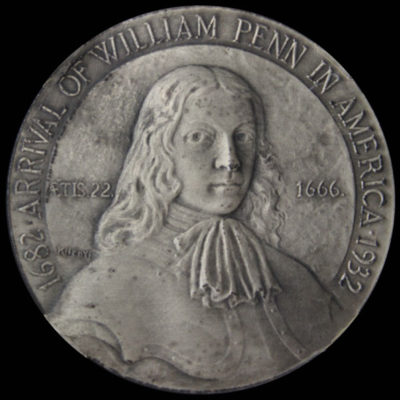
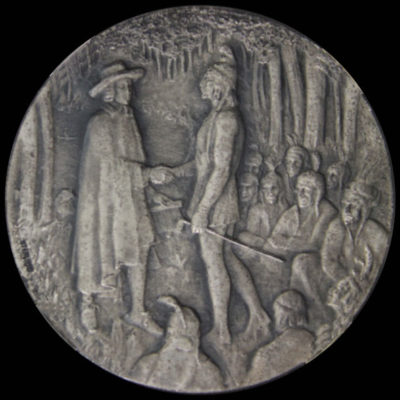
William Penn Arrival in America 250th Anniversary
1932 · HK-461 · Silver · 1930
The bust of Penn in armor on the obverse was taken from the only known…

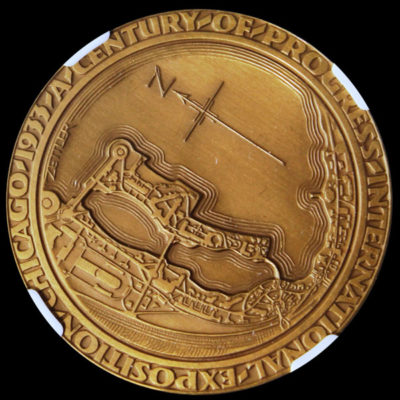
Century of Progress Exposition Official Medal
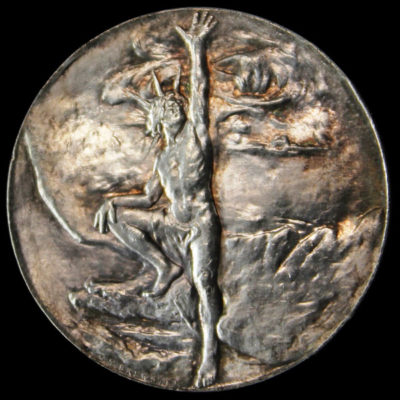
1933 · HK-463 · 1933-34 Century of Progress Exposition
A semi-nude male with just a lion-cloth stretches his arms over Research and Industry graces…
Golden Gate International Exposition Hensley’s U.S. Expositions
1939 · SH 23-4 GP · HK-478 · Gold-Plated · 1939-40 Golden Gate International Exposition
Golden Gate International Exposition Protestant Lord’s Prayer / Textured Seal
1939 · SH 23-6 GP · HK-479 · Gold-Plated · 1939-40 Golden Gate International Exposition

Golden Gate International Exposition Catholic Lord’s Prayer / Textured Seal
1939 · SH 23-8 GP · HK-479A · Gold-Plated · 1939-40 Golden Gate International Exposition
Golden Gate International Exposition Catholic Lord’s Prayer / Pictorial Seal
1939 · SH 23-9 GP · HK-480 · Gold-Plated · 1939-40 Golden Gate International Exposition
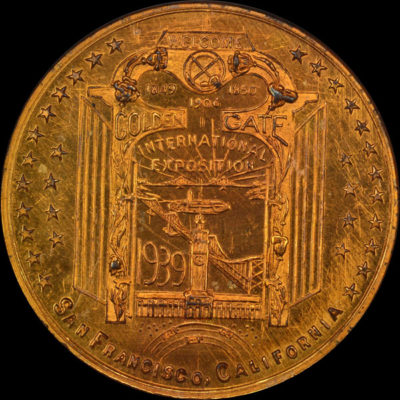
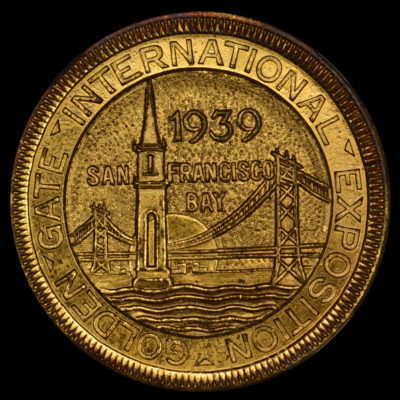
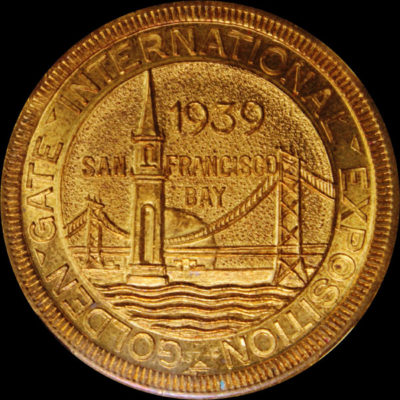
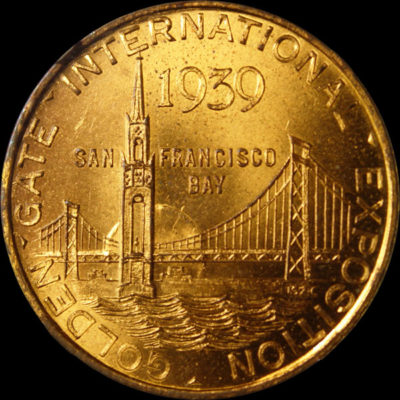
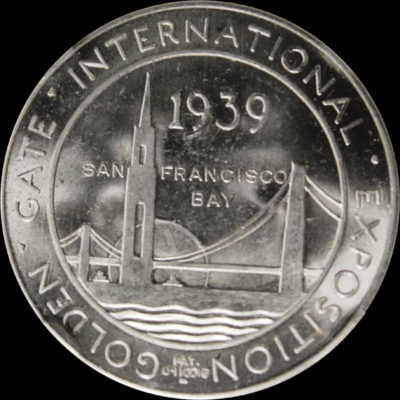
Golden Gate International Exposition Official
1939 · SH 23-1 GP · HK-481 · Gold-Plated · 1939-40 Golden Gate International Exposition
Golden Gate International Exposition Official
1939 · SH 23-1 SP · HK-482 · Silver-Plated · 1939-40 Golden Gate International Exposition
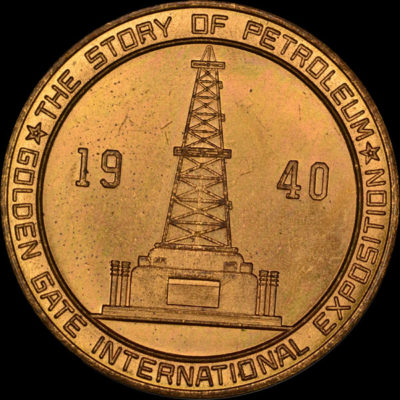
Golden Gate International Exposition 1940 Petroleum
1940 · SH 23-12 GP · HK-483 · Gold-Plated · 1939-40 Golden Gate International Exposition
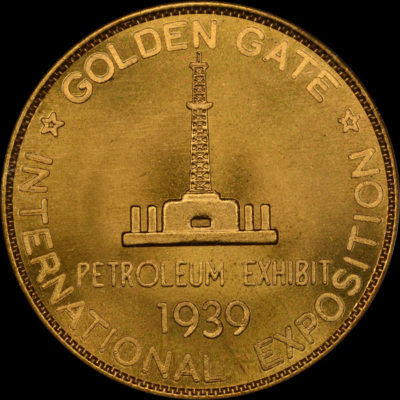
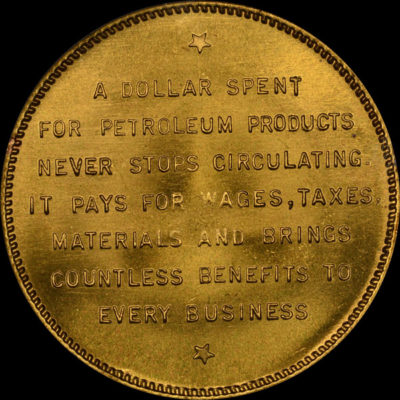
Golden Gate International Exposition 1939 Petroleum
1939 · SH 23-11 GP · HK-484 · Gold-Plated · 1939-40 Golden Gate International Exposition
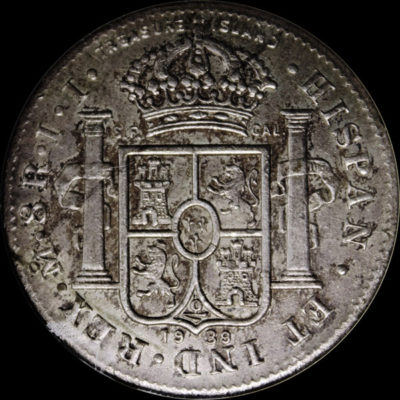
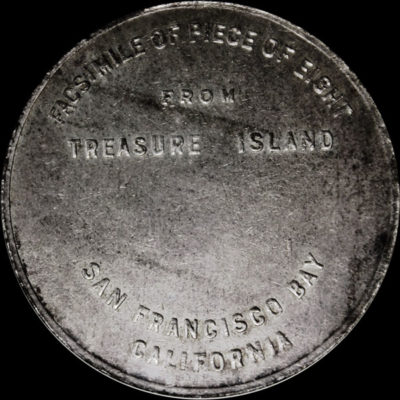
Golden Gate International Exposition Piece of Eight
1939 · SH 23-3 SPBS · HK-485 · Silver-Plated Brass · 1939-40 Golden Gate International Exposition
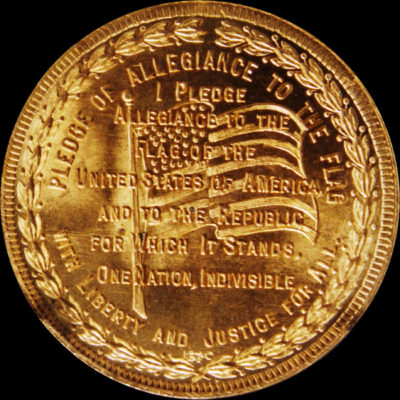
Golden Gate International Exposition Pledge of Allegiance / Textured Seal
1939 · SH 23-10 GP · HK-486 · Gold-Plated · 1939-40 Golden Gate International Exposition
Golden Gate International Exposition Charbneau
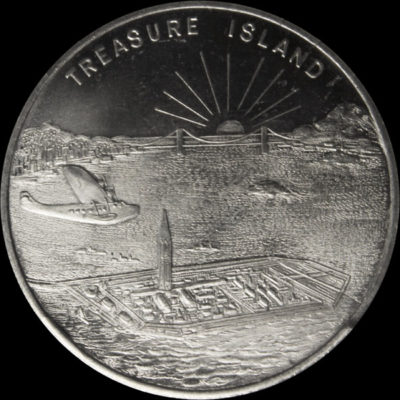
1939, 1940 · SH 23-5 · HK-488 · 1939-40 Golden Gate International Exposition
Designed by Jules Charbneau and sold as souvenirs at the GGIE. Fourteen different varieties were…
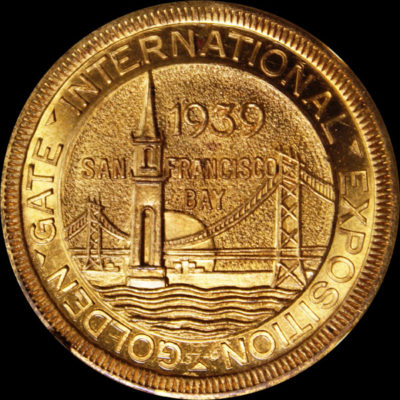
Golden Gate International Exposition Tower of Sun / Pictorial Seal
1939 · SH 23-2 GP · HK-490A · Gold-Plated · 1939-40 Golden Gate International Exposition
California Gold Discovery Centennial
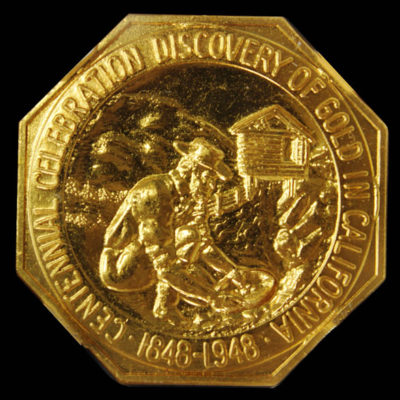
1948 · HK-497 · Bronze · 1940
Obverse depicts a miner panning for gold in Coloma, California with Sutter’s Mill in the…

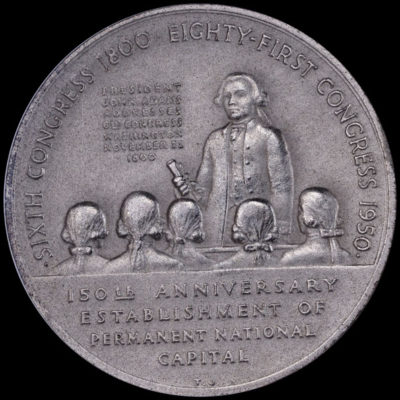
1950 Washington, DC Sesquicentennial SCD
1950 · HK-507 · Silver · 1950
To commemorate the 150th anniversary of the establishment of the seat of Federal Government in…
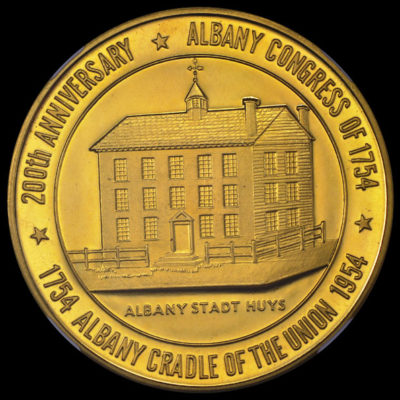
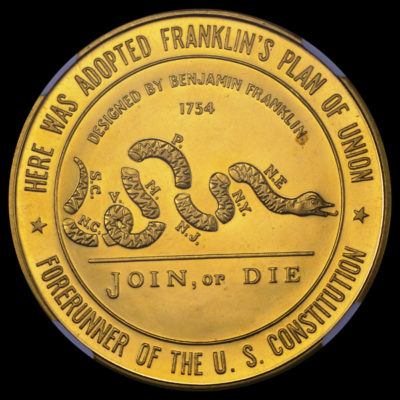
1954 Cradle of the Union Celebration SCD
1954 · HK-511 · Gold · 1950
This medal honors the 200th anniversary of the Albany, New York, Congress of 1754 –…
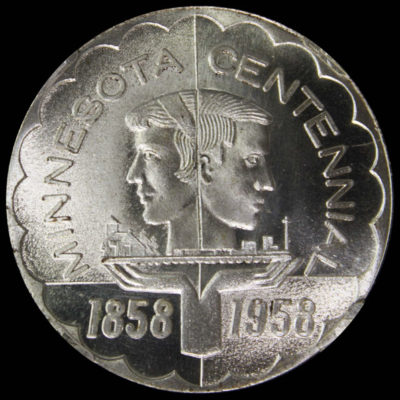
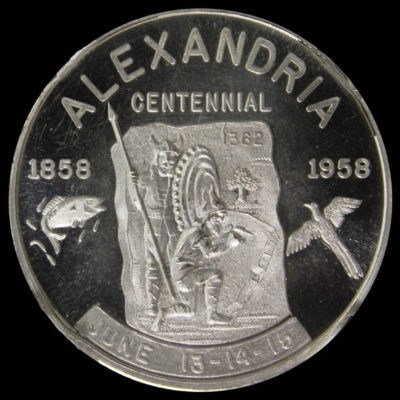
1958 Minnesota Statehood Centennial Alexandria SCD
1958 · HK-519 · Silver · 1950
Issued by the Alexandria Centennial committee for the 1958 Minnesota Centennial Celebration. Official emblem on…
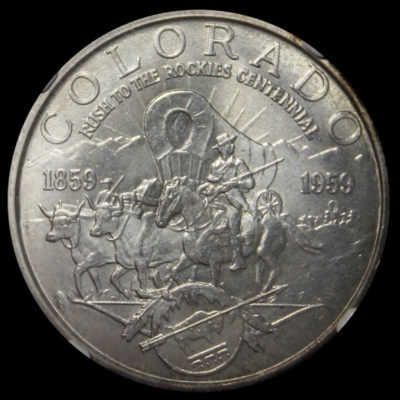
1959 Colorado Rush to the Rockies Centennial SCD
1959 · HK-542 · Silver · 1950
Oxen pulling a covered wagon heading west being escorted by a cowboy on horseback adorn…
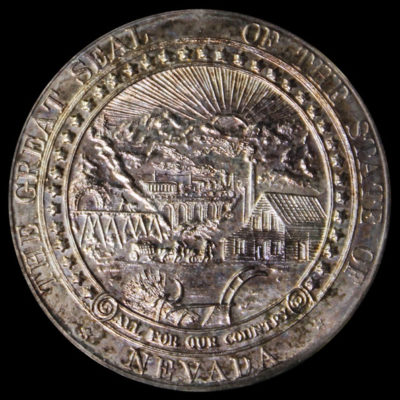
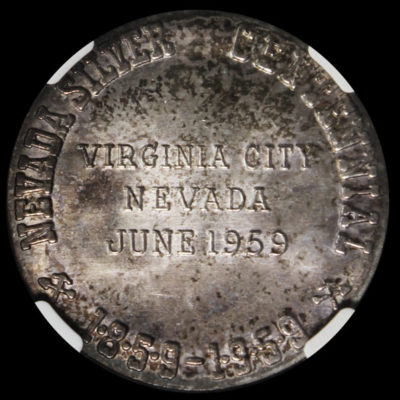
1959 Nevada Silver Centennial SCD
1959 · HK-552 · Silver · 1950
The State Seal of Nevada with a mining scene, train and agriculture implements is depicted…
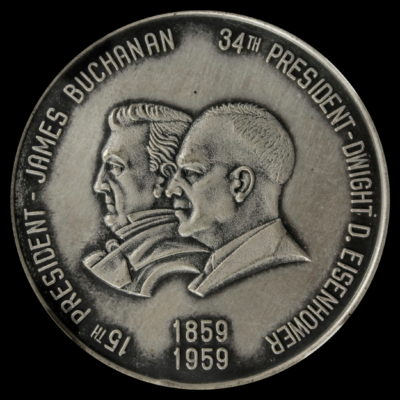
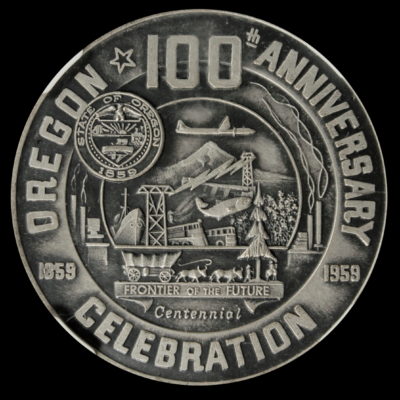
1959 Oregon Statehood Centennial Silver Buchanan-Eisenhower SCD
1959 · HK-553 · Silver · 1950
The conjoined busts of 15th President James Buchanan and 34th President Dwight D. Eisenhower grace…

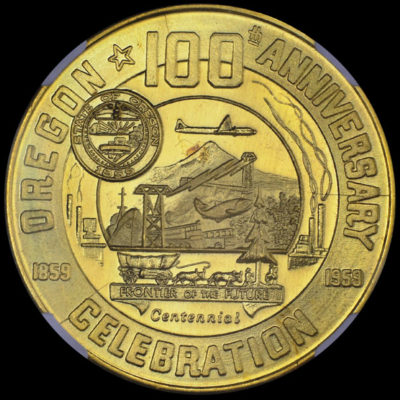
1959 Oregon Statehood Centennial Gold Buchanan-Eisenhower SCD
1959 · HK-554 · Gold · 1950
The conjoined busts of 15th President James Buchanan and 34th President Dwight D. Eisenhower grace…
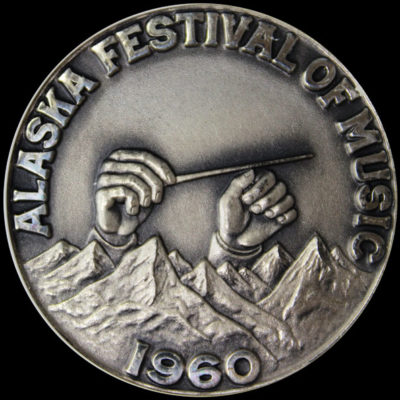
Alaska Festival of Music
1960 · HK-575 · Silver · 1960
The Anchorage Festival of Music was organized to promote music and it’s appreciation in Alaska…
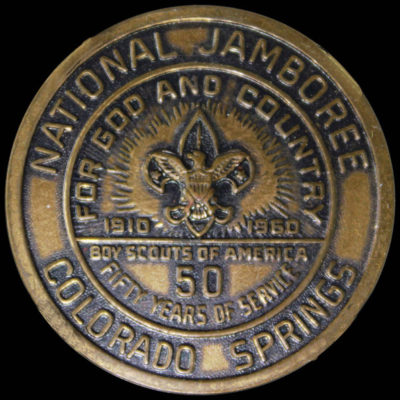

Boy Scouts of America 50th Anniversary Jamboree
1960 · HK-577 · Bronze · 1960
Over 50,000 Scouts from all 50 states and 26 foreign countries participated. The Scout Shield…
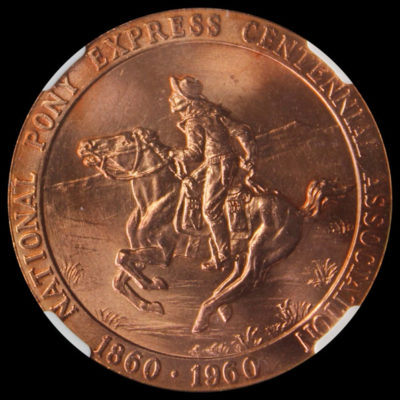
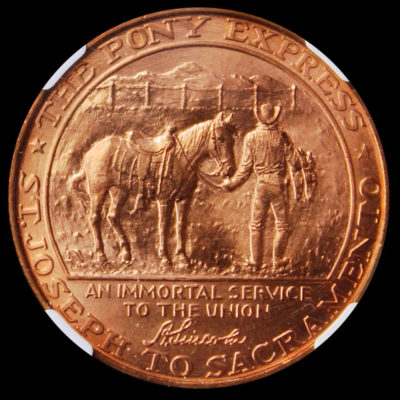
Pony Express Centennial
1960 · HK-583 · 1960
This piece was struck to commemorate the 100th anniversary of the famed Pony Express which…
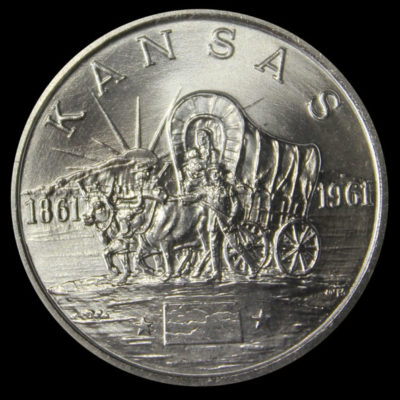
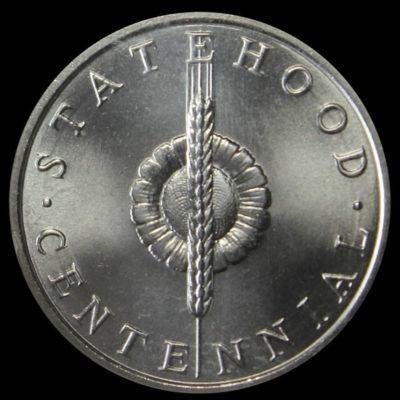
Kansas Statehood Centennial
1961 · HK-586 · 1960
Issued for the Kansas Centennial the medal’s obverse shows a covered-wagon train being pulled by…
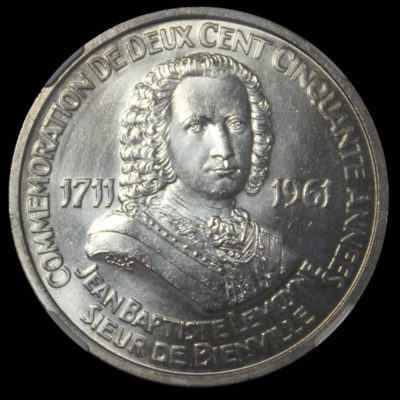
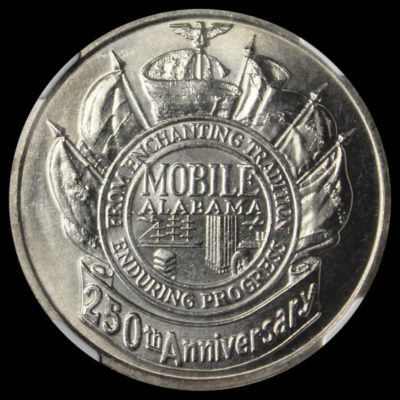
Mobile, Alabama 250th Anniversary
1961 · HK-587 · 1960
A bust of Sieur de Bienville, who founded the city in 1711 as the French…
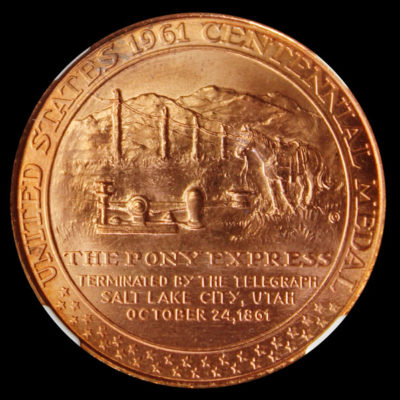
Pony Express Termination Centennial
1961 · HK-589 · 1960
The Pony Express was discontinued when the transcontinental telegraph was completed in late 1861. President…
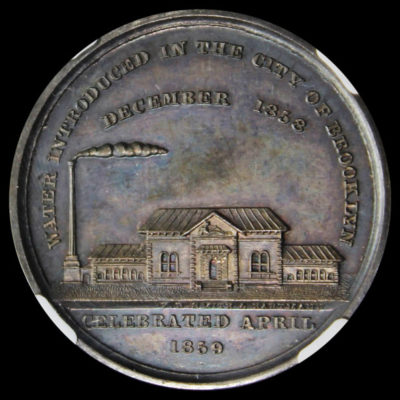
1859 Nassau Water Works White Metal SCD
1859 · HK-589B · White Metal · 1850
Neptune moves a lever with his right arm, which causes water to gush out of…
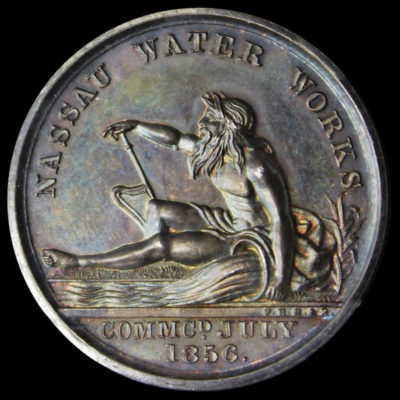
1859 Nassau Water Works Silver SCD
1859 · HK-589C · Silver · 1850
Neptune moves a lever with his right arm, which causes water to gush out of…
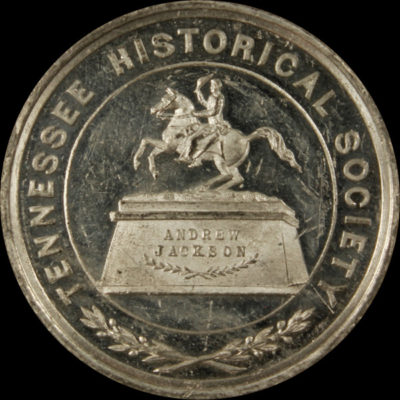
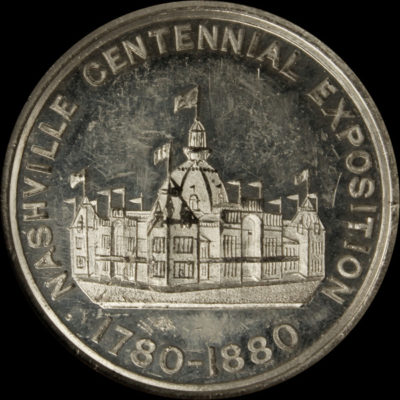
1880 Nashville Centennial Exposition Official Medal
1880 · SH 3-21 SP · HK-591 · Silver-Plated · 1880 Nashville Centennial Exposition
Obverse statue of Andrew Jackson, the seventh president of the United States, on horseback. The…
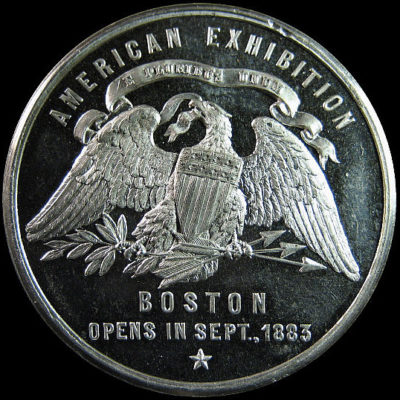

American Exposition of Foreign Products Official Medal
1883 · SH 3-51 WM · HK-594 · White Metal · 1883 American Expo of Foreign Products
A large spread eagle on the obverse. The Arts and Manufactures Building is on the…

South Carolina General Assembly Centennial
1891 · HK-621 · 1890
Celebrating the centennial of the “Start of South Carolina,” which occurred in 1791 with the…
Atlantic City 50th Anniversary
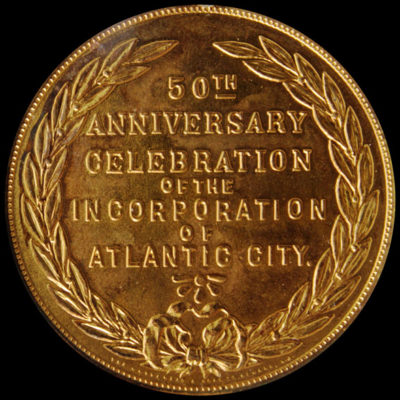
1904 · HK-651 · 1900
Celebrates the 50th anniversary of the incorporation of Atlantic City, New Jersey. Obverse features a…
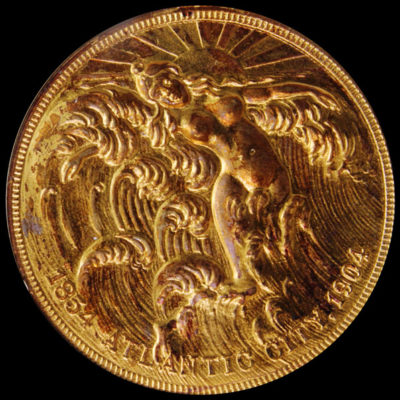
Atlantic City 50th Anniversary Splashing Waves
1904 · HK-651B · Gilt Bronze · 1900
Provocative obverse features a female with waves from the ocean splashing around her, the sun…
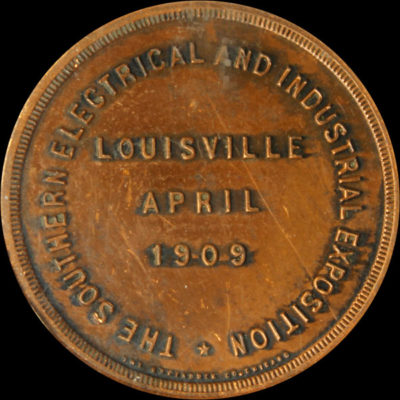
Southern Electrical & Industrial Exposition Official Medal
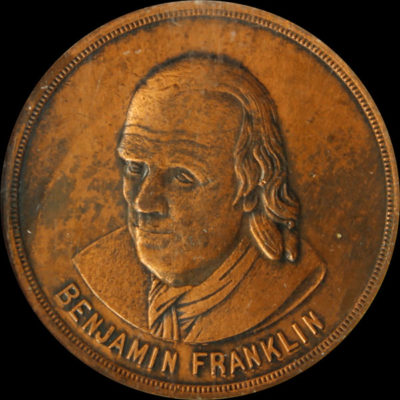
1909 · SH 17-1 ACU · HK-656 · Antiqued Copper · 1909 Southern Electrical & Industrial Exposition
Bust of Benjamin Franklin on the obverse, reverse legend about the exposition. Micro signature on…
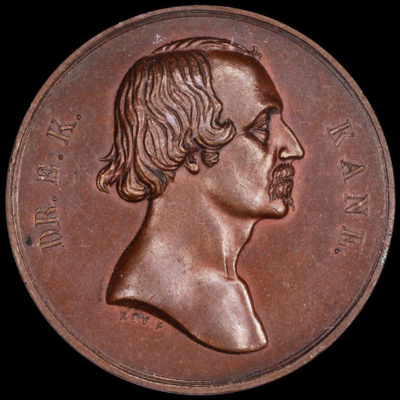
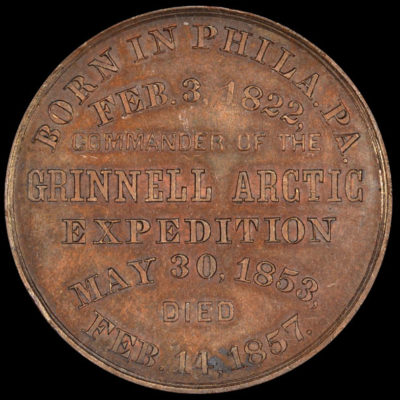
1857 Dr. Kane SCD
1857 · HK-756 · Bronze · 1850
The bust of Elisha Kent Kane, commander of the Second Grinnell Artic Expedition, is on…
Bryan Dollar Cartwheel with Legend
1900 · HK-782 · 1900
A satirical piece struck to discredit Democratic Congressman William Jennings Bryan during his 1900 presidential…
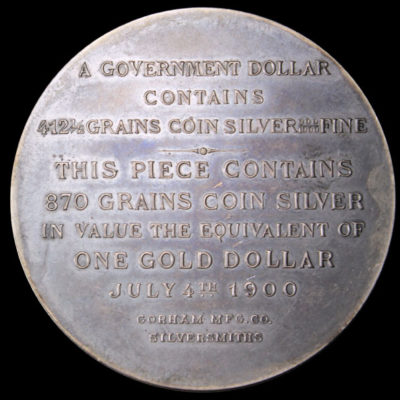
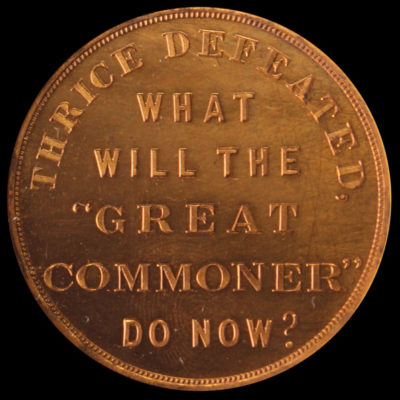
Bryan the Great Commoner by Thomas Elder
1908 · HK-805 · 1900
William Jennings Bryan, who virtually controlled the Democratic Party for 30 years, ran unsuccessfully for…
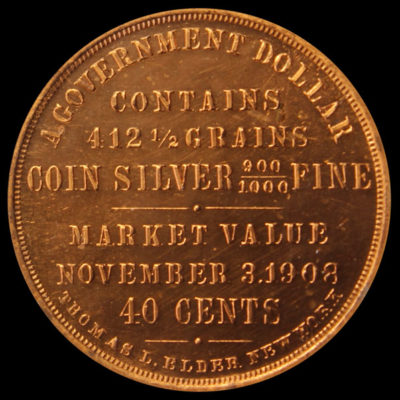
Bryan the Great Commoner by Thomas Elder
1908 · HK-807 · 1900
William Jennings Bryan, who virtually controlled the Democratic Party for 30 years, ran unsuccessfully for…
Dickeson Continental Dollar & Modern Restrikes
1861 · HK-852 · 1860
Professor and prominent numismatist Montroville Dickeson, publisher of the American Numismatic Manual of 1859, had…
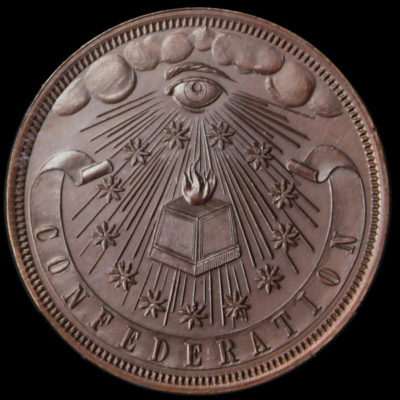
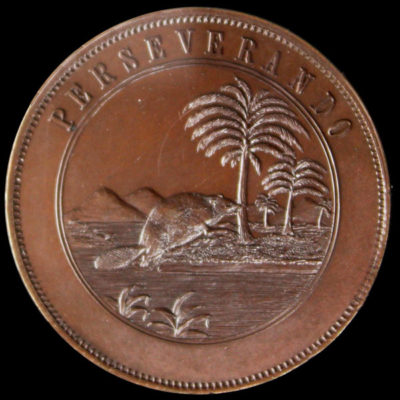
Dickeson Perseverando/Confederation
1861 · HK-866B · Bronze · 1860
For the obverse, Dickeson adopted a vignette from the Perseverando $6 bills issued by the…
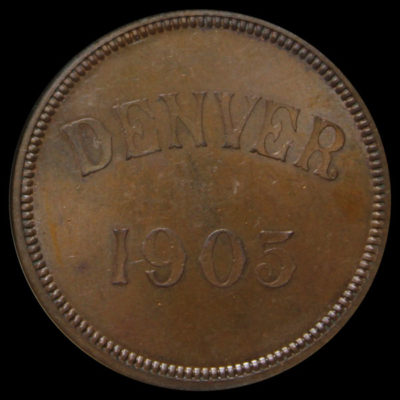
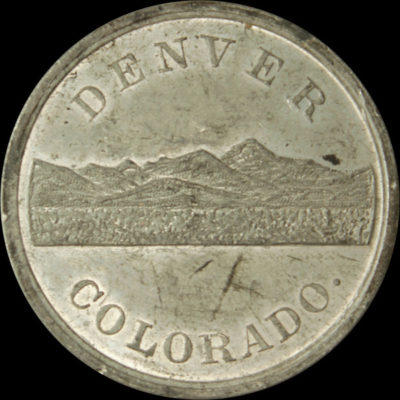
Denver Mint Opening
1905 · HK-876 · Bronze · 1900
As the first product of the Denver Mint, this type was struck to test the…
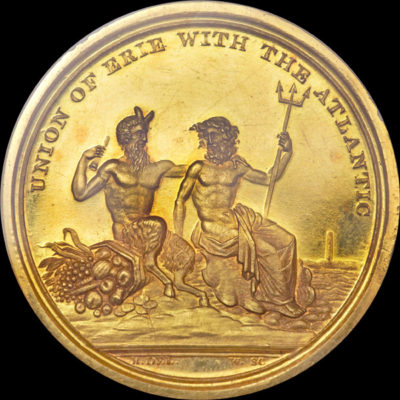
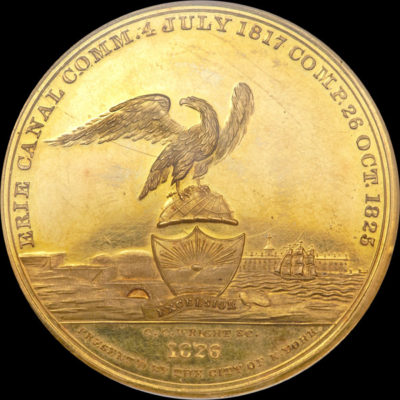
1826 Erie Canal Completion SCD
1826 · HK-1001 · Gold · 1820
This piece was struck to celebrate the completion of the Erie Canal, the greatest and…
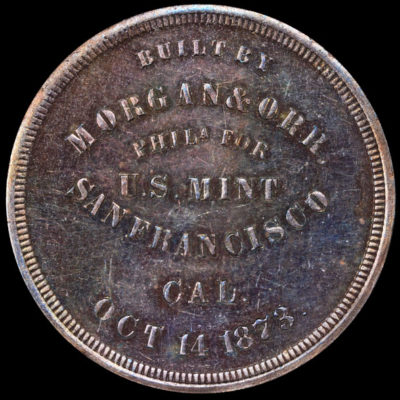
San Francisco Mint Coining Press
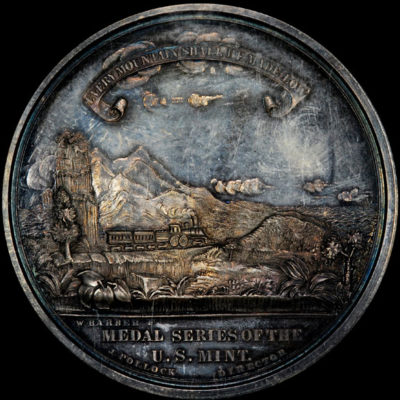
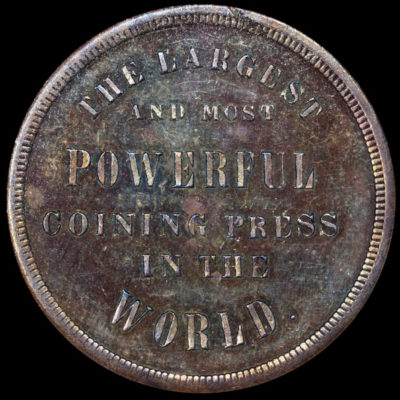
1873 · HK-1003A · 1870
The mint in San Francisco was elevated from a branch mint to United States Mint…

Wilson Dollar Manila Mint Opening
1920 · HK-1031 · 1920
This medal was struck at the opening of the Manila mint in the Philippines, the…